

Building Android chat app using Stream Chat SDK + holiday stickers
We will explore Stream Chat SDK for Android and bring the holidays spirit into our chat app with stickers. Scroll down for the last blog of the year!


Happy new y̷e̷a̷r̷ app! 🎄
My name is Vedant, and we continue to review the most helpful tools for building chat apps. So far, we have tried PubNub, CometChat, and Twilio. Today we will talk about Stream. Stream is one of the most popular chat SDKs with the inbuilt chat UI kit powered by AI/ML. We will integrate the Stream Chat SDK into the android app and add a bit of holiday spirit with Stipop stickers.
Prerequisites
- Kotlin
- Android SDK (API 16 or higher)
- Stream Kotlin API
- Java 8
- AndroidX
- Gradle 3.5.4 or higher
Let's do it!
As the first step, we go to Stream Dashboard and create a free account. Once created, you will be able to see the production API key.
From here, we click on Create app, fill in the app name, and set a configuration that satisfies our app requirements.
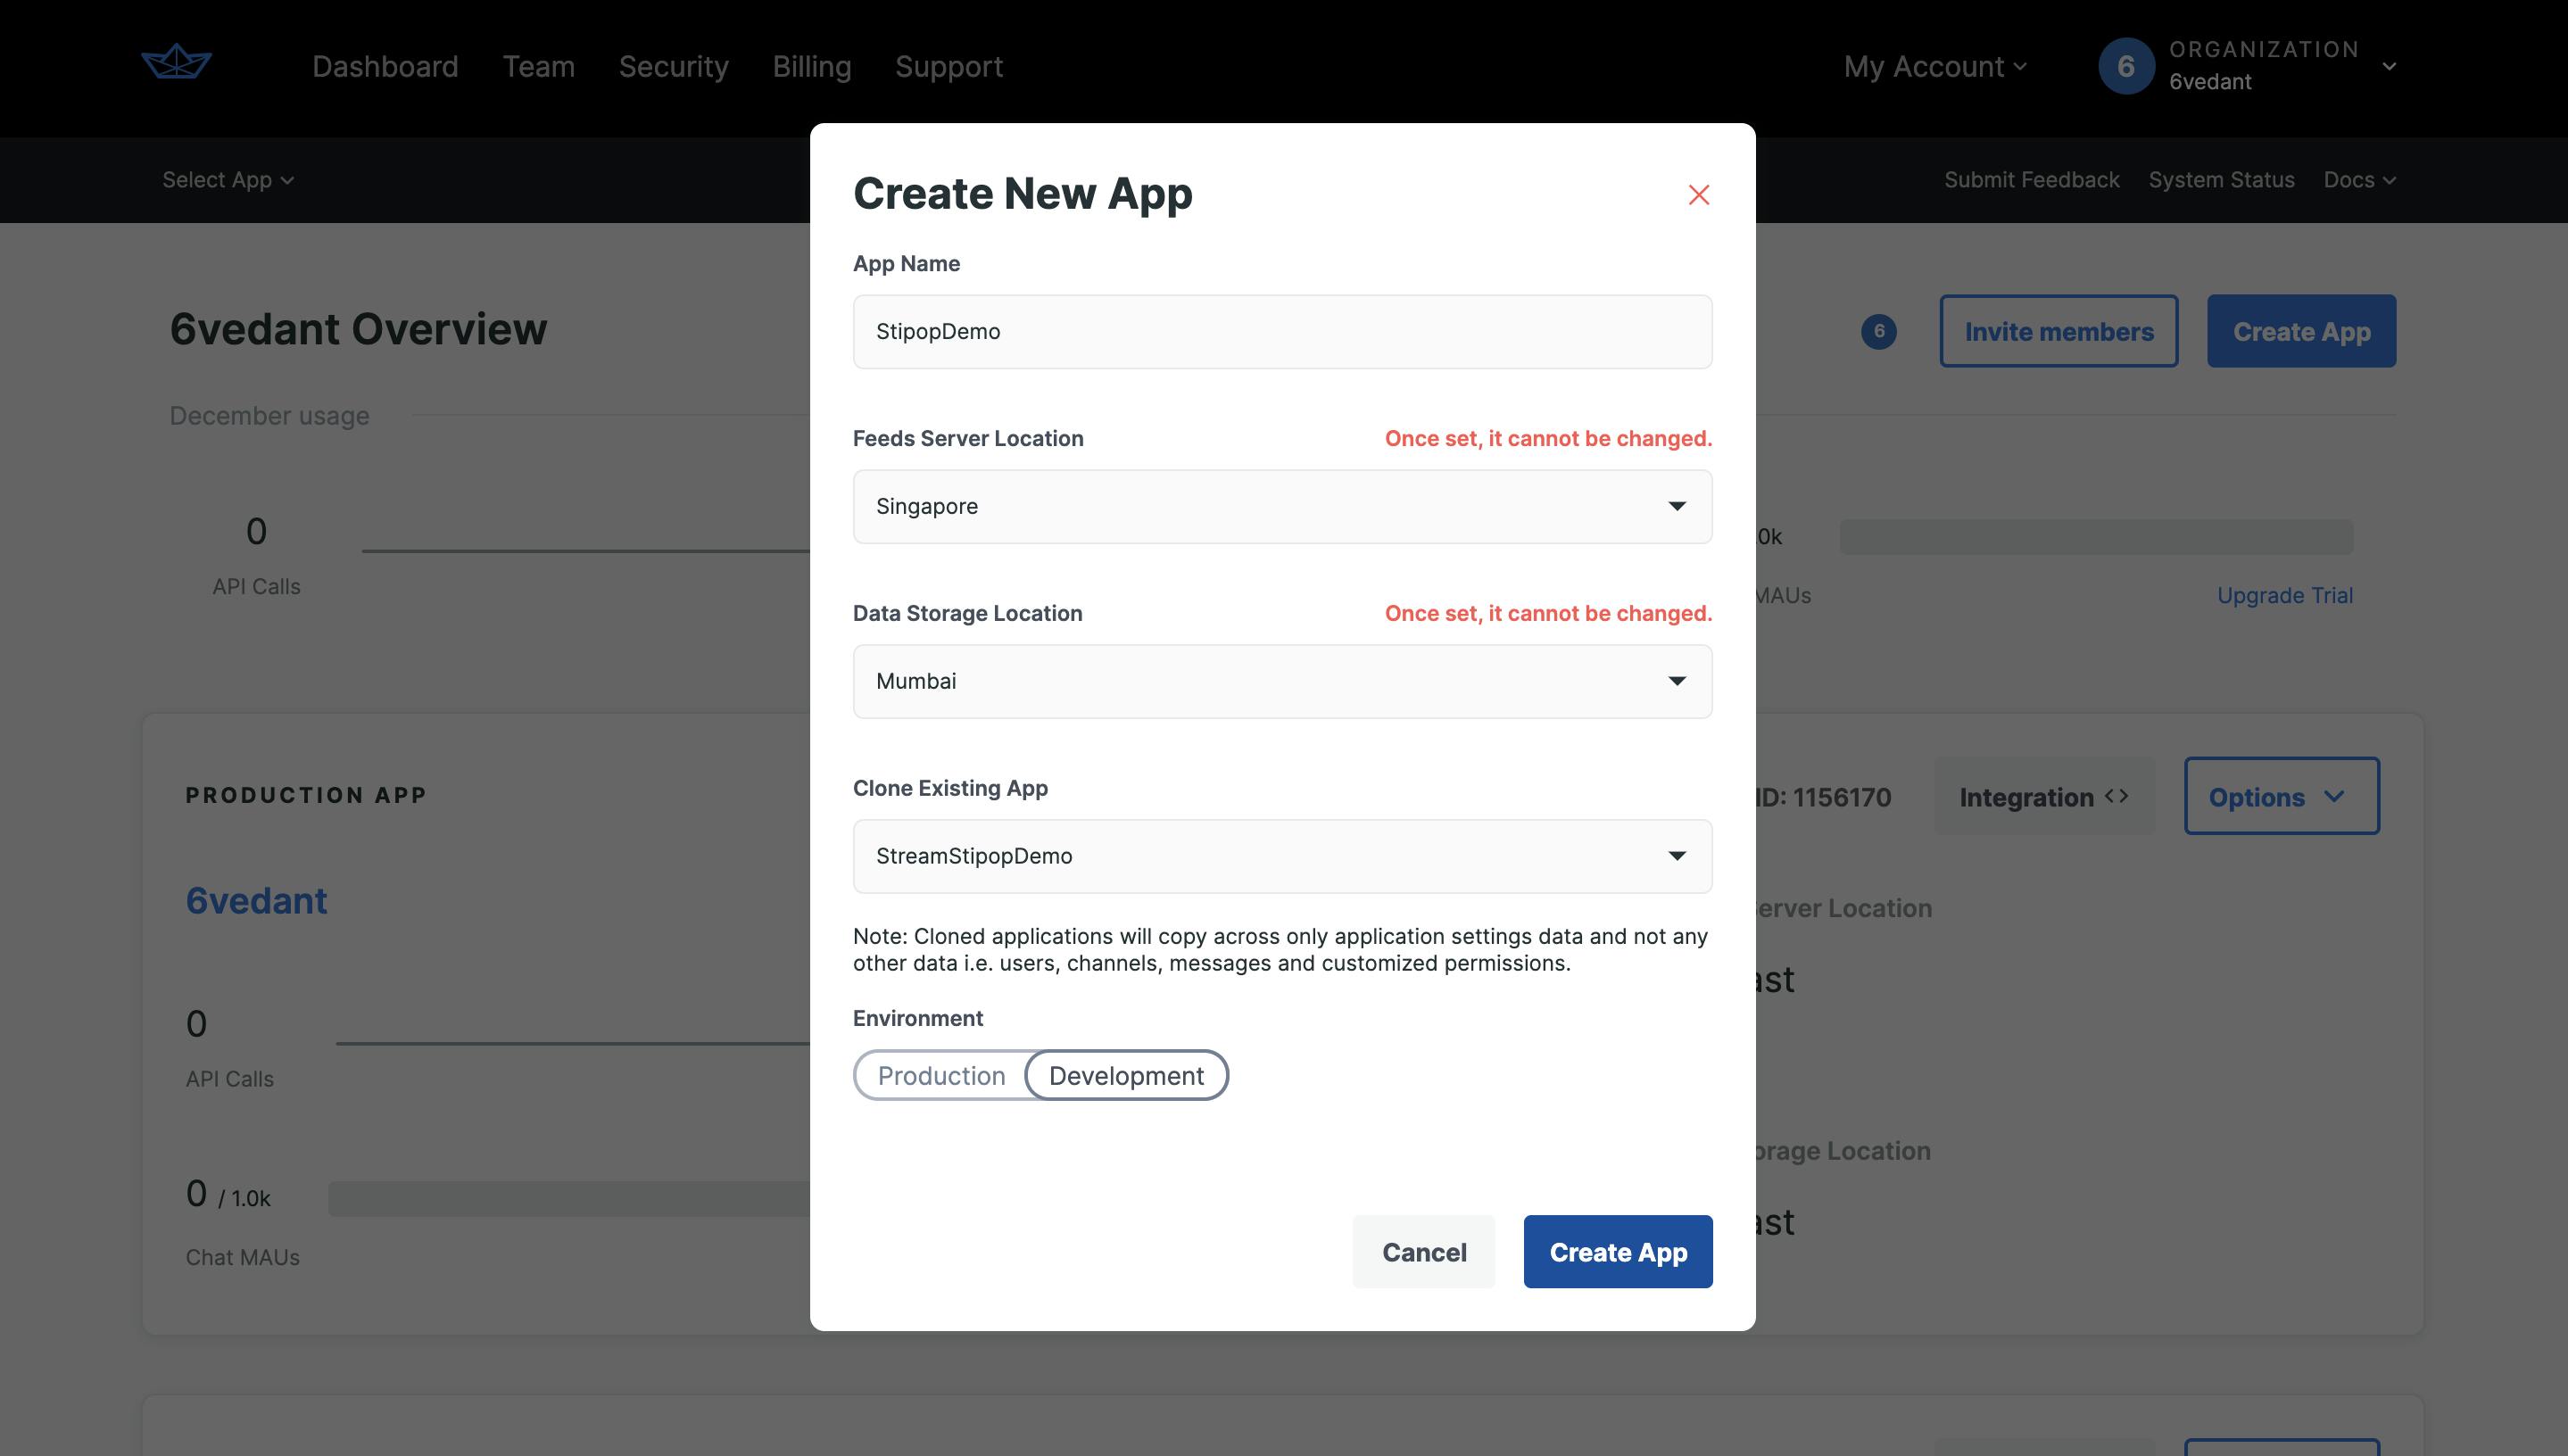
After creating the app, you will see the API Key, API Secret, API key usage, and other applicable settings like Notifications, Groups, Channels, etc., on the Stream Dashboard.
Later on, you will need API keys, so keep them handy.
Let's code!
We will now start developing the Android chat app using the Stream SDK.
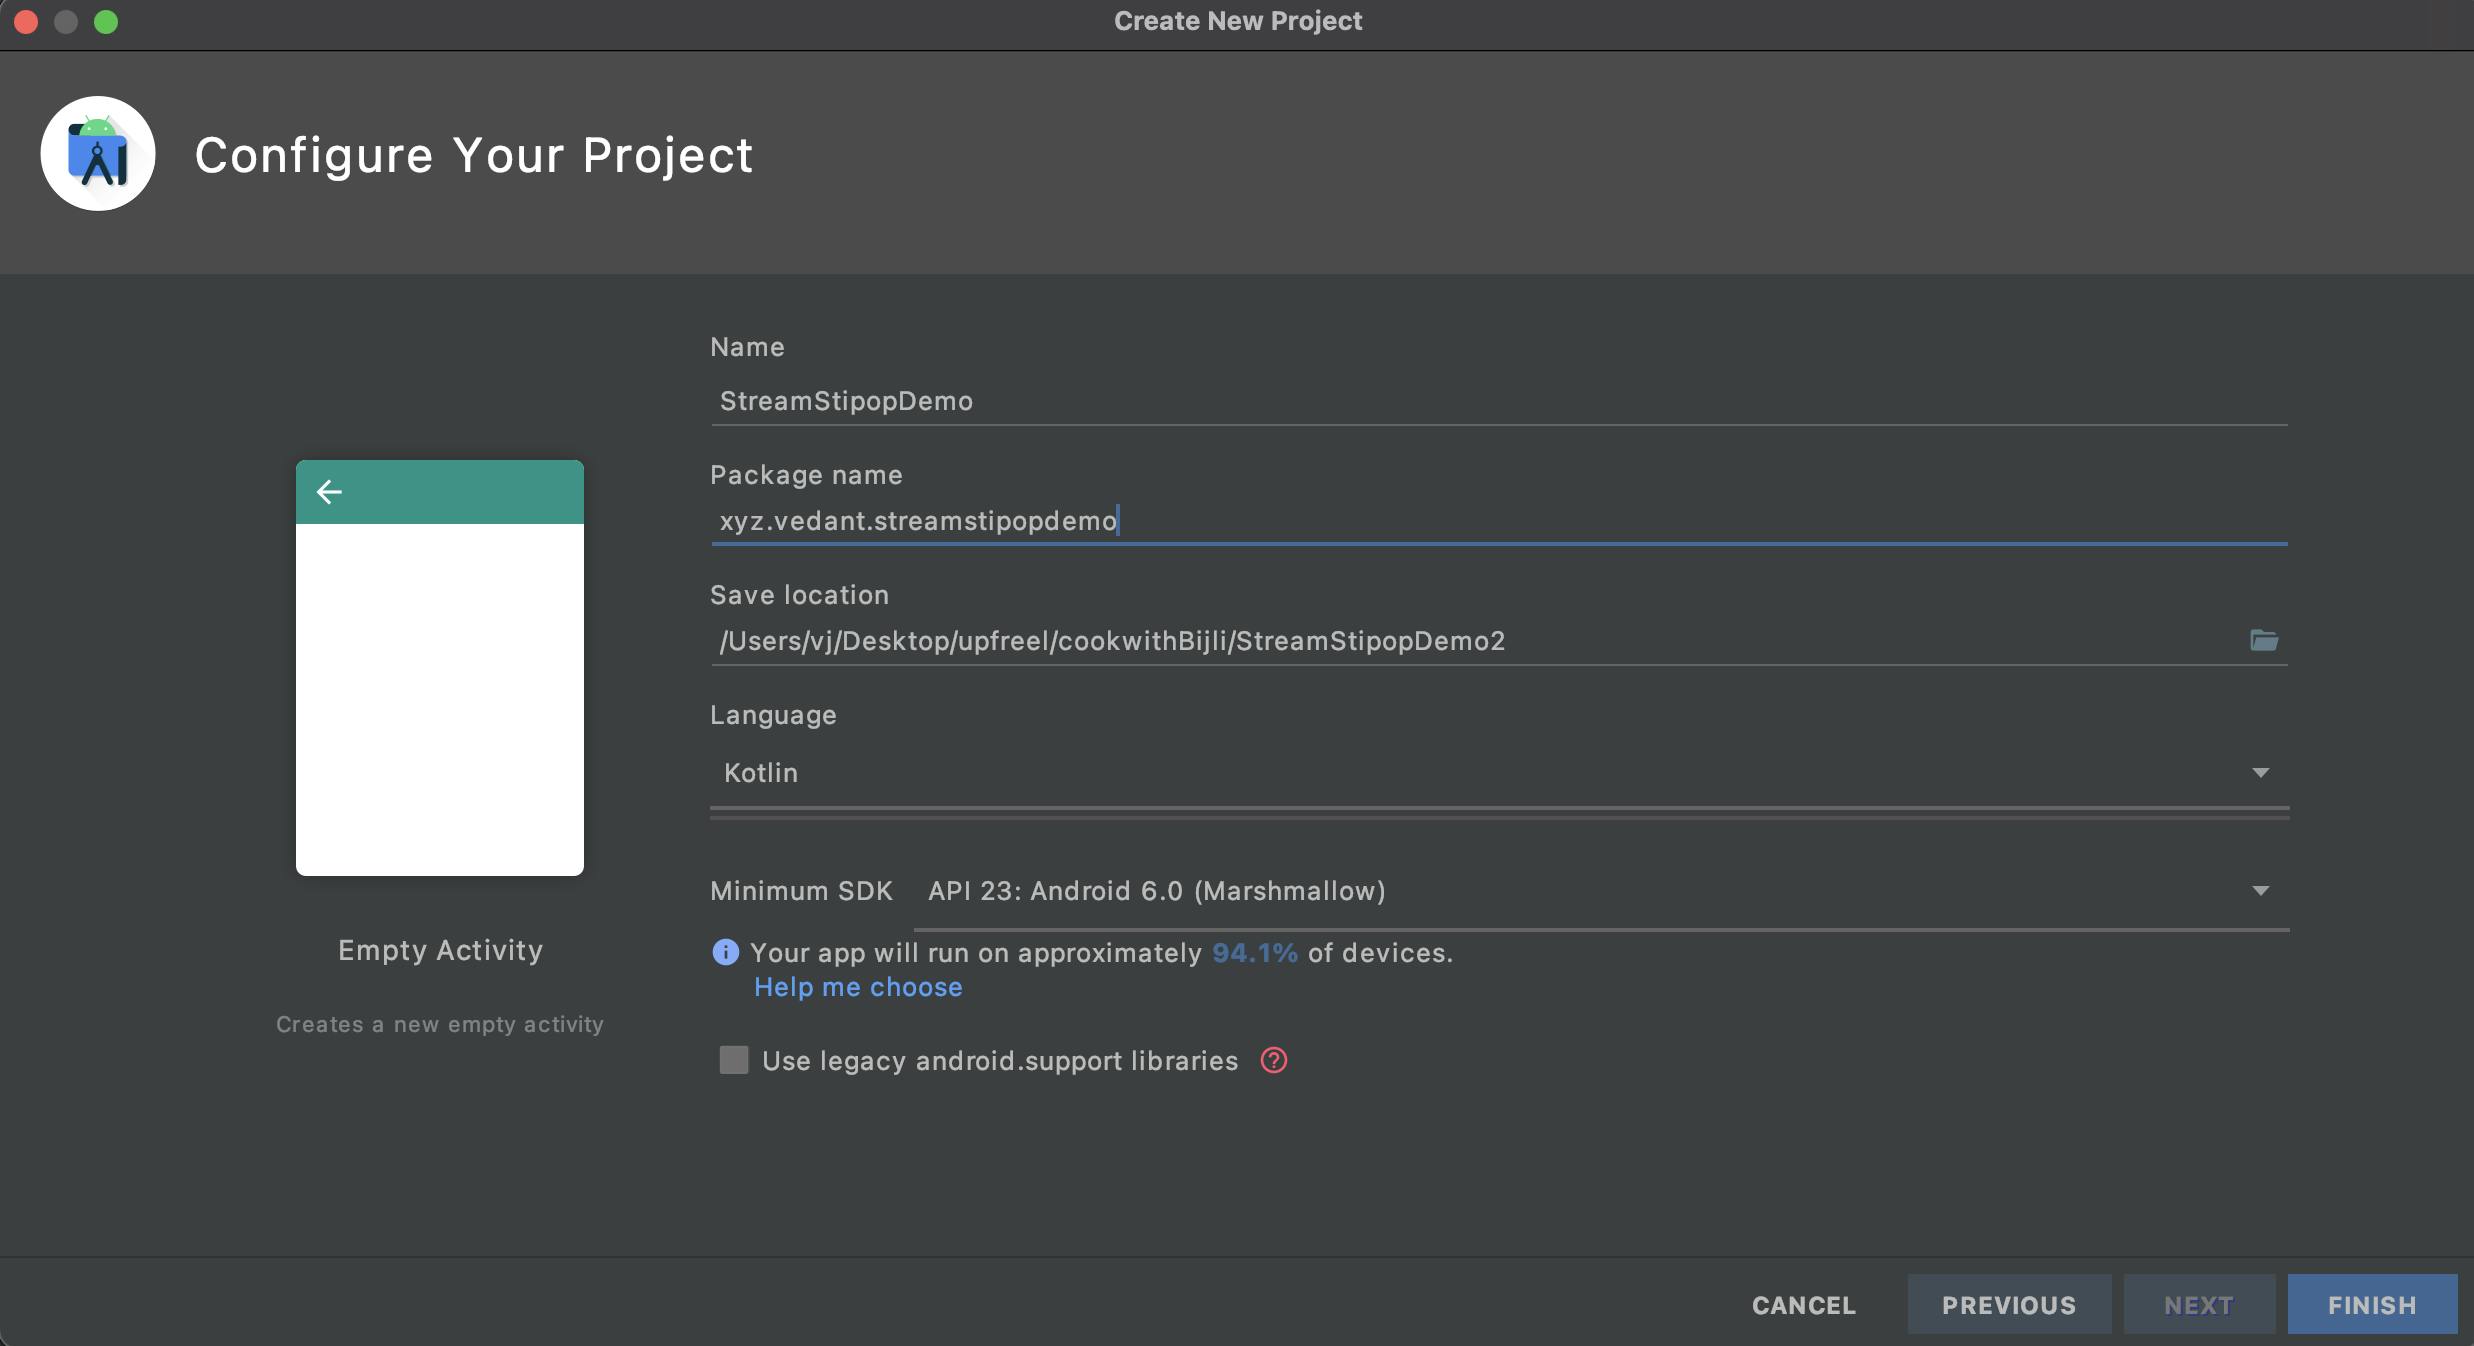
Navigate to the Android Studio and create a blank project. You can name the project to whatever you want (we will go with StreamStipopDemo) and set the language to Kotlin.
First, we will enable data-binding and add the stream SDK dependency to the build.gradle(app level).
android {
   compileSdkVersion 31
   buildToolsVersion "31.0.0"

   . . .
   buildFeatures {
        viewBinding true
    }
}
implementation "io.getstream:stream-chat-android-ui-components:4.23.0"
implementation "io.coil-kt:coil:1.4.0"
implementation "androidx.activity:activity-ktx:1.4.0"
Also, we need to include the below dependency in the build.gradle(project level), otherwise the Stream SDK won’t compile successfully.
allprojects {
   repositories {
       google()
       jcenter()
       mavenCentral()
       maven { url "https://jitpack.io" }
   }
}
After this, sync and rebuild the project. We are now able to access the Stream classes.
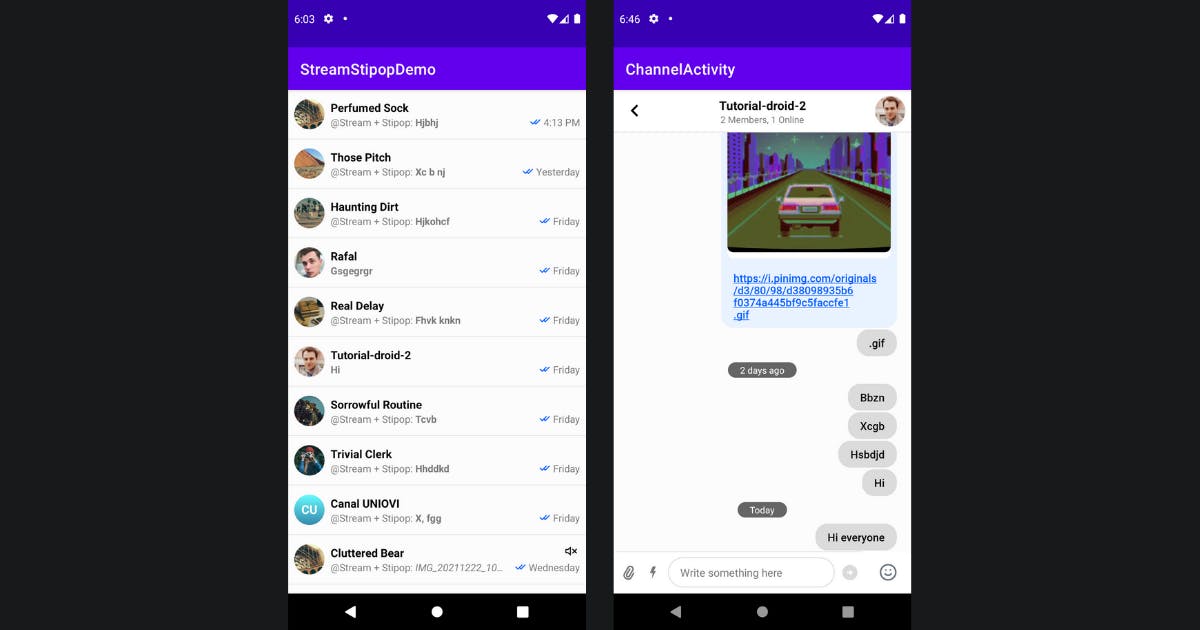
Channel list Home Screen
Now we are going to build the Channel list screen. For this navigate to the activity_main.xml file and start building the user interface for the android app.
<?xml version="1.0" encoding="utf-8"?>
<androidx.constraintlayout.widget.ConstraintLayout xmlns:android="http://schemas.android.com/apk/res/android"
   xmlns:app="http://schemas.android.com/apk/res-auto"
   xmlns:tools="http://schemas.android.com/tools"
   android:layout_width="match_parent"
   android:layout_height="match_parent"
   tools:context=".MainActivity">

   <io.getstream.chat.android.ui.channel.list.ChannelListView
       android:id="@+id/channelListView"
       android:layout_width="0dp"
       android:layout_height="0dp"
       app:layout_constraintBottom_toBottomOf="parent"
       app:layout_constraintEnd_toEndOf="parent"
       app:layout_constraintStart_toStartOf="parent"
       app:layout_constraintTop_toTopOf="parent" />

</androidx.constraintlayout.widget.ConstraintLayout>
We will now proceed with the onCreate method of the MainActivity.kt class to bind the layout and make the Stream API calls. We will show how to do that in the steps below:
Step 1: Use binding to instantiate the layout from activity_main.xml
binding = ActivityMainBinding.inflate(layoutInflater)
setContentView(binding.root)
Step 2: Set up the Stream Chat client for API calls and the domain for offline storage
val client = ChatClient.Builder("b67pax5b2wdq", applicationContext)
       .logLevel(ChatLogLevel.ALL) // Set to NOTHING in prod
       .build()
ChatDomain.Builder(client, applicationContext).build()
Step 3: Create a user account and authenticate the user to enable chat APIs.
val user = User(id = "tutorial-droid").apply {
   name = "Stream + Stipop"
   image = "https://bit.ly/2TIt8NR"
}
client.connectUser(
       user = user,
       token = "eyJhbGciOiJIUzI1NiIsInR5cCI6IkpXVCJ9.eyJ1c2VyX2lkIjoidHV0b3JpYWwtZHJvaWQifQ.NhEr0hP9W9nwqV7ZkdShxvi02C5PR7SJE7Cs4y7kyqg"
).enqueue()
Step 4: Set the list of channels on the MainActivity for messaging and members, including the logged-in users.
val filter = Filters.and(
       Filters.eq("type", "messaging"),
       Filters.`in`("members", listOf(user.id))
)
val viewModelFactory = ChannelListViewModelFactory(filter, ChannelListViewModel.DEFAULT_SORT)
val viewModel: ChannelListViewModel by viewModels { viewModelFactory }
Step 5: Connect the ChannelListViewModel to the ChannelListView, so that once we click on the channel, it will open the chat room in the ChannelActivity.kt.
viewModel.bindView(binding.channelListView, this)
binding.channelListView.setChannelItemClickListener { channel ->
   // start channel activity
   startActivity(ChannelActivity.newIntent(this, channel))
}
Channel Chat-Room Screen
To build the chat room for the selected channel, we will create a new activity. Just click on File -> New -> Activity -> Blank Activity , and name it to ChannelActivity . Then navigate to the activity_channel.xml file and add the below snippets for the layout design of the chat room.
<?xml version="1.0" encoding="utf-8"?>
<androidx.constraintlayout.widget.ConstraintLayout xmlns:android="http://schemas.android.com/apk/res/android"
   xmlns:app="http://schemas.android.com/apk/res-auto"
   android:layout_width="match_parent"
   android:layout_height="match_parent">

   <io.getstream.chat.android.ui.message.list.header.MessageListHeaderView
       android:id="@+id/messageListHeaderView"
       android:layout_width="0dp"
       android:layout_height="wrap_content"
       app:layout_constraintEnd_toEndOf="parent"
       app:layout_constraintStart_toStartOf="parent"
       app:layout_constraintTop_toTopOf="parent" />

   <io.getstream.chat.android.ui.message.list.MessageListView
       android:id="@+id/messageListView"
       android:layout_width="0dp"
       android:layout_height="0dp"
       app:layout_constraintBottom_toTopOf="@+id/messageInputView"
       app:layout_constraintEnd_toEndOf="parent"
       app:layout_constraintStart_toStartOf="parent"
       app:layout_constraintTop_toBottomOf="@+id/messageListHeaderView" />


   <io.getstream.chat.android.ui.message.input.MessageInputView
       android:id="@+id/messageInputView"
       android:layout_width="0dp"
       android:layout_height="wrap_content"
       android:layout_weight=".9"
       app:layout_constraintBottom_toBottomOf="parent"
       app:layout_constraintEnd_toEndOf="parent"
       app:layout_constraintStart_toStartOf="parent" />


</androidx.constraintlayout.widget.ConstraintLayout>
For the above XML code snippet, we are adding the layout containers for the Stream Chat room
- Message Header Container
- Messages List Container
- Message Input Container
Let's bind these containers in the ChannelActivity.kt class and handle the chat messaging functionality.
Step 1: Use data-binding to instantiate the chat room containers in activity_channel.xml
binding = ActivityChannelBinding.inflate(layoutInflater)
setContentView(binding.root)

val cid = checkNotNull(intent.getStringExtra(CID_KEY)) {
  // "Specifying a channel id is required when starting ChannelActivity"
}
Step 2: Create three separate ViewModels for the views so it is easy to customize them
val factory = MessageListViewModelFactory(cid)
val messageListHeaderViewModel: MessageListHeaderViewModel by viewModels { factory }
val messageListViewModel: MessageListViewModel by viewModels { factory }
val messageInputViewModel: MessageInputViewModel by viewModels { factory }
Step 3: Bind the View and ViewModels as they are loosely coupled, so it is easy to customize
messageListHeaderViewModel.bindView(binding.messageListHeaderView, this)
messageListViewModel.bindView(binding.messageListView, this)
messageInputViewModel.bindView(binding.messageInputView, this)
Step 4: Sync the MessageListHeaderView and MessageInputView as the thread is started
messageListViewModel.mode.observe(this) { mode ->
   when (mode) {
       is Thread -> {
   //  messageListHeaderViewModel.setActiveThread(mode.parentMessage)           //messageInputViewModel.setActiveThread(mode.parentMessage)
       }
       MessageListViewModel.Mode.Normal -> {
           messageListHeaderViewModel.resetThread()
           messageInputViewModel.resetThread()
       }
   }
}
Step 5: Enable the message input container to listen to the message editing
binding.messageListView.setMessageEditHandler(messageInputViewModel::postMessageToEdit)
Step 6: Attach the method to handle the navigate-up the state
messageListViewModel.state.observe(this) { state ->
   if (state is MessageListViewModel.State.NavigateUp) {
       finish()
   }
}

val backHandler = {
   messageListViewModel.onEvent(MessageListViewModel.Event.BackButtonPressed)
}

binding.messageListHeaderView.setBackButtonClickListener(backHandler)
onBackPressedDispatcher.addCallback(this) {
   backHandler()
}
Step 7: Declare the CID_KEY companion object at the class level.
companion object {
   private const val CID_KEY = "key:cid"

   fun newIntent(context: Context, channel: Channel): Intent =
       Intent(context, ChannelActivity::class.java).putExtra(CID_KEY, channel.cid)
}
Now we are good to rebuild the project and run it on the emulator or any physical Android device.
Stipop API Key
Sign in to your Stipop Dashboard, or if you don’t have an account yet, sign up here. Then create an application with app name, region, and your app’s monthly active users.
You will then be able to see the API Key on top and download the Stipop.json file under android settings, as shown below.
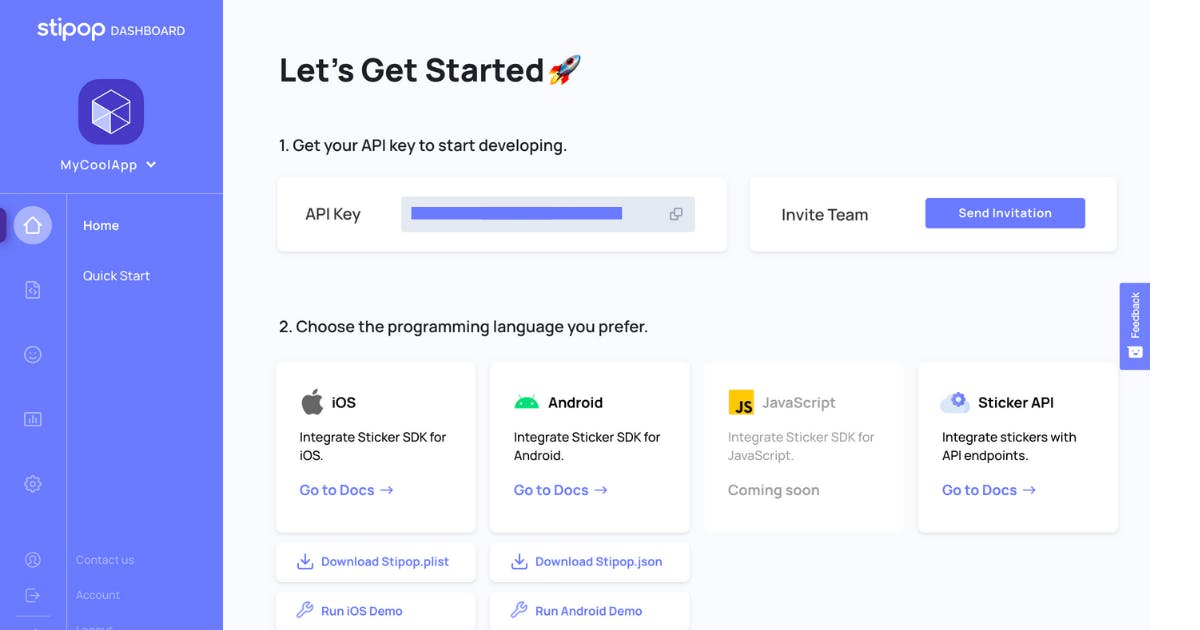
Place the Stipop.json file under app/ src/ main/ assets/ Stipop.json.
Stipop Android SDK
We will proceed with the Android SDK integration for the Stream chat app. Navigate to the build.gradle file (project level) and add the below dependency.
allprojects {
  repositories {
    ...
    maven { url 'https://jitpack.io' }
  }
}
Again add the below dependency in the build.gradle file (app level).
dependencies {
  ...
  implementation 'com.github.stipop-development:stipop-android-sdk:0.0.6'
}
We have already included the Stipop.json file in the assets folder. Now sync and rebuild the project to make Stipop classes accessible. The next step is to initialize the Stipop instance in the GlobalApplication.kt class.
import android.app.Application
import android.content.Context
import io.stipop.Stipop

class GlobalApplication : Application() {
   companion object {
       lateinit var instance: GlobalApplication
           private set
   }
   override fun onCreate() {
       super.onCreate()
       instance = this
       Stipop.configure(this)
   }
   fun context(): Context = applicationContext
}
Add the below snippet to the AndroidManifest.xml file and insert the replace-theme line.
<application
   android:name=".GlobalApplication"
   android:allowBackup="true"
   android:icon="@mipmap/ic_launcher"
   android:label="@string/app_name"
   android:roundIcon="@mipmap/ic_launcher_round"
   android:supportsRtl="true"
   android:theme="@style/Theme.StreamStipopDemo"
   tools:replace="android:theme">
We will now add the Stipop button that looks like smiley 😊 and opens the Stipop sticker keyboard to select a sticker. Navigate to the activity_channel.xml and add the Stipop button as shown below.
<LinearLayout
   android:id="@+id/layout_input_conatiner"
   android:layout_width="match_parent"
   android:layout_height="wrap_content"
   android:orientation="horizontal"
   app:layout_constraintBottom_toBottomOf="parent"
   app:layout_constraintEnd_toEndOf="parent"
   app:layout_constraintStart_toStartOf="parent">

   <io.getstream.chat.android.ui.message.input.MessageInputView
       android:id="@+id/messageInputView"
       android:layout_width="0dp"
       android:layout_height="wrap_content"
       android:layout_weight=".9" />

   <io.stipop.extend.StipopImageView
       android:id="@+id/stipopIV"
       android:layout_width="24dp"
       android:layout_height="24dp"
       android:layout_gravity="center"
       android:layout_weight=".1"
       android:foregroundGravity="center"
       android:src="@mipmap/ic_sticker_normal" />
</LinearLayout>
Now we will handle the click event for the Stipop image button. Add the below event handler in the onCreate method of the ChannelActivity class.
import io.stipop.StipopDelegate

class ChannelActivity : AppCompatActivity(), StipopDelegate {
override fun onCreate(savedInstanceState: Bundle?) {

...

val stipopIV = findViewById<StipopImageView>(R.id.stipopIV)

Stipop.connect(this, stipopIV, "1234", "en", "US", this)

stipopIV.setOnClickListener {
   Stipop.showKeyboard()
}
When done, override the methods for the StipopDelegate interface as given in the below code snippet.
override fun onStickerSelected(sticker: SPSticker): Boolean {
   Log.d(TAG, sticker.packageId+" : url: "+sticker.stickerImg);
   return true
}

override fun canDownload(spPackage: SPPackage): Boolean {
   print(spPackage)
   return true
}
Create Stipop Layout for Chat Room
We will now create the layout for the Stipop gif so that when a user selects any of the stickers, we will render this layout and pass the sticker URL. To do that, create one layout file attachment_stipop.xml and add the below layout-design snippet to enable the loading of Stipop stickers.
<?xml version="1.0" encoding="utf-8"?>
<androidx.constraintlayout.widget.ConstraintLayout xmlns:android="http://schemas.android.com/apk/res/android"
   android:layout_width="match_parent"
   android:layout_height="wrap_content"
   xmlns:app="http://schemas.android.com/apk/res-auto">

   <com.google.android.material.imageview.ShapeableImageView
       android:id="@+id/iv_media_thumb"
       android:layout_width="wrap_content"
       android:layout_height="0dp"
       android:layout_marginStart="8dp"
       android:layout_marginTop="4dp"
       android:layout_marginEnd="8dp"
       android:scaleType="centerCrop"
       app:layout_constraintBottom_toBottomOf="parent"
       app:layout_constraintDimensionRatio="h,1:1"
       app:layout_constraintEnd_toEndOf="parent"
       app:layout_constraintStart_toStartOf="parent"
       app:layout_constraintTop_toTopOf="parent" />

</androidx.constraintlayout.widget.ConstraintLayout>
We will use the ShareableImageView to load the Stipop stickers, so we need to create an attachment view handler class StipopAttachmentViewFactory.kt, and handle the Stipop sticker as an attachment to the Stream Chat container. We check if the selected attachment URL contains the stipop keyword and trigger the StipopAttachmentViewFactory to load the sticker URL.
import android.view.LayoutInflater
import android.view.View
import android.view.ViewGroup
import coil.load
import com.getstream.sdk.chat.adapter.MessageListItem
import io.getstream.chat.android.client.models.Attachment
import io.getstream.chat.android.ui.message.list.adapter.MessageListListenerContainer
import io.getstream.chat.android.ui.message.list.adapter.viewholder.attachment.AttachmentViewFactory
import io.getstream.chat.android.ui.message.list.MessageListItemStyle


class StipopAttachmentViewFactory: AttachmentViewFactory() {
   override fun createAttachmentView(
       data: MessageListItem.MessageItem,
       listeners: MessageListListenerContainer?,
       style: MessageListItemStyle,
       parent: ViewGroup,
   ): View {
       val stipopAttachment = data.message.attachments.firstOrNull { it.isStipopAttachment() }
       return when {
           stipopAttachment != null -> createStipopAttachmentView(stipopAttachment, parent)
           else -> super.createAttachmentView(data, listeners, style, parent)
       }
   }

   private fun Attachment.isStipopAttachment(): Boolean = imageUrl?.contains("stipop") == true

   private fun createStipopAttachmentView(stipopAttachment: Attachment, parent: ViewGroup): View {
       val binding = AttachmentStipopBinding
           .inflate(LayoutInflater.from(parent.context), null, false)

       binding.ivMediaThumb.apply {
           shapeAppearanceModel = shapeAppearanceModel
               .toBuilder()
               .setAllCornerSizes(resources.getDimension(R.dimen.stream_ui_selected_attachment_corner_radius))
               .build()
           load(stipopAttachment.imageUrl) {
               allowHardware(false)
               crossfade(true)
               placeholder(R.drawable.stream_ui_picture_placeholder)
           }
       }

       return binding.root
   }

}
Finally, we can call the StipopAttachmentViewFactory from Stipop’s onStickerSelected method in ChannelActivity.kt class. It will use the data-binding to attach the Stipop sticker view layout to the message list view.
override fun onStickerSelected(sticker: SPSticker): Boolean {
   Log.d("STICKER", " : " + sticker.packageId + " : url: " + sticker.stickerImg);
   binding.messageListView.setAttachmentViewFactory(StipopAttachmentViewFactory())
   return true
}
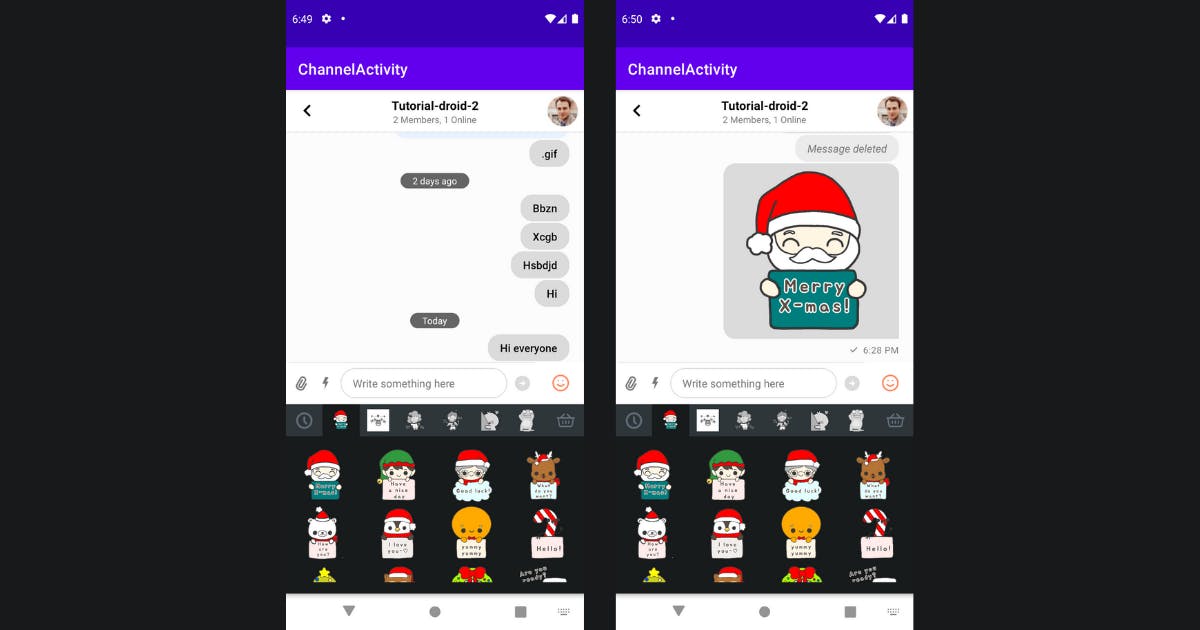
This is all the coding we have to do, and we are good to run the app and test if everything is working as expected. You can see the Stipop smiley button at the right corner in the Inputbox layout. Once tapped, it opens up the Stipop sticker keyboard to select the stickers.
We’ve reached the end
We have successfully integrated the Stipop Android SDK into our Stream chat app. Integrating Stipop SDK is easy, and it comes with an inbuilt Sticker Keyboard and Sticker Search engine, which make it a great addition to any chat application.
If you want to check other holiday stickers, head to Stipop Dashboard -> Configuration -> Chat stickers and type winter or any other keyword in the search bar!
Thanks for reading and Happy Holidays ❄️🎄☃️
🎅🏼 About Vedant
Vedant Jha is a full-stack developer and a technical writer at Stipop. Have a question about this article? Contact Vedant here.