

How to add stickers to Android chat app built with Twilio
Want to integrate stickers into your Twilio chat app? There is a way! Follow this blog to know how to do that with Stipop.


Hello everyone 🖐🏼
My name is Vedant, and we are back at it! One can never code too many apps, so today we are going to build a chat app using Twilio and show how to integrate stickers into it ✌🏼
Twilio has been a popular library for decades in the developer community with thousands of tools for chat, voice, and video applications. We will explore Twilio Conversations API and build an Android chat application with stickers. Twilio doesn't have a Stipop extension just yet (check this blog and this one to know which platforms do), so we will proceed with our Stipop SDK integration following Stipop Docs.
Prerequisite
Kotlin
Android SDK (API 16 or higher)
Twilio Conversation API
Java 8
AndroidX
Gradle 3.5.4 or higher
Firebase
Getting started: Twilio API keys and secrets
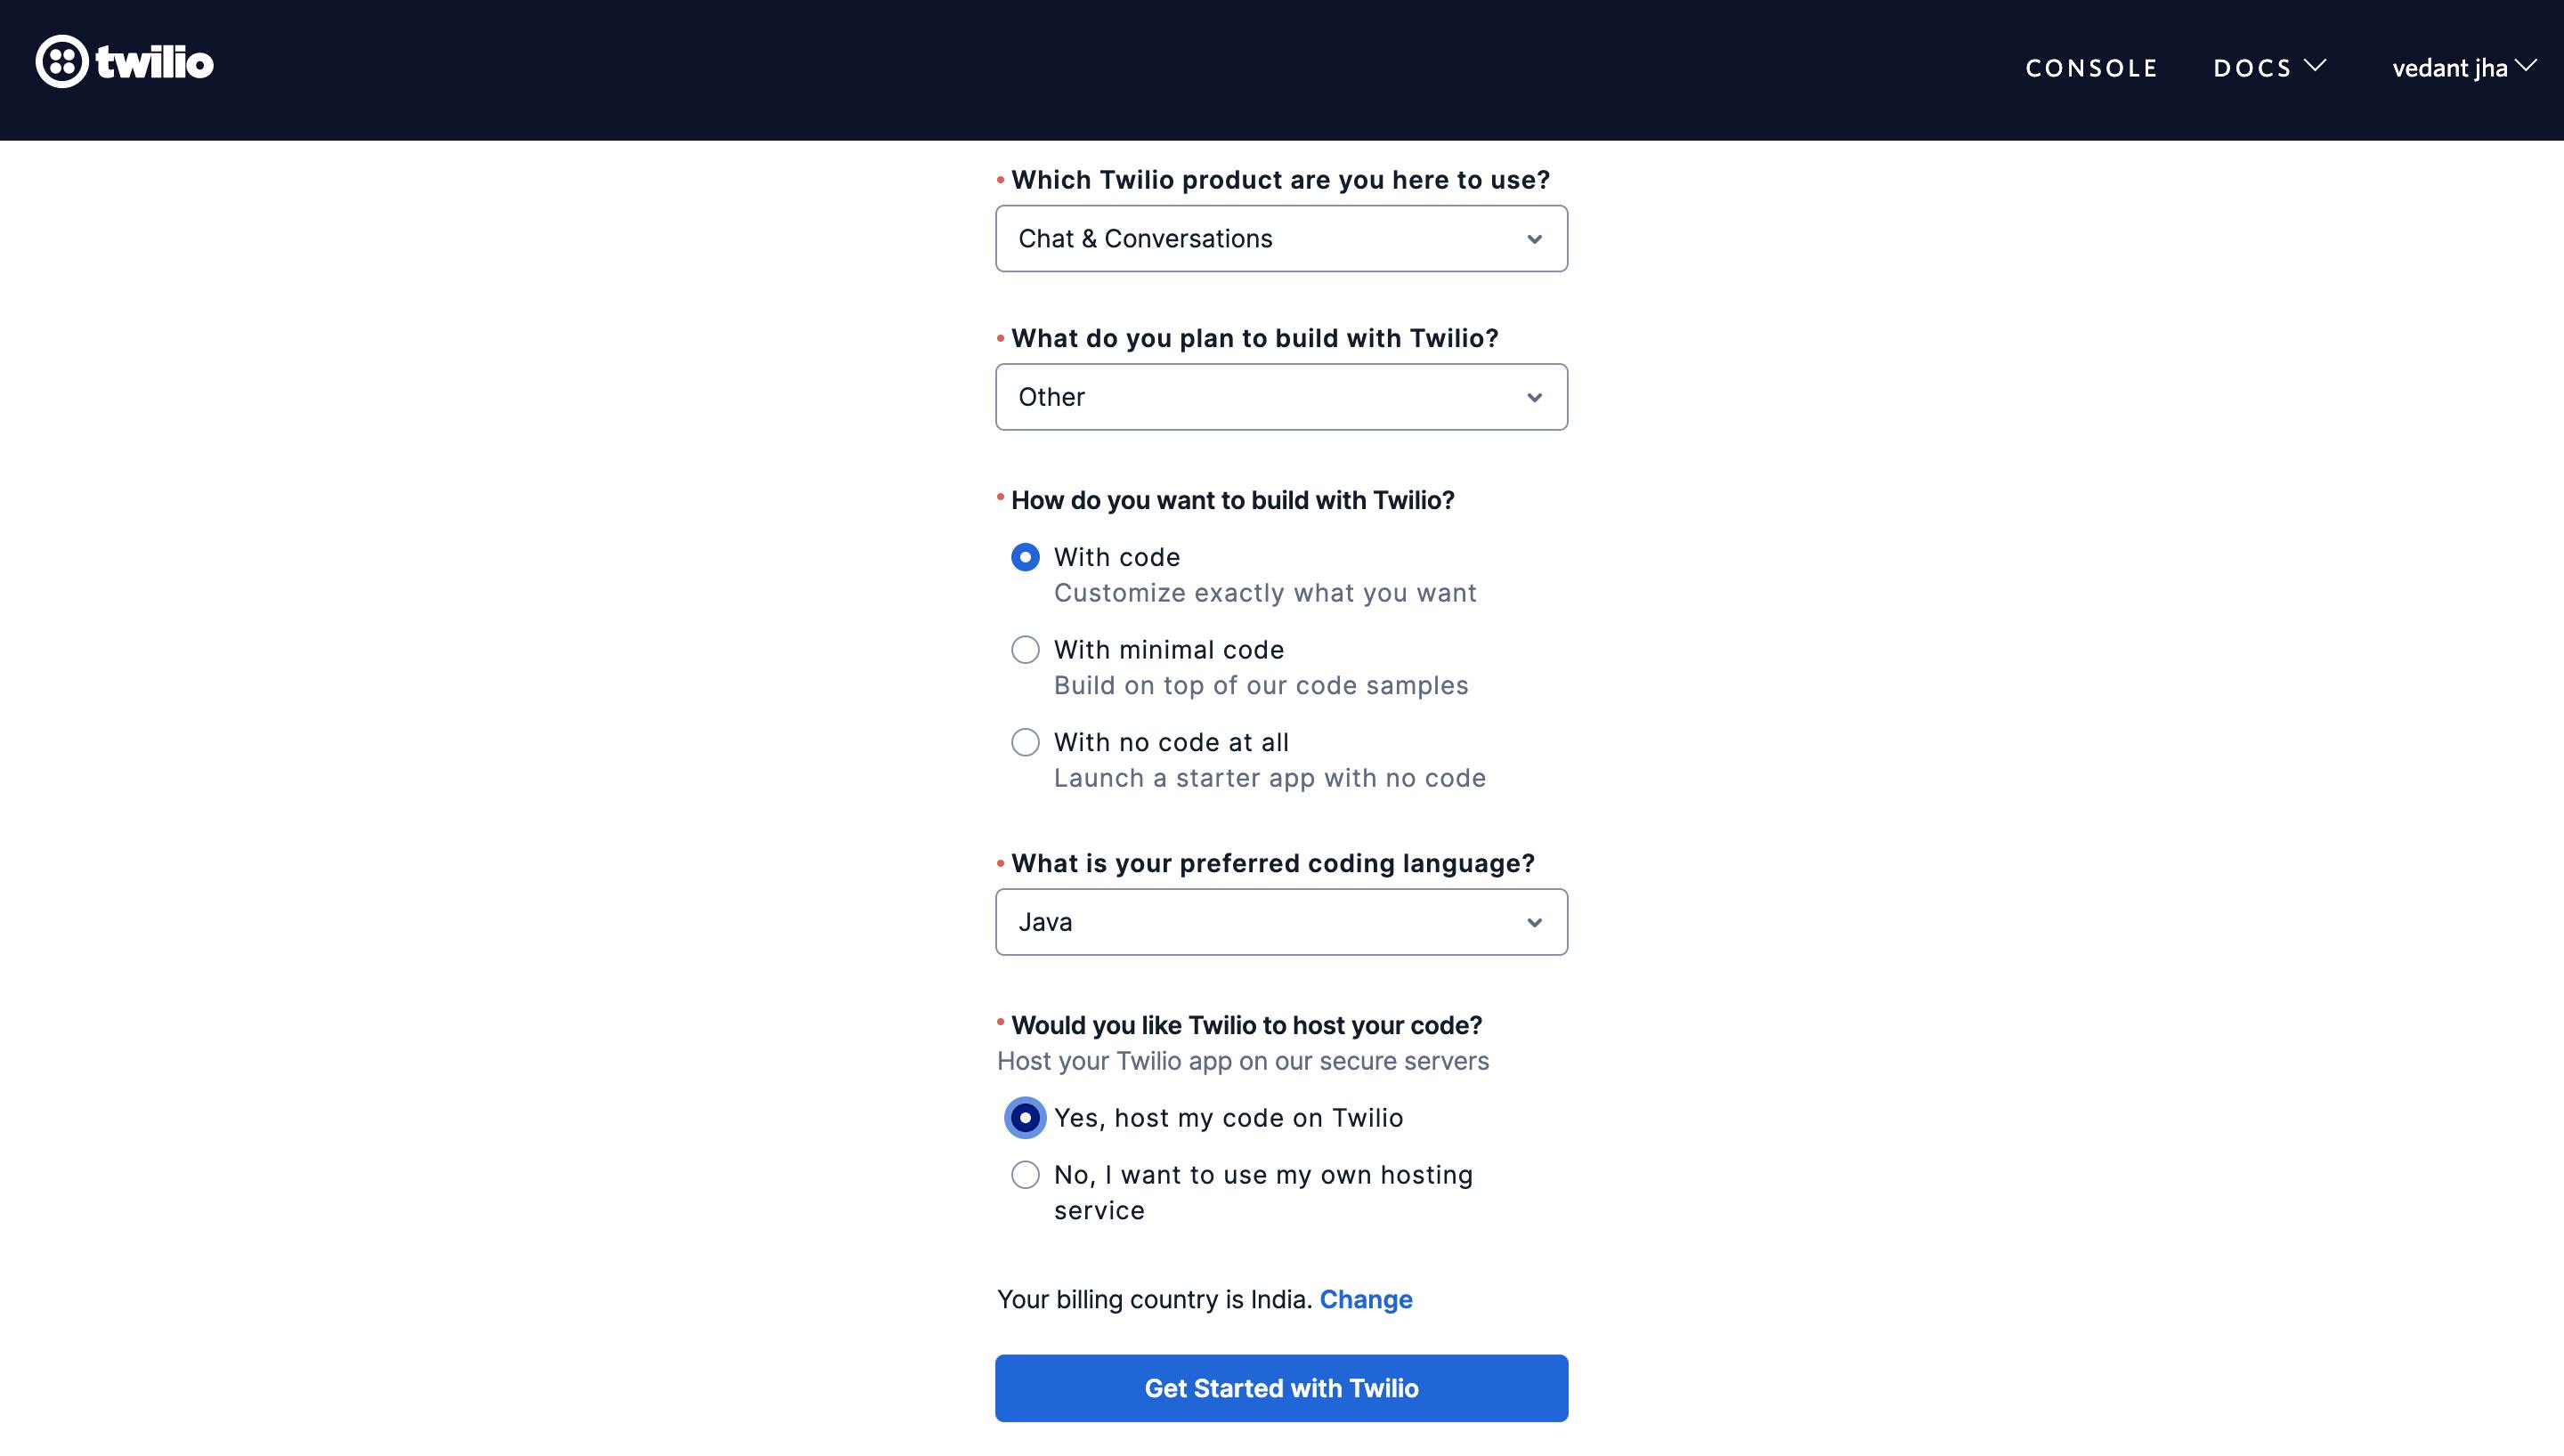
Let's go to Twilio Dashboard and create a free account. We will then be asked to verify email and phone number. Once done, we can choose Chat & Conversation in the products options, choose with Code, and click on Get Started with Twilio.
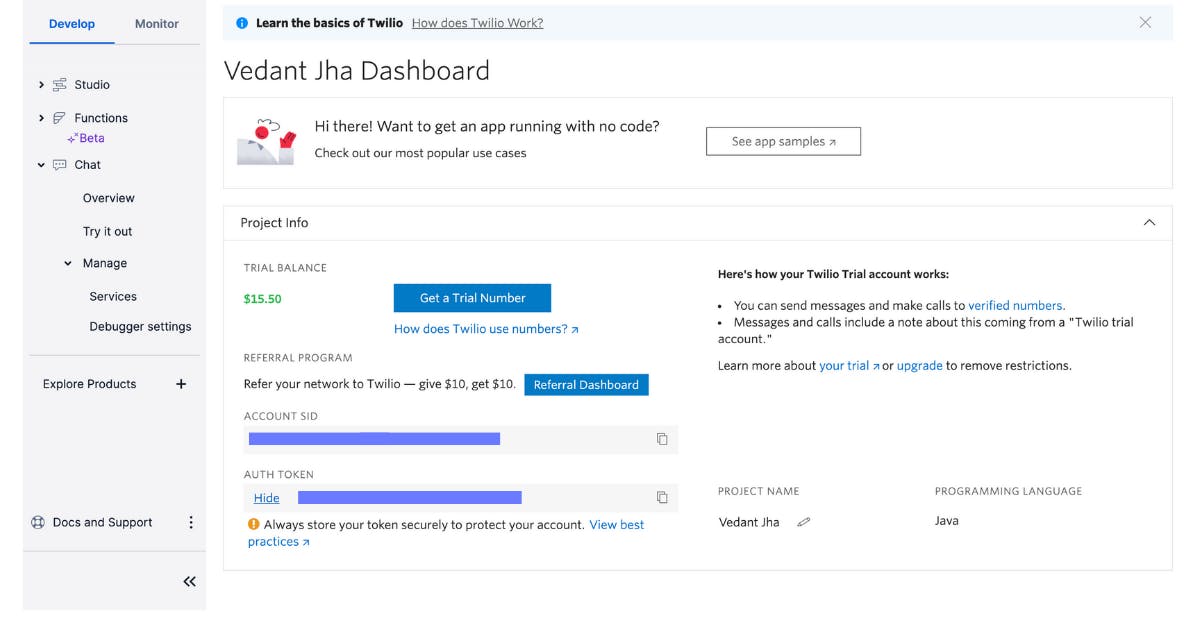
You will then see options like Chat and Functions in the hamburger menu. From there, you need to access the Account SID (Twilio API Key) and Auth Token (Twilio Auth Token). We will need these two later.
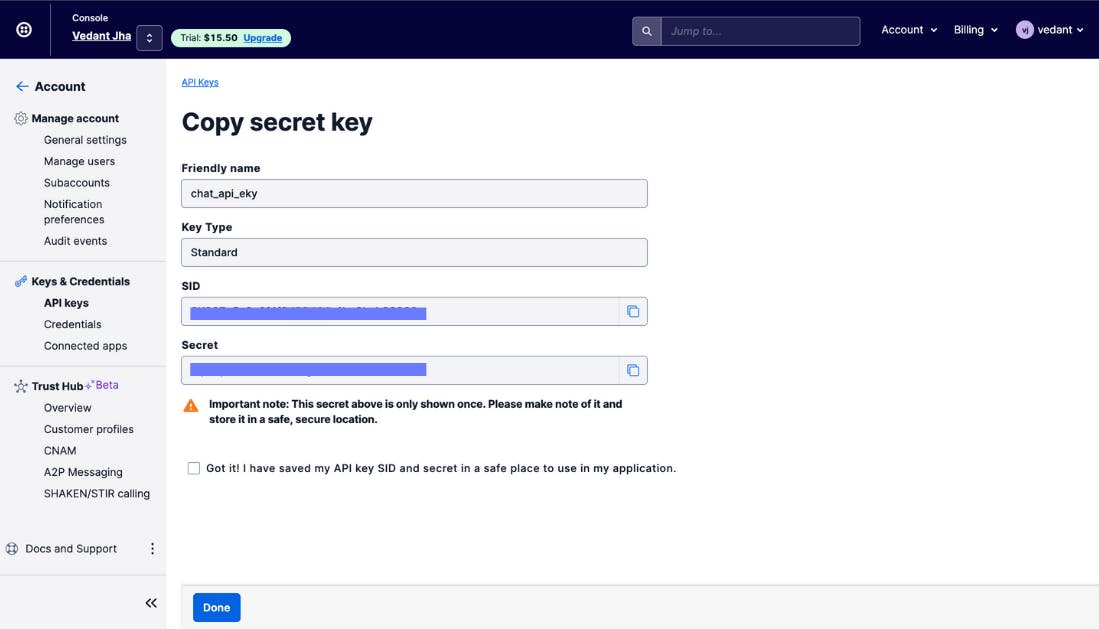
Now we click Account on the menu bar, go to API keys, and click on Create API key. You will see the chat Service API key (SID). Please keep it around, as we will need it as well.
We also need to copy the secret key here:
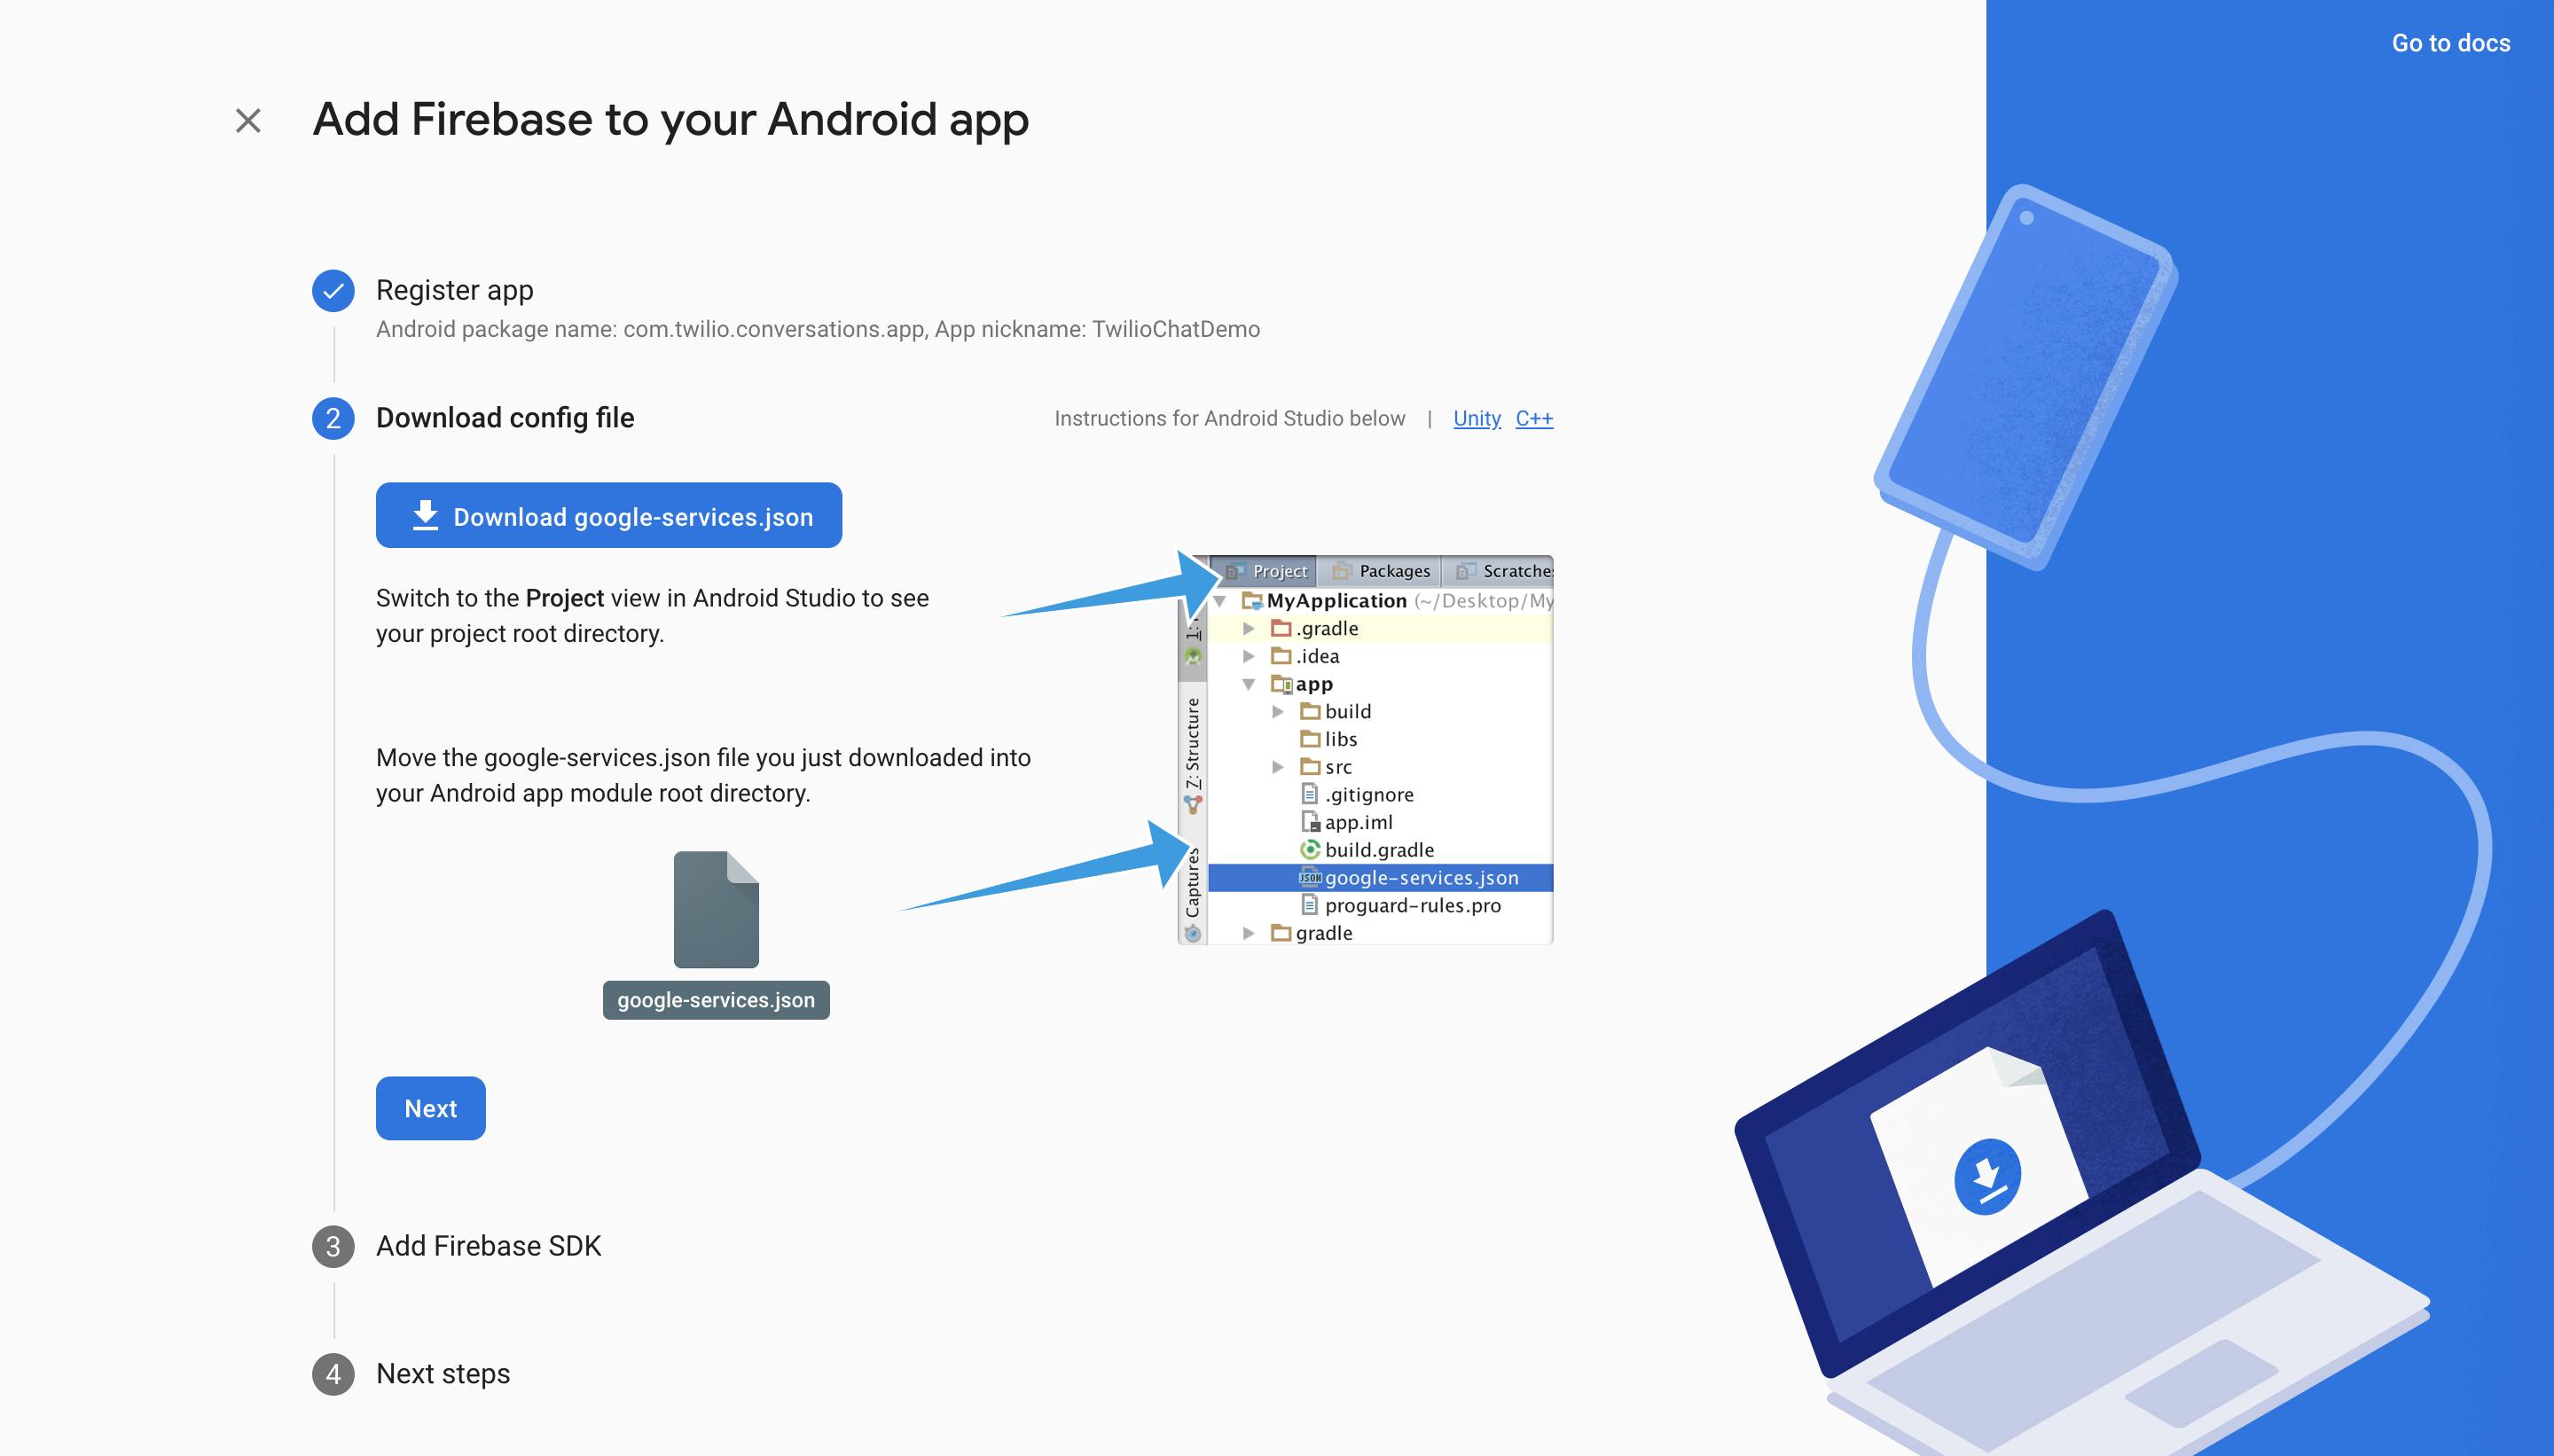
The next step is to set up the Firebase account for the Twilio Android Chat app. Login to Firebase or create a free account. Then create an app and pass the packageID of the android app (example: “com.twilio.conversations.app”). You will be able to download the google-services.json file for the Firebase settings.
If you want to enable push notifications, you can create the PUSH_CREDENTIAL_SID. Navigate to the Account/ Credentials/ FCM_PUSH_CREDENTIAL and click the Create button. You can find your GCM API Key value under your Firebase settings. You will be able to see the PUSH_CREDENTIAL_SID. You guessed that right - we will need it later as well.
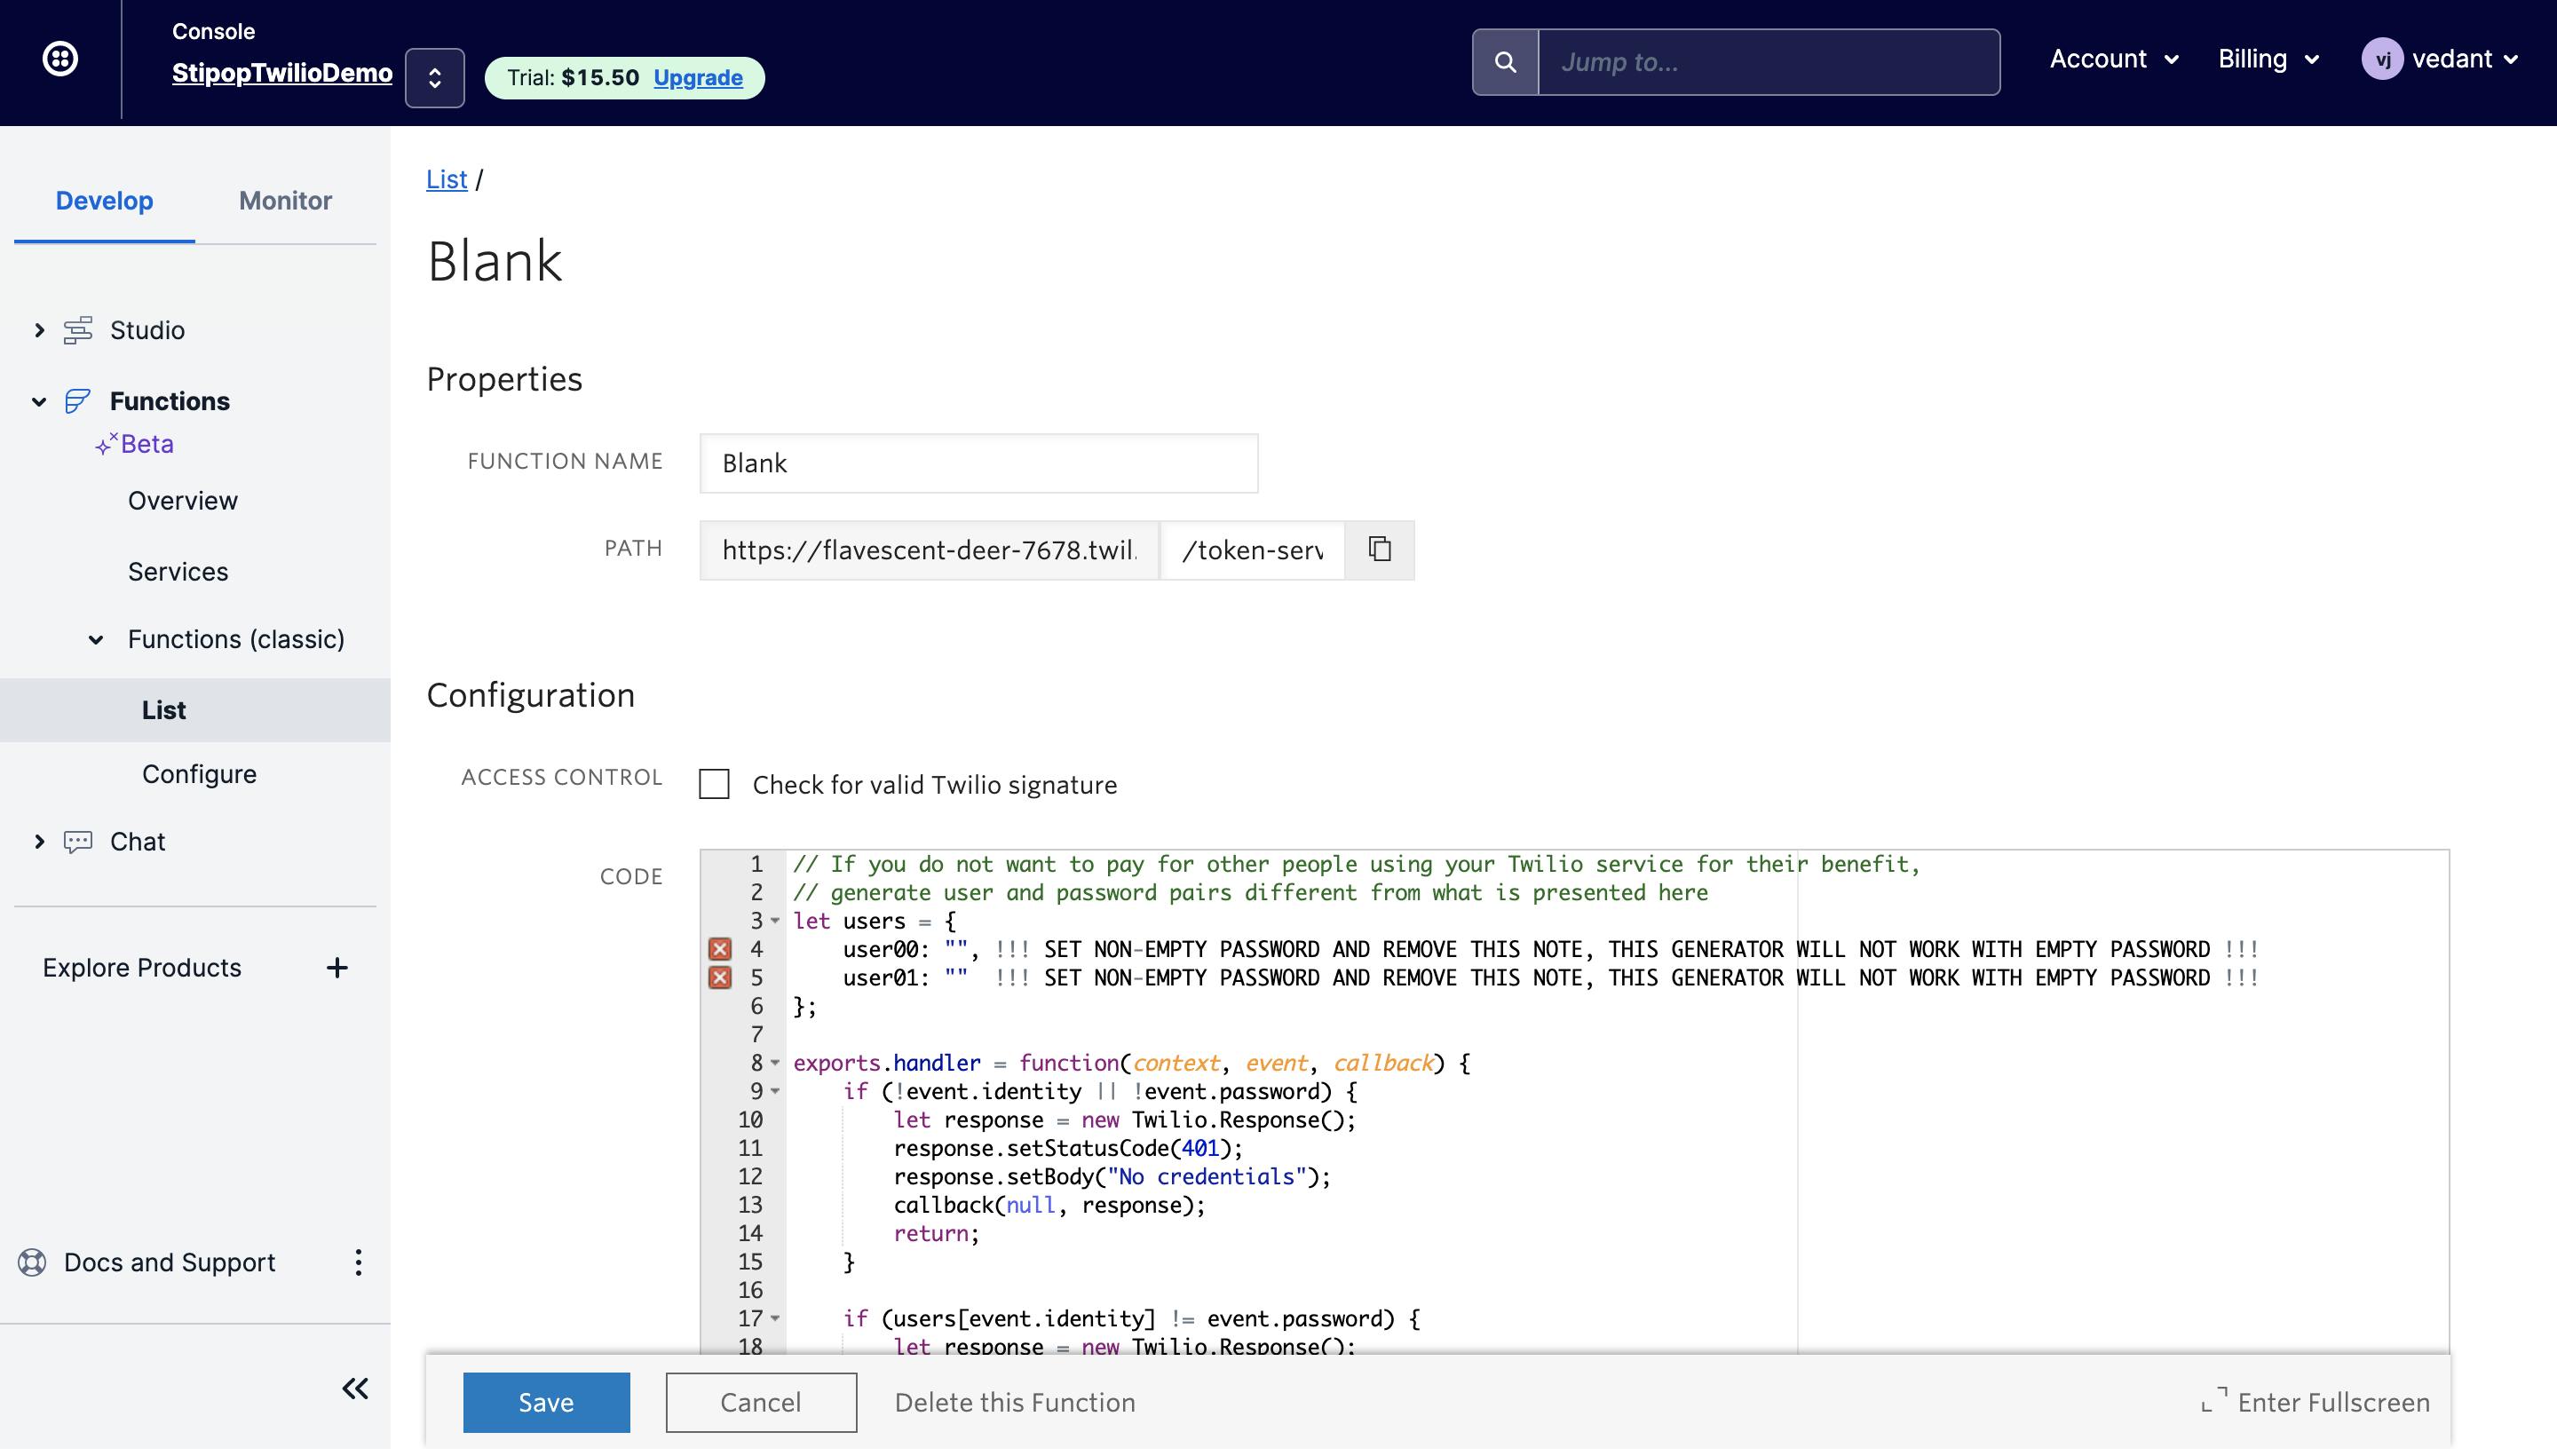
As the next step, navigate to the Functions/ Functions(Classic)/ List and click on the Create a New Function. Choose the template option as Blank and click on Create. You will see the blank function prototype, and here we need to make some changes.
You need to enter "/token-service" in the path field
Uncheck the Check for valid Twilio signature checkbox
Insert the following code:
// generate user and password pairs different from what is presented here
let users = {
    user00: "", !!! SET NON-EMPTY PASSWORD AND REMOVE THIS NOTE, THIS GENERATOR WILL NOT WORK WITH EMPTY PASSWORD !!!
    user01: ""  !!! SET NON-EMPTY PASSWORD AND REMOVE THIS NOTE, THIS GENERATOR WILL NOT WORK WITH EMPTY PASSWORD !!!
};

exports.handler = function(context, event, callback) {
    if (!event.identity || !event.password) {
        let response = new Twilio.Response();
        response.setStatusCode(401);
        response.setBody("No credentials");
        callback(null, response);
        return;
    }

    if (users[event.identity] != event.password) {
        let response = new Twilio.Response();
        response.setStatusCode(401);
        response.setBody("Wrong credentials");
        callback(null, response);
        return;
    }

    let AccessToken = Twilio.jwt.AccessToken;
    let token = new AccessToken(
      context.ACCOUNT_SID,
      context.TWILIO_API_KEY,
      context.TWILIO_API_SECRET, {
        identity: event.identity,
        ttl: 3600
      });

    let grant = new AccessToken.ChatGrant({ serviceSid: context.SERVICE_SID });
    grant.pushCredentialSid = context.PUSH_CREDENTIAL_SID;
    token.addGrant(grant);

    callback(null, token.toJwt());
};
Click the Save button to save the function
Copy the URL path as we will use this only to communicate to the Twilio Server
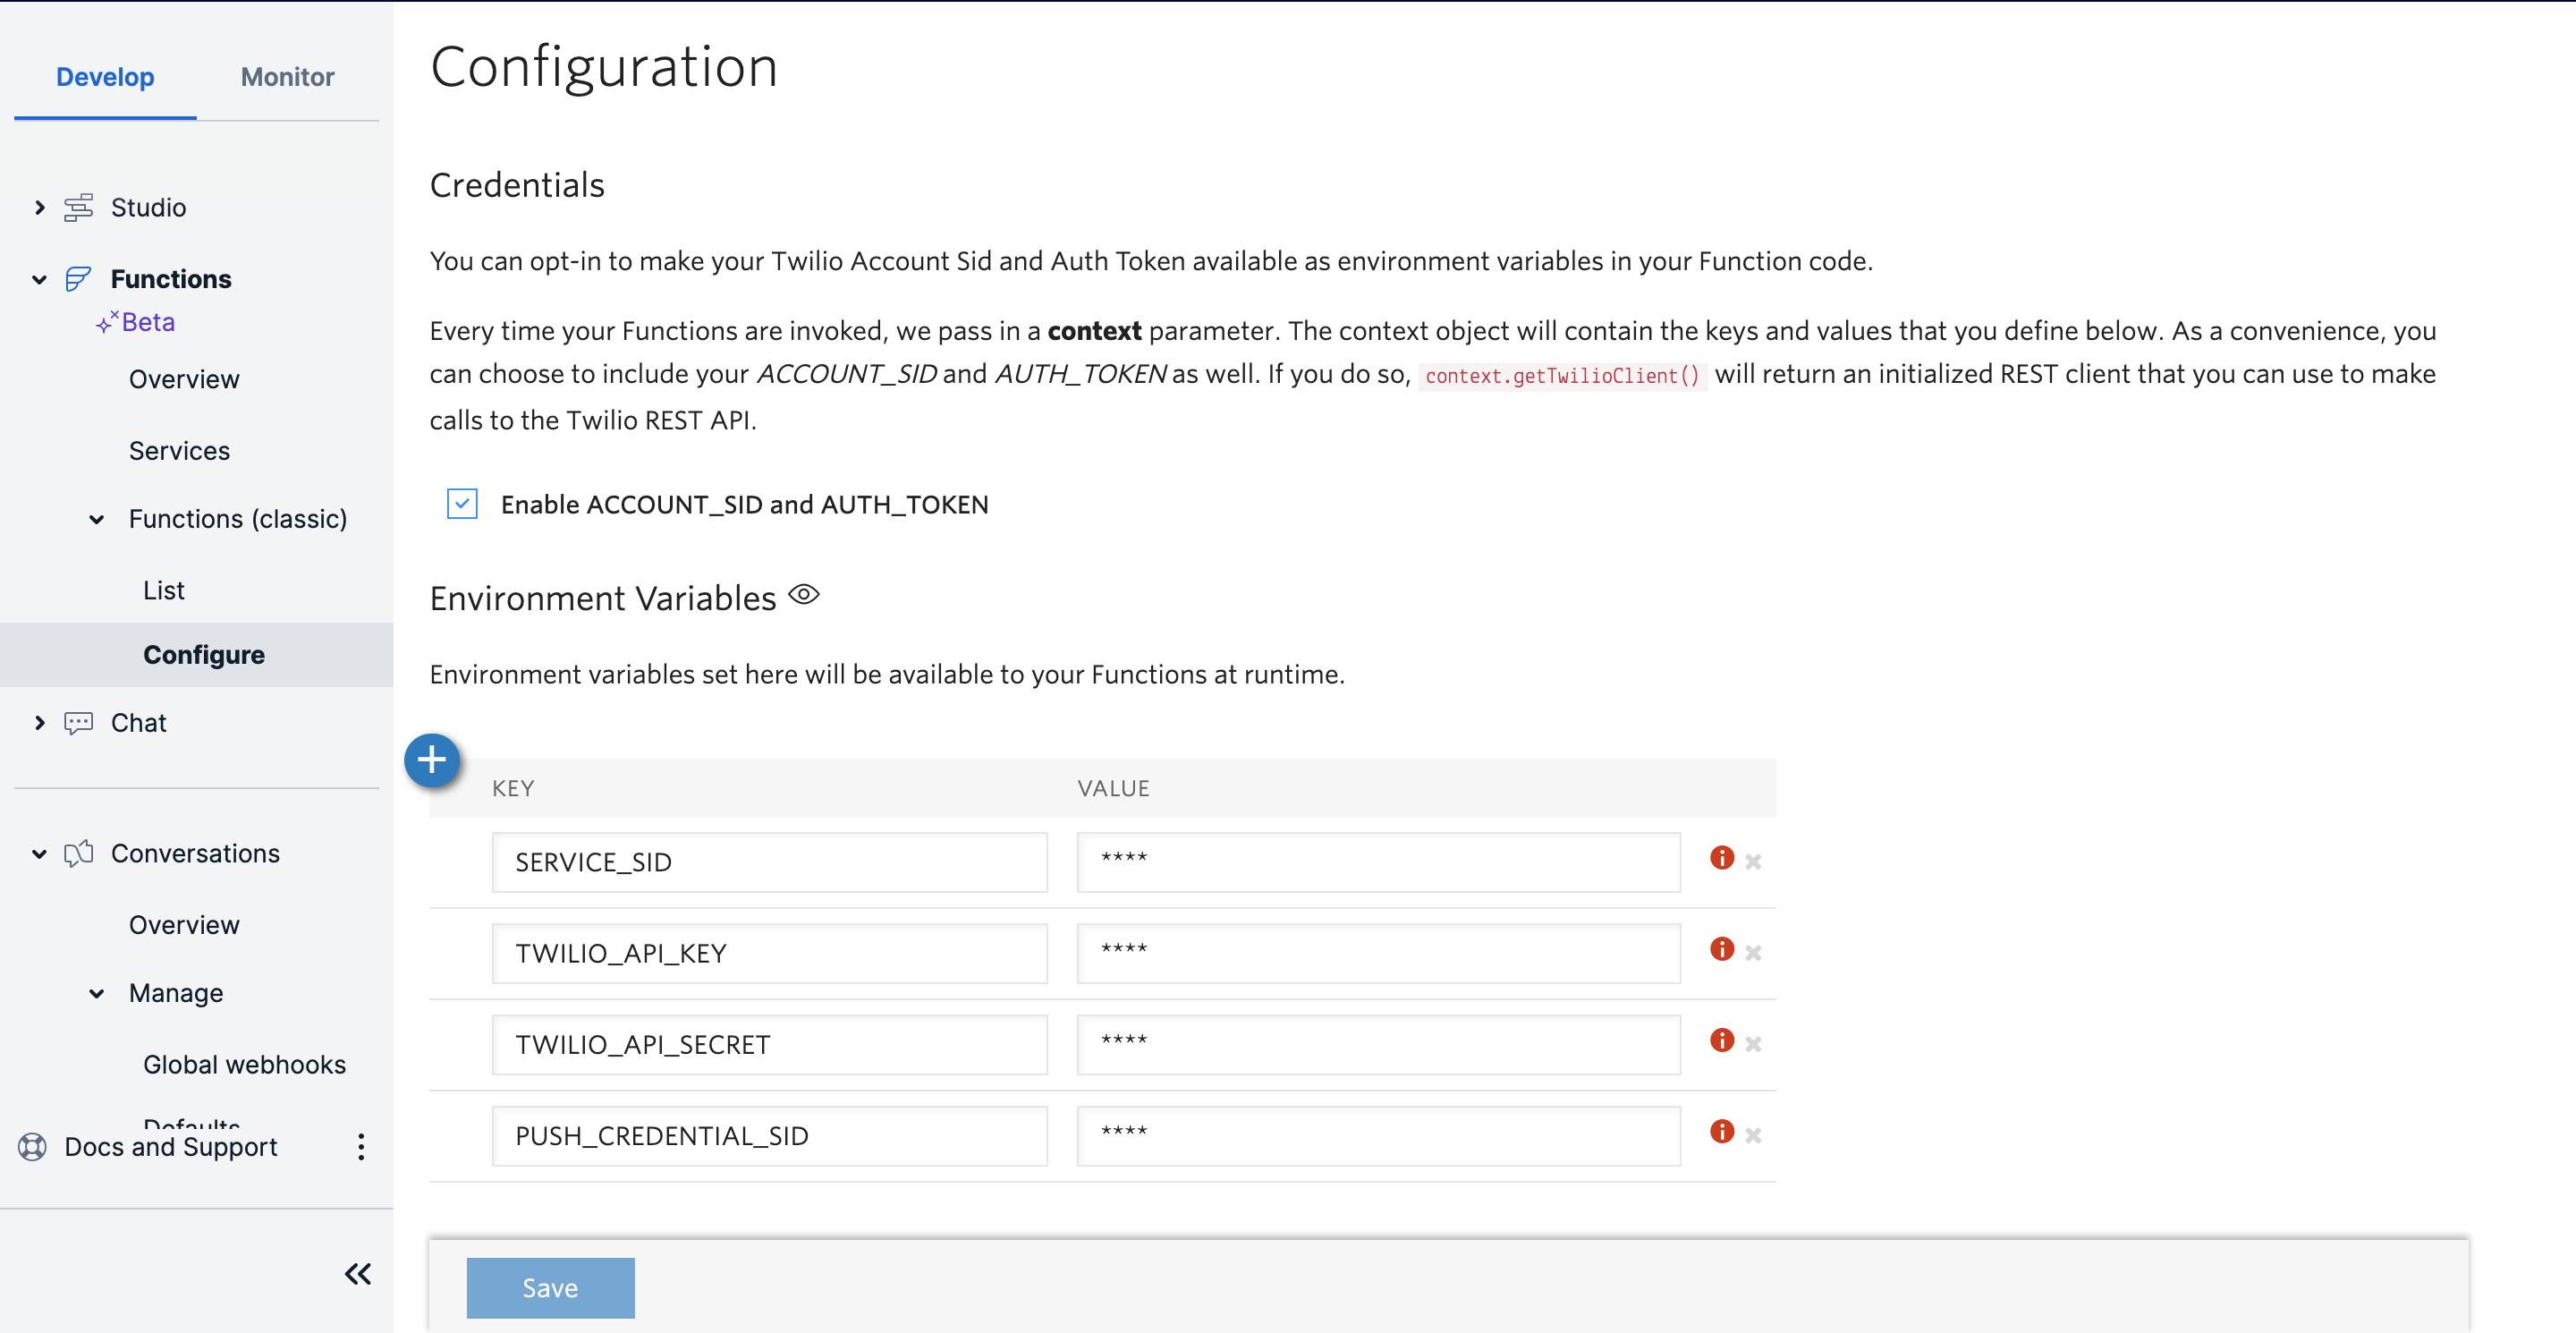
From here we navigate to Functions/ Functions (Classic)/ Configure and set up a few environment variables. Use the API Keys and Secrets captured earlier as values for SERVICE_SID, TWILIO_API_KEY, TWILIO_API_SECRET, PUSH_CREDENTIAL_SID as shown in the image below.
Now let's use the URL path that we copied above in the gradle of the Android App.
Clone Twilio chat app
With Twilio, we don't need to start from the very beginning. We can just clone the Twilio Kotlin Conversations Repository and move to the stickers integration.
git clone https://github.com/twilio/twilio-conversations-demo-kotlin.git
Now open the project in the Android Studio and navigate to gradle.properties, and add the below line. Replace the value with the URL path from the above step.
ACCESS_TOKEN_SERVICE_URL=http://URL_PATH.com/get-token/
The next step is to place the google-services.json, Firebase settings file in the app folder that we downloaded above.
Code overview
There are a few kotlin classes that are important for the stickers integration. MessageListActivity contains the chat room for the exchange of messages. We will integrate the Stipop stickers SDK in this activity only and use MessageListViewModel to exchange messages.
val messageListViewModel by lazyViewModel {
   injector.createMessageListViewModel(applicationContext, intent.getStringExtra(EXTRA_CONVERSATION_SID)!!)
}

private fun sendMessage() {
   binding.messageInput.text.toString().takeIf { it.isNotBlank() }?.let { message ->
       Timber.d("Sending message: $message")
       messageListViewModel.sendTextMessage(message)
       binding.messageInput.text?.clear()
   }
}
MessagesListManager interface contains all the abstract methods like sending text/media messages and provides it to MessageListViewModel to implement those methods.
suspend fun sendTextMessage(text: String, uuid: String)
suspend fun retrySendTextMessage(messageUuid: String)
suspend fun sendMediaMessage(
   uri: String,
   inputStream: InputStream,
   fileName: String?,
   mimeType: String?,
   messageUuid: String
)
suspend fun retrySendMediaMessage(inputStream: InputStream, messageUuid: String)
In MessageListViewModel.kt class, you will find all the necessary methods for sending a text message, like sending a text message or a media message.
fun sendTextMessage(message: String) = viewModelScope.launch {
   val messageUuid = UUID.randomUUID().toString()
   Timber.d("messageUuid: $messageUuid")
   try {
       messageListManager.sendTextMessage(message, messageUuid)
       onMessageSent.call()
       Timber.d("Message sent: $messageUuid")
   } catch (e: ConversationsException) {
       Timber.d("Text message send error: ${e.errorInfo?.status}:${e.errorInfo?.code} ${e.errorInfo?.message}")
       messageListManager.updateMessageStatus(messageUuid, SendStatus.ERROR, e.errorInfo?.code ?: 0)
       onMessageError.value = ConversationsError.MESSAGE_SEND_FAILED
   }
}

fun sendMediaMessage(uri: String, inputStream: InputStream, fileName: String?, mimeType: String?) =
   viewModelScope.launch {
       val messageUuid = UUID.randomUUID().toString()
       try {
           messageListManager.sendMediaMessage(uri, inputStream, fileName, mimeType, messageUuid)
           onMessageSent.call()
           Timber.d("Media message sent: $messageUuid")
       } catch (e: ConversationsException) {
           Timber.d("Media message send error: ${e.errorInfo?.status}:${e.errorInfo?.code} ${e.errorInfo?.message}")
           messageListManager.updateMessageStatus(messageUuid, SendStatus.ERROR, e.errorInfo?.code ?: 0)
           onMessageError.value = ConversationsError.MESSAGE_SEND_FAILED
       }
   }
Create users
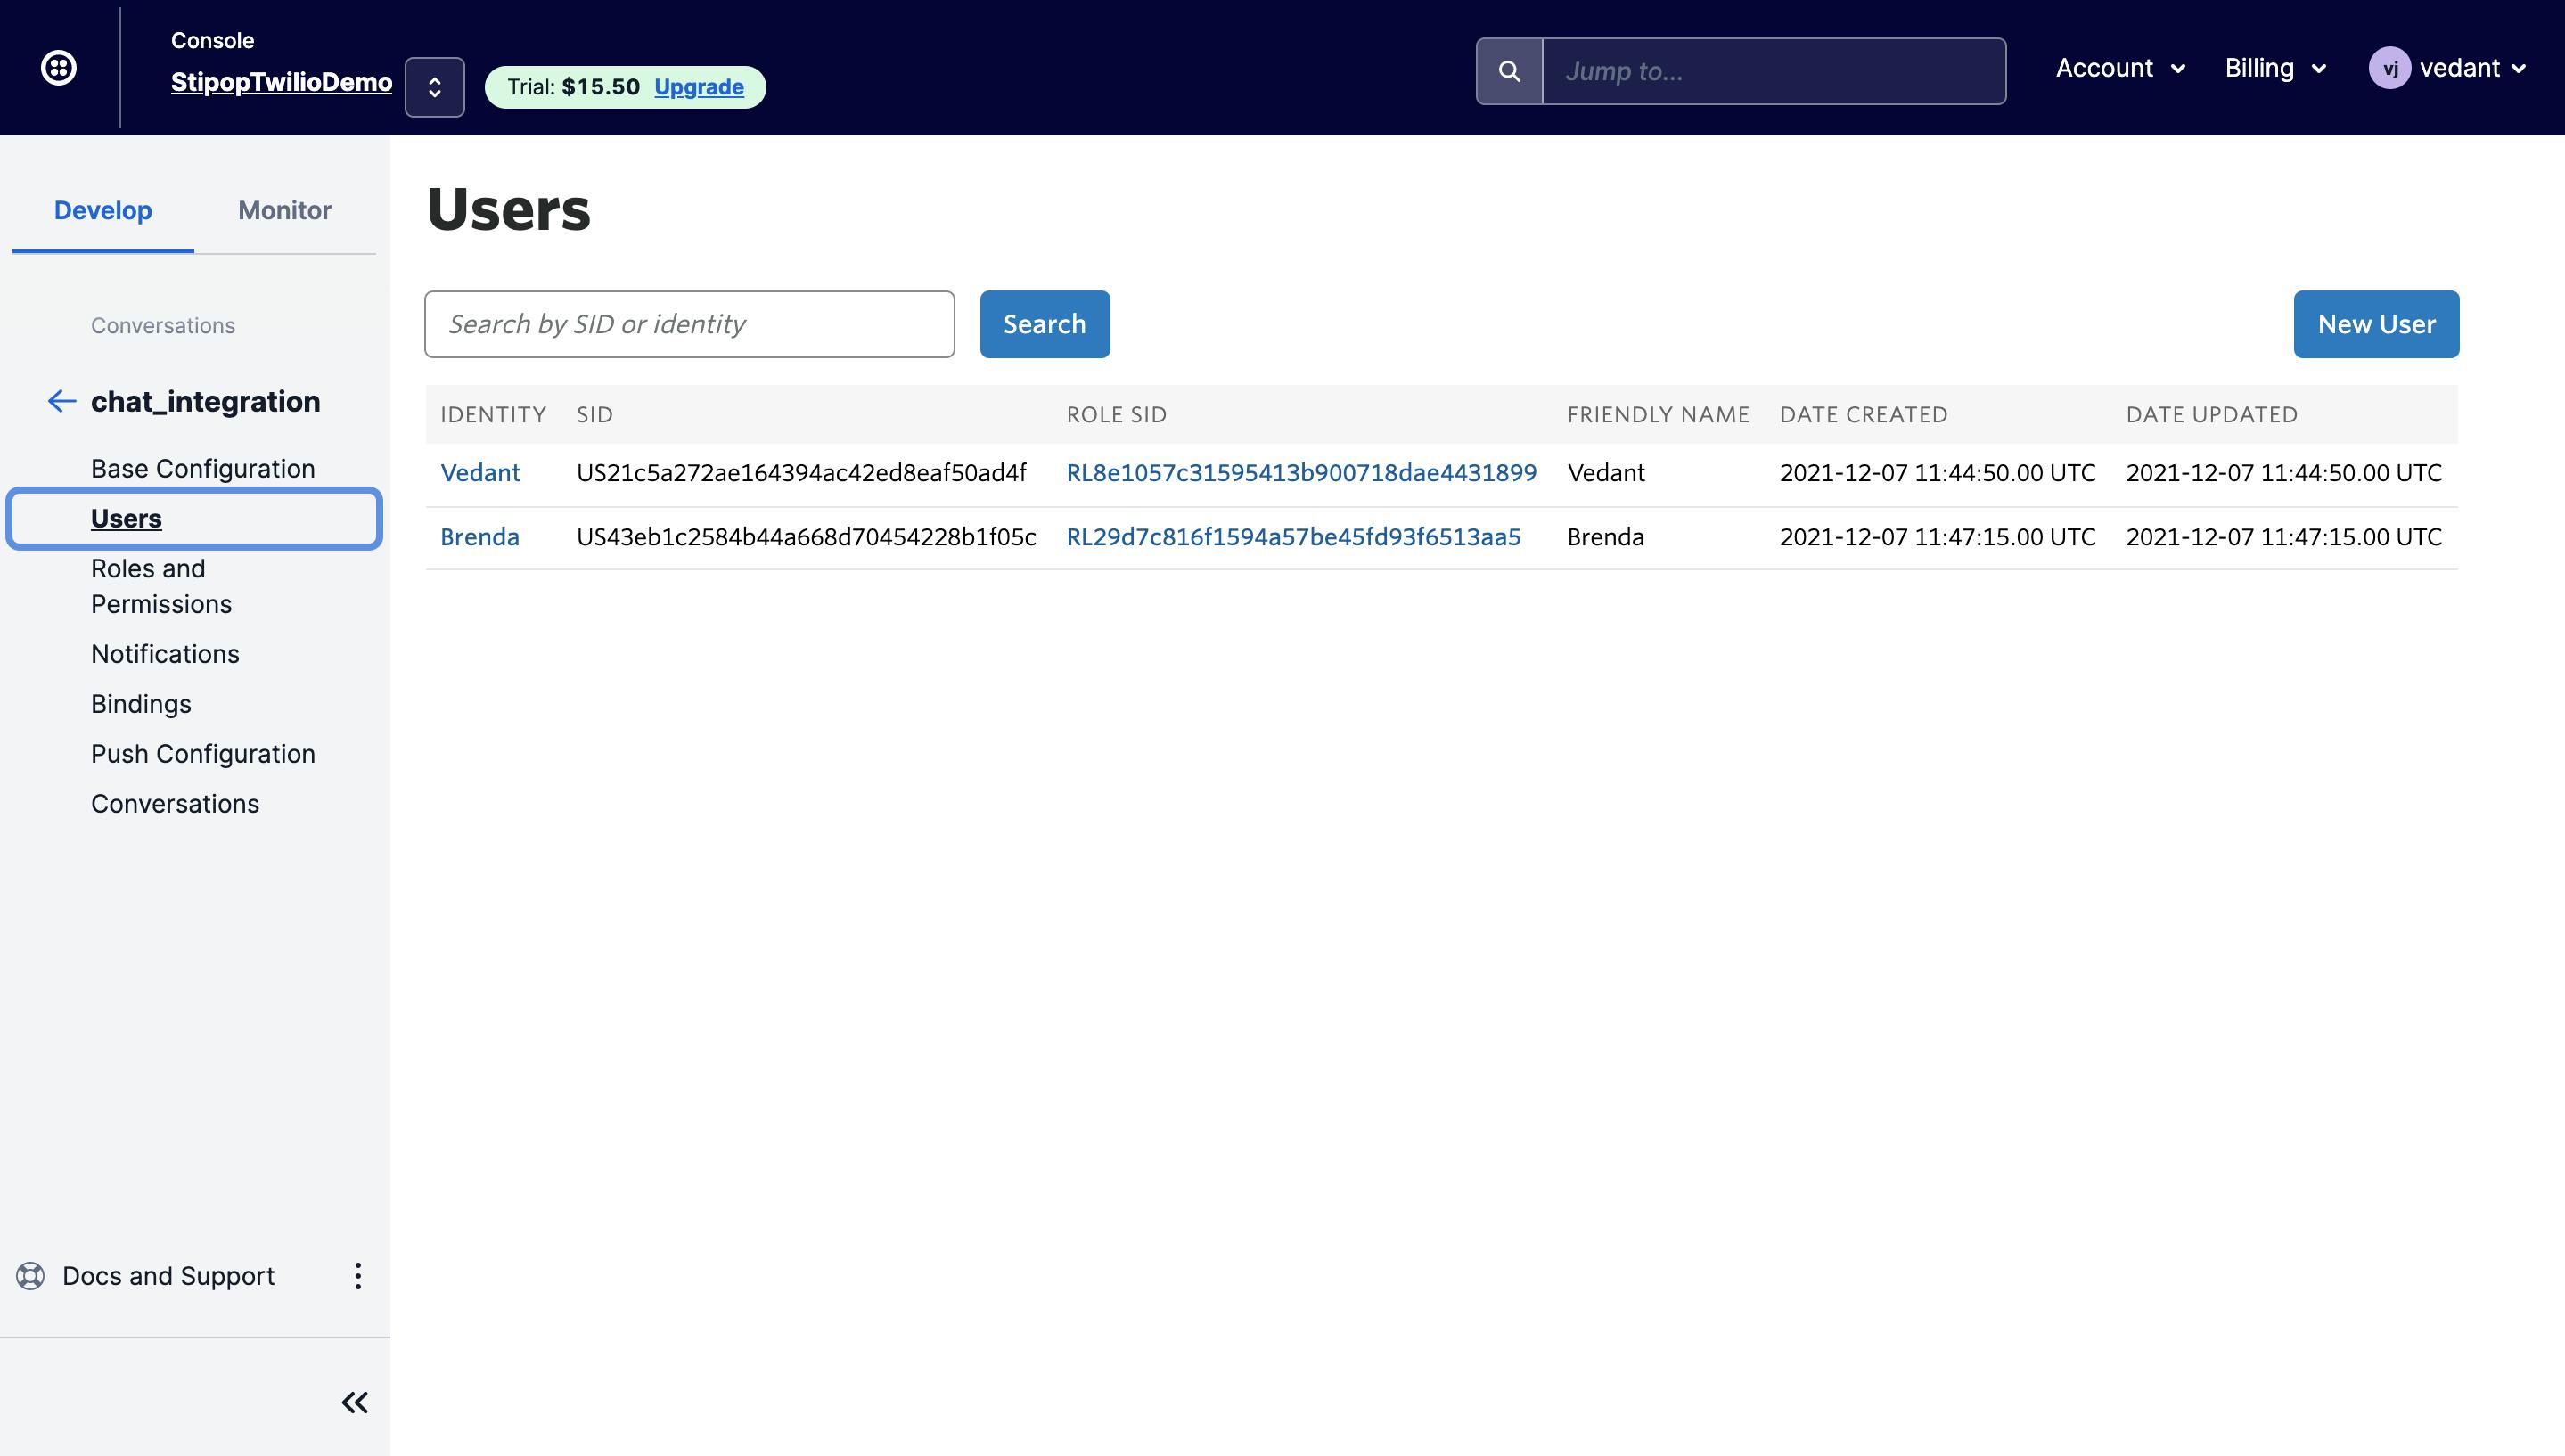
We will need to make a few user accounts to test the chat feature. We can create users on the Twilio Dashboard under the Conversations/ Services option in the hamburger menu. In the Users section, option-click on Create New User and pass the Identity, Friendly name, etc., as shown below.
You will see a list of active users and their roles in the Twilio Dashboard. We will use them in our Twilio chat app. Please note that you can also create/ manage the user accounts programmatically.
Run the Chat App
We are all done with the app environment and setting up the API Keys. We will run the debug variant of the app. On successful build of the project, you will see the debuggable app on the emulator or the physical device.

Get Stipop API Config
We will need to add the API Key for Stipop SDK integration to our existing Twilio Kotlin app. To find your API Key, Sign up to Stipop Dashboard. After successful sign-in, make an application with your app's details.
You will see the API Key on the main page, where you will also need to download the Stipop.json file under android settings, as shown below.

You need to place the Stipop.json file under app/ src/ main/ assets/ Stipop.json.
Integrate Stipop Android SDK
We will now proceed with the Android SDK integration for the Twilio chat app. Navigate to the build.gradle file (project level) and add the below dependency.
allprojects {
  repositories {
    ...
    maven { url 'https://jitpack.io' }
  }
}
Add the below dependency in the build.gradle file (app level).
dependencies {
  ...
  implementation 'com.github.stipop-development:stipop-android-sdk:0.0.6'
}
We have already included the Stipop.json file in the assets folder. Now sync and rebuild the project to make the Stipop classes accessible. The next step is to initialize the Stipop instance in the ConversationsApplication class.
import io.stipop.Stipop

override fun onCreate() {
   super.onCreate()
   ...
   Stipop.configure(this)
}
Add the below line to the AndroidManifest.xml file and add the replace theme line.
<application
   android:name=".ConversationsApplication"
   android:allowBackup="true"
   android:icon="@drawable/ic_launcher"
   android:label="@string/app_name"
   android:supportsRtl="true"
   android:theme="@style/AppTheme.NoActionBar"
   android:allowNativeHeapPointerTagging="false"
   tools:replace="android:theme"
   tools:ignore="GoogleAppIndexingWarning">
We need to add the Stipop button, which will open the Stipop Keyboard upon clicking. Once clicked, users will be able to select stickers to send. Navigate to the activity_message_list.xml and add the below Stipop button inside the TextInput field.
<androidx.constraintlayout.widget.ConstraintLayout
   android:id="@+id/messageInputLayout"
   android:layout_width="match_parent"
   android:layout_height="wrap_content"
   android:background="@color/gray_background"
   app:layout_constraintBottom_toBottomOf="parent"
   app:layout_constraintEnd_toEndOf="parent"
   app:layout_constraintStart_toStartOf="parent"
   app:layout_constraintTop_toBottomOf="@+id/messageList">

   ....

<io.stipop.extend.StipopImageView
   android:id="@+id/stipopIV"
   android:layout_width="24dp"
   android:layout_height="24dp"
    android:src="@mipmap/ic_sticker_normal"/>
We will now handle the click event for the Stipop image button. Add the below event handler in the onCreate method of the MessageListActivity class.
import io.stipop.StipopDelegate

class MessageListActivity : BaseActivity(), StipopDelegate {
override fun onCreate(savedInstanceState: Bundle?) {

...

val stipopIV = findViewById<StipopImageView>(R.id.stipopIV)

Stipop.connect(this, stipopIV, "1234", "en", "US", this)

stipopIV.setOnClickListener {
   Stipop.showKeyboard()
}
After this, override the methods for the StipopDelegate interface as given in the code snippet below.
override fun onStickerSelected(sticker: SPSticker): Boolean {
   Log.d(TAG, sticker.packageId+" : url: "+sticker.stickerImg);
   return true
}

override fun canDownload(spPackage: SPPackage): Boolean {
   print(spPackage)
   return true
}
Now let's add the utility method for sending Sticker messages overriding the sendMediaMessage function. Navigate to the MessageListViewModel.kt class and add the below code snippet.
fun sendStickerMessage(sticker: SPSticker) =
   viewModelScope.launch {
       val messageUuid = UUID.randomUUID().toString()
       try {
           sticker.stickerImg?.let { with(messageListManager) { sendMediaMessage(it, InputStream(sticker.stickerImg), sticker.keyword, "image/*", messageUuid) } }
           onMessageSent.call()
           Timber.d("Sticker message sent: $messageUuid")
       } catch (e: ConversationsException) {
           Timber.d("Sticker message send error: ${e.errorInfo?.status}:${e.errorInfo?.code} ${e.errorInfo?.message}")
           messageListManager.updateMessageStatus(messageUuid, SendStatus.ERROR, e.errorInfo?.code ?: 0)
           onMessageError.value = ConversationsError.MESSAGE_SEND_FAILED
       }
   }
All we need to do now is to call this method in onStickerSelected method.
override fun onStickerSelected(sticker: SPSticker): Boolean {

   Log.d(TAG, " : "+sticker.packageId+" : url: "+sticker.stickerImg);

   messageListViewModel.sendStickerMessage(sticker)
   return true
}
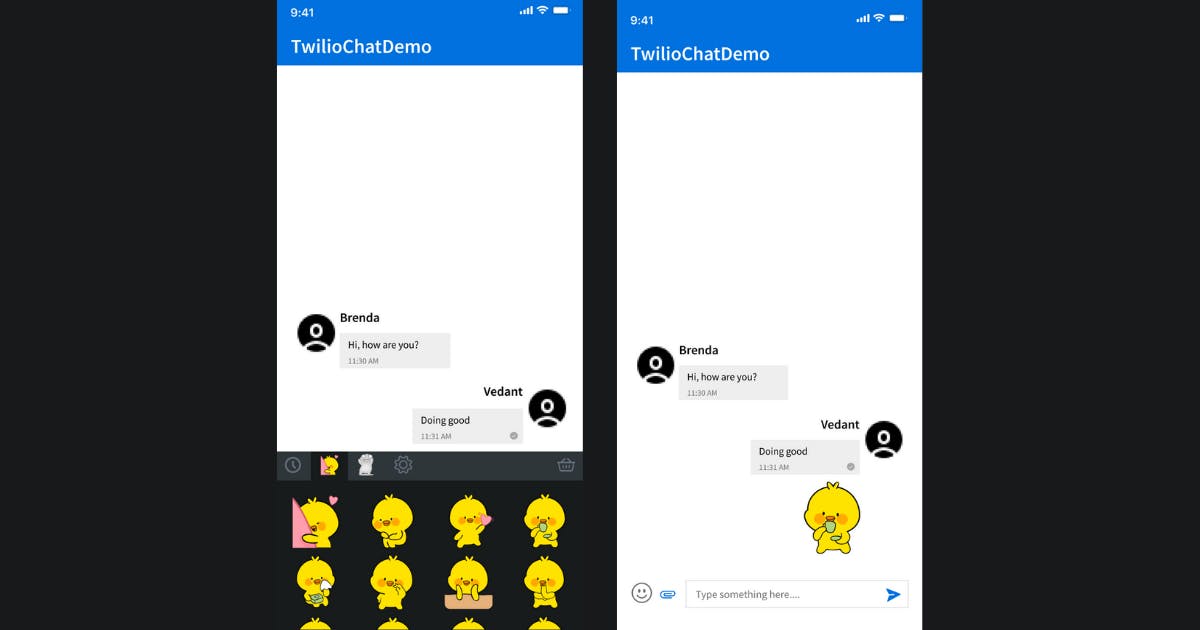
We are now ready to run the project and test it on an emulator. We will see the Stipop sticker panel by clicking on the emoji button (powered by Stipop), from where we can select the stickers.
That's it folks!
We have successfully integrated the Stipop Android SDK into our Twilio chat app. Integrating Stipop SDK is really easy as it has an inbuilt sticker keyboard and sticker search option. You should definitely try the Stipop SDK/API if you are building a chat application with Twilio.
Thanks for reading and happy coding 😎
🎅🏼 About Vedant
Vedant Jha is a full-stack developer and a technical writer at Stipop. Have a question about this article? Contact Vedant here.