


Hello dear fellow community members 🙌🏻🙌🏻 do you know - A good programmer is someone who always looks both ways before crossing a one-way street 😂😅 Funny right. Jokes apart, I hope the first month of 2022 went well for all of you. Today we will put our brains to some thrilling integration like always.
We picked Pusher this time. So without further ado lets discuss Pusher and Pusher channel APIs to build an Andriod chat app, finally integrating them to Stipop stickers 👊. A popular library for decades in the developer community which provides real-time charts, notifications, location tracking etc. Pusher further provides In-app chat APIs to integrate group chat into our web/mobile apps.
Prerequisites
Android SDK (API 16 or higher)
Java 8 AndroidX
Gradle 3.5.4 or higher
Node.js, npm & Heroku
Dear community let's warm up the fingers first starting with creating the Chat Backend
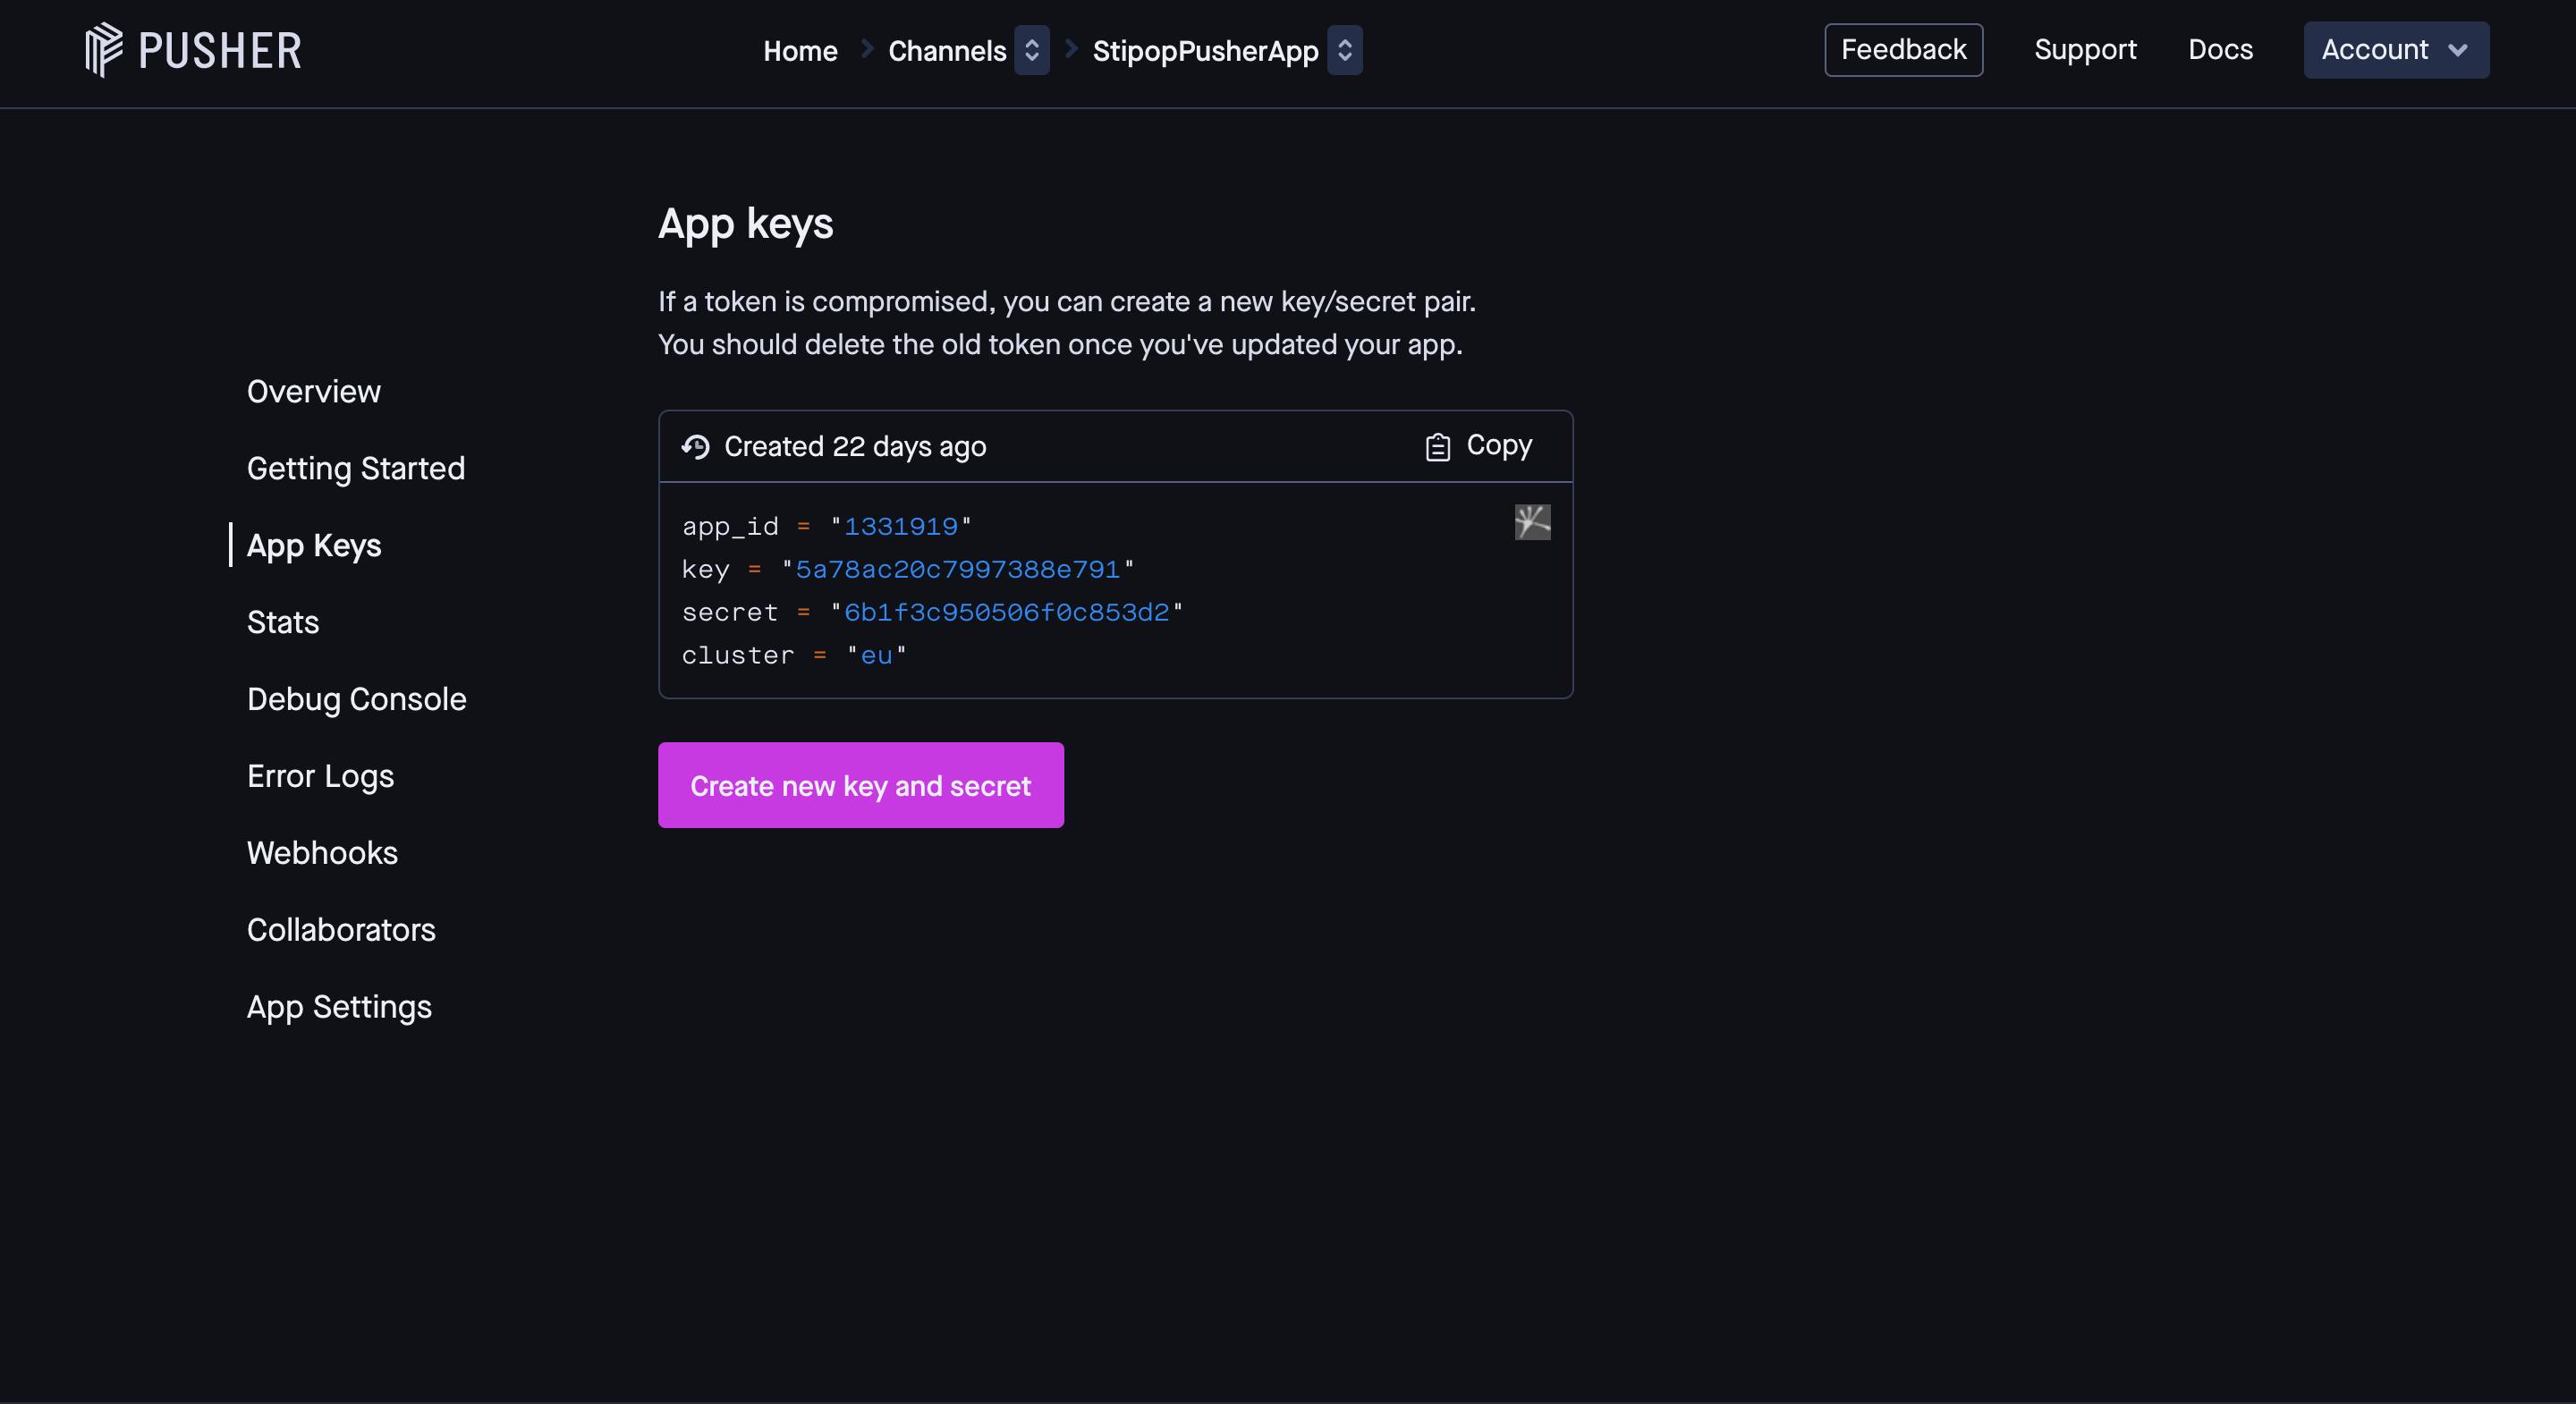
- We need a set of Pusher API keys and secrets to start the development of a chat app.
- Create a free account on Pusher Dashboard and create a channel. Now you will be able to then see the API key and the secret under the App Keys section keep it handy for the next step.
We now have to create the chat APIs which we will be using in our Android chat app. Let’s clone the below repository as we don’t need to build it from scratch.
git clone https://github.com/6vedant/PusherNodeBackend.git -b master
Let’s first understand about some important libraries used in the package.json for the node-app.
"dependencies": {
   "body-parser": "^1.18.2",
   "express": "^4.15.5",
   "pusher": "^1.5.1"
 }
The pusher SDK version is defined in the package.json along with the express and body-parser library. Then the pusher client is initialized using the API Key and secrets from the above step.
var pusher = new Pusher({
   appId: '1331919',
   key: '5a78ac20c7997388e791',
   secret: '6b1f3c950506f0c853d2',
   cluster: 'eu',
   encrypted: true
});
Then we will create a POST API to trigger a new response message which will accept the message body as the request.
app.post('/messages/:room', function(req, res){
   var message = req.body;
   var chatRoom = req.params.room;
   pusher.trigger(chatRoom, 'new_message', message);
   res.json({success: 200});
});
app.listen(port);
Finally, we will deploy this backend app on Heroku. Create a free account on the Heroku dashboard and create an app.
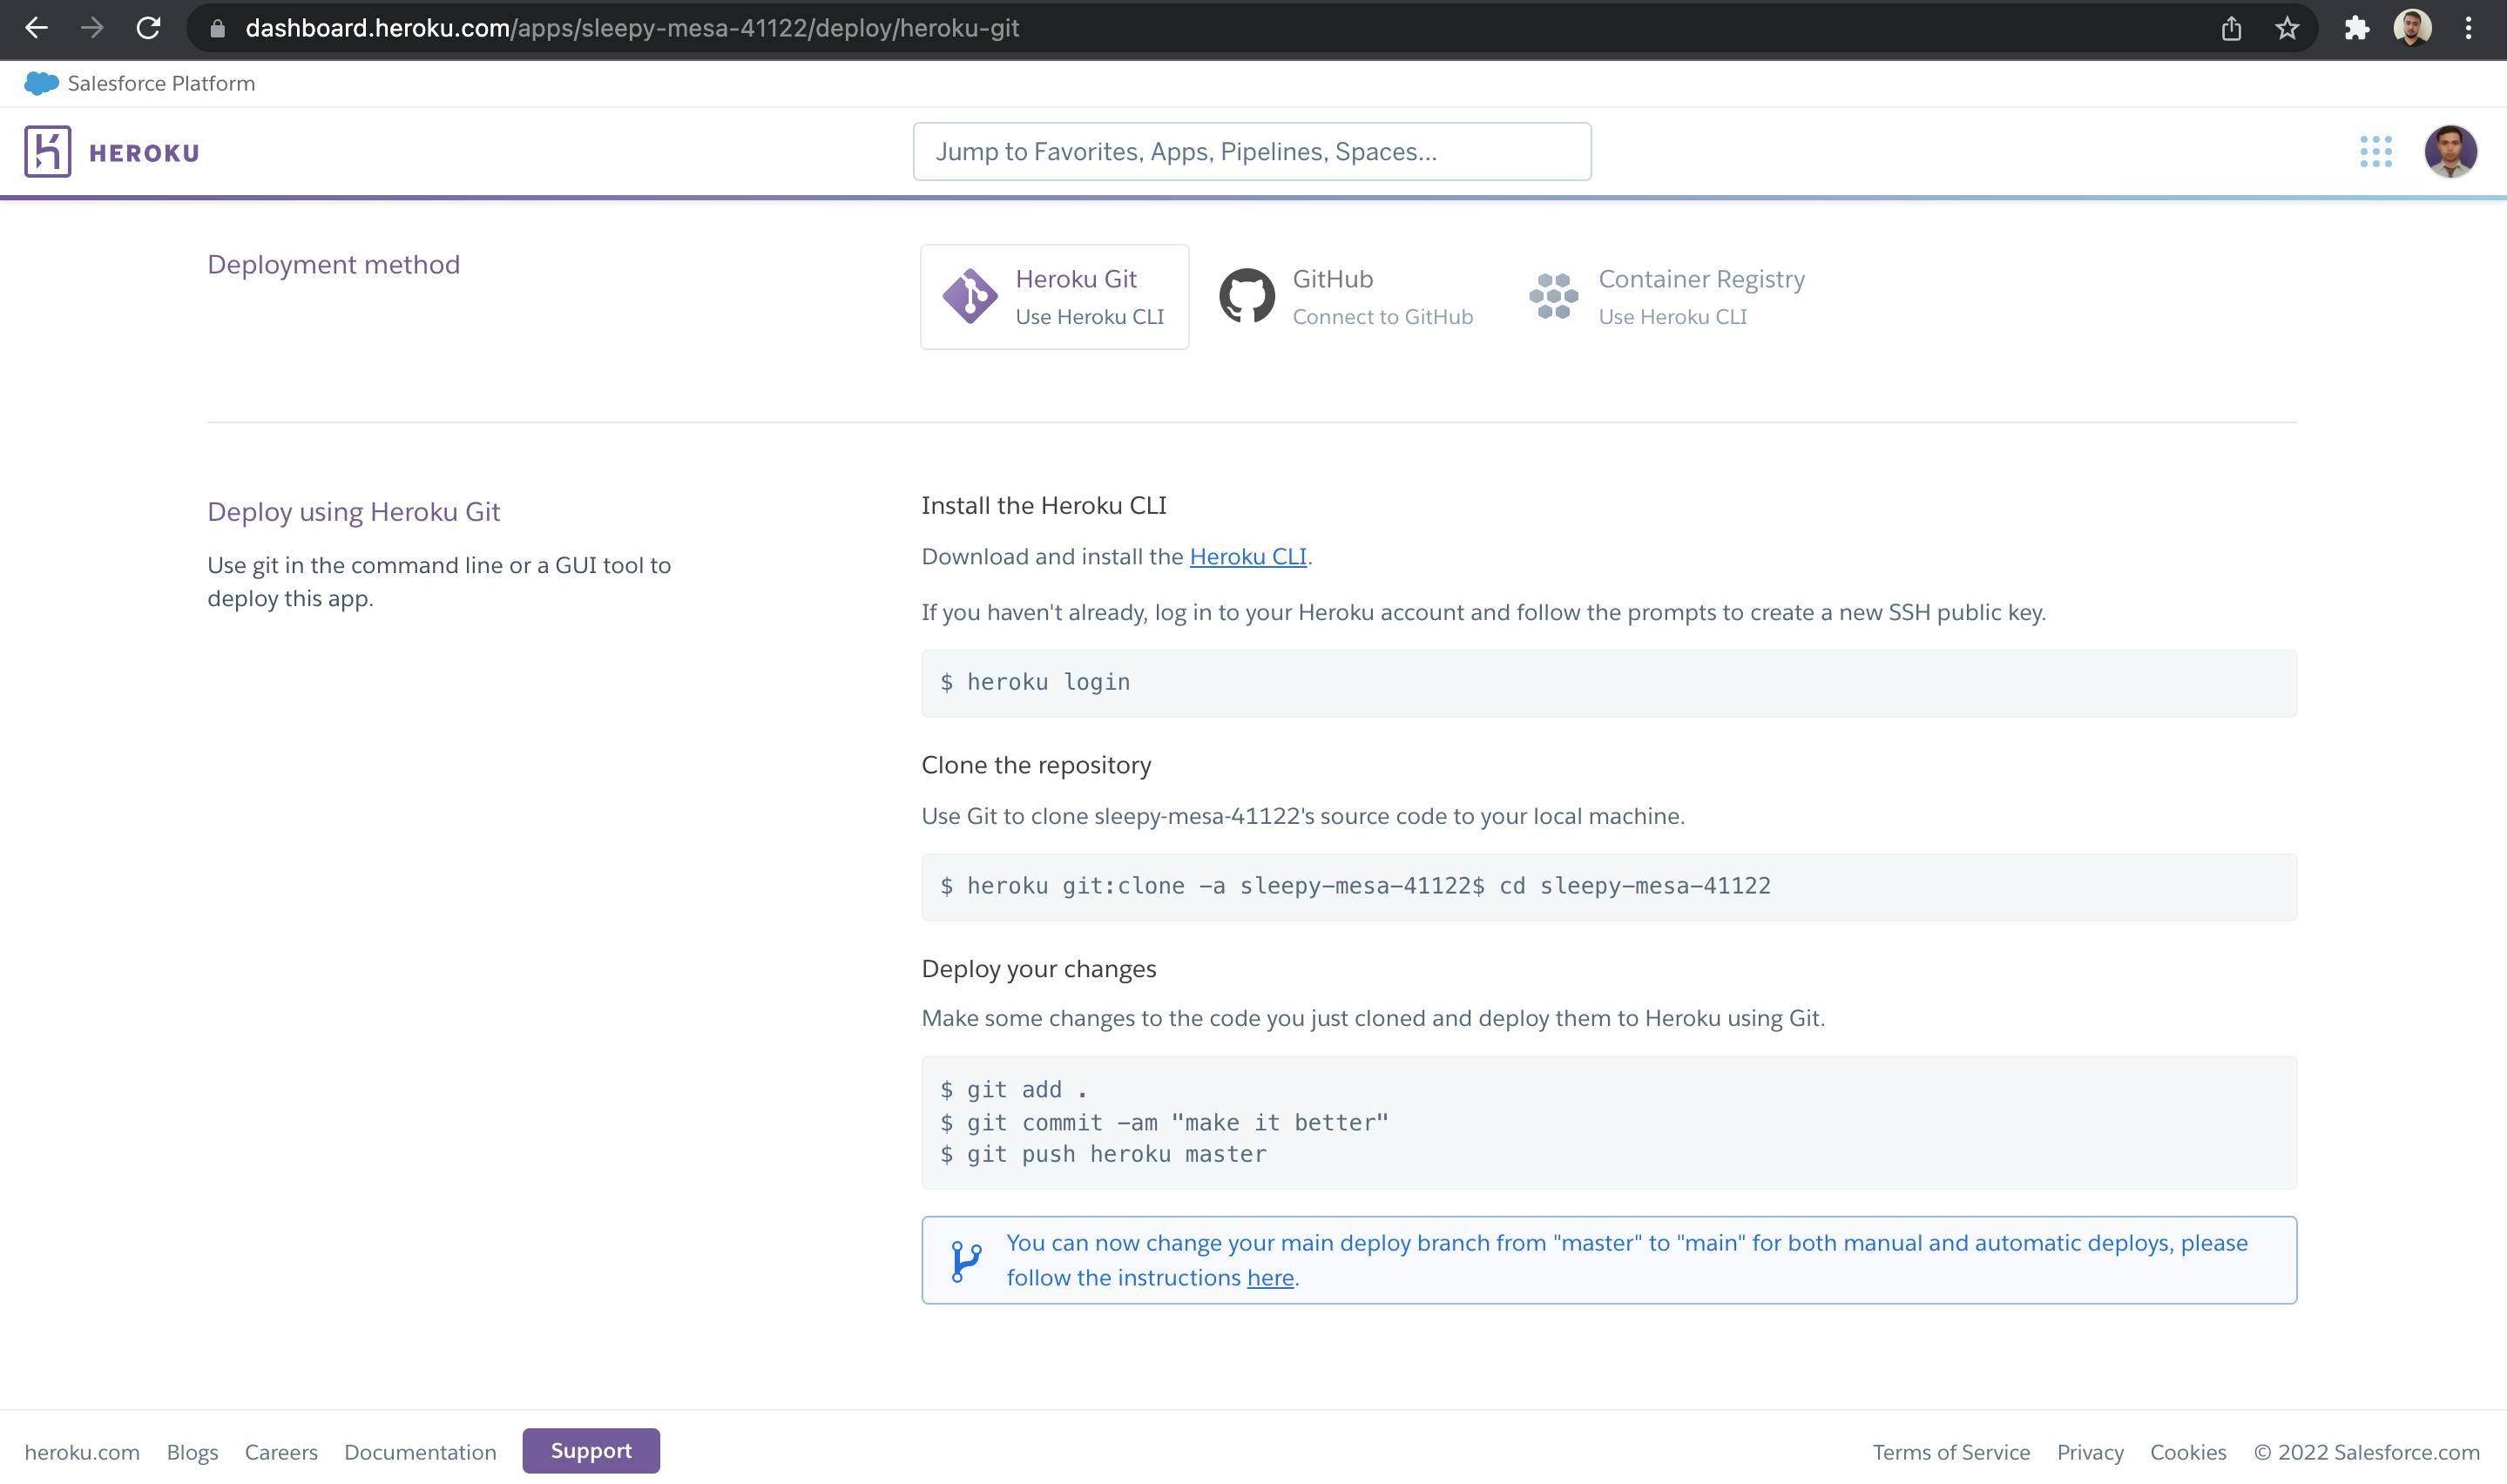
Then, you will need to run the below commands to deploy.
heroku login
heroku git:clone -a sleepy-mesa-41122$ cd sleepy-mesa-41122
git add .
git commit -am "Initial Commit"
git push heroku master
Once you are done with the above step, you will be able to see the deployment base URL of the Heroku, or you can also find it in the Heroku Dashboard under app/ settings.
Cool the finger warmup activity is over and now what we developer live for -Development right 🤝🤝.
Let’s start the App Development👏🏻😎
We will now proceed with the development of the chat app and integrate the Pusher chat APIs. We will clone the Pusher Android chat app repository instead of building from scratch.
git clone https://github.com/6vedant/PusherStipopDemo.git
Open the project in the Android Studio and clean/ rebuild the app module. We will discuss the classes which are used in the app one by one.
CreateRoomActivity:
Launcher activity responsible for the creation of the chat room where the participants can chat using their username.
So let’s declare two EditText for entering the room name and the user name.
@BindView(R.id.edt_room_name)
EditText edt_room_name;
@BindView(R.id.edt_user_name) EditText edt_user_name;
On button click , it will redirect to the ChatActivity screen and will pass the user_name and chat_room_name as the parameters bundled with the intent.
@OnClick(R.id.btn_enter)
void btnEnterClick(){
   String chat_room_name=edt_room_name.getText().toString();
   String user_name=edt_user_name.getText().toString();

   if (TextUtils.isEmpty(chat_room_name)){
       showToastMessage("Enter a chat room name");
       return;
   }

   if (TextUtils.isEmpty(user_name)){
       showToastMessage("Enter a username");
       return;
   }

   enterRoom(chat_room_name,user_name);
}

private void enterRoom(String chat_room_name, String user_name) {
   Intent intent=new Intent(this,ChatActivity.class);
   intent.putExtra(Constants.CHAT_ROOM_NAME_EXTRA,chat_room_name);
intent.putExtra(Constants.USER_NAME_EXTRA,user_name);
   startActivity(intent);
}
ChatActivity:
This screen will present the chat room for participants to chat in a specific group/room. So let’s define an input-box to enter the message and a button to send the message.
Also, RecyclerView will be used to display a list of the messages which are exchanged between the participants.
@BindView(R.id.edt_chat_message)
EditText edt_chat_message;
@BindView(R.id.fab_send_message)
FloatingActionButton fab_send_message;
@BindView(R.id.chat_recycler_view)
RecyclerView chat_recycler_view;
@BindView(R.id.progress)
ProgressBar progress;
ChatRecyclerAdapter is basic viewholder and the adapter class that will display the messages as the list and will set the same to the RecyclerView.
chatRecyclerAdapter=new ChatRecyclerAdapter(this,messageList,username);
chat_recycler_view.setLayoutManager(new LinearLayoutManager(this,LinearLayoutManager.VERTICAL,false));
chat_recycler_view.setItemAnimator(new DefaultItemAnimator());
chat_recycler_view.setAdapter(chatRecyclerAdapter);
Lets begin the main course 🥗🍱 now by integrating the Chat APIs🌟
We have already created the Chat APIs, so now it's time to integrate the same into the Android Chat App.
MessageObject:
We will start by creating a model class for the Message object, which will contain the attributes like the message text and the user name of the string datatype.
public class Message implements Parcelable {
   private String message;
   private String username;

   public Message() {
   }

   public Message(String message, String username) {
       this.message = message;
       this.username = username;
   }
}
APIService:
In this class, sendMessage() method is declared which will accept the room_id and the message object as the parameter to invoke the API which we declared above in our backend.
public interface APIService {

   @POST("messages/{room}")
   Call<ServerResponse> sendMessage(@Path("room") String room,
                                    @Body Message message);
}
Constants:
The URL is to be pasted in the BASE_URL, after the deployment of the node backend app to Heroku.
public static final String BASE_URL = "https://sleepy-mesa-41122.herokuapp.com/"; //paste here: heroku url
ChatActivity:
Let’s navigate to the ChatActivity once again and establish the Pusher connection using PusherOptions() and pass the cluster and API key as suggested in the below snippet.
//Pusher Connection
PusherOptions options = new PusherOptions();
options.setCluster("eu");
Pusher pusher = new Pusher("5a78ac20c7997388e791", options);

channel = pusher.subscribe(chat_room_name);
channel.bind("new_message", subscriptionEventListener);

pusher.connect();
The most important method is the sendMessage() which accepts the message string as the input parameter. It internally calls the sendMessage POST API and handles the API failure and successful response scenarios.
private void sendMessage(final String message) {
   showProgress();

   Retrofit.Builder builder =
           new Retrofit.Builder()
                   .baseUrl(Constants.BASE_URL)
                   .addConverterFactory(GsonConverterFactory.create());

   APIService apiService= builder.build().create(APIService.class);
   Call<ServerResponse> call=apiService.sendMessage(chat_room_name,
           new Message(message,username));
   call.enqueue(new Callback<ServerResponse>() {
       @Override
       public void onResponse(Call<ServerResponse> call, Response<ServerResponse> response) {
     if (response.body()!=null){
               if (response.body().getSuccess()!=null) {
                   hideProgress();
                   edt_chat_message.setText("");
               }
           }
       }

       @Override
       public void onFailure(Call<ServerResponse> call, Throwable t) {
           hideProgress();
       }
   });
Upon the successful API call, it appends the message to the chat list, and the chat_recycler_view is always scrolled to the latest chat message.
Wow, That went smooth like a Messi freekick right ⚽🥅.
public void showMessageAdded(Message message){
   chatRecyclerAdapter.addMessage(message);
   chat_recycler_view.scrollToPosition((chatRecyclerAdapter.getItemCount()-1));
}
Not to mention now its time to run the Android Chat app
As we are now done with the integration of the pusher chat APIs , let’s run the android app to check if the chat functionality is working fine or not.
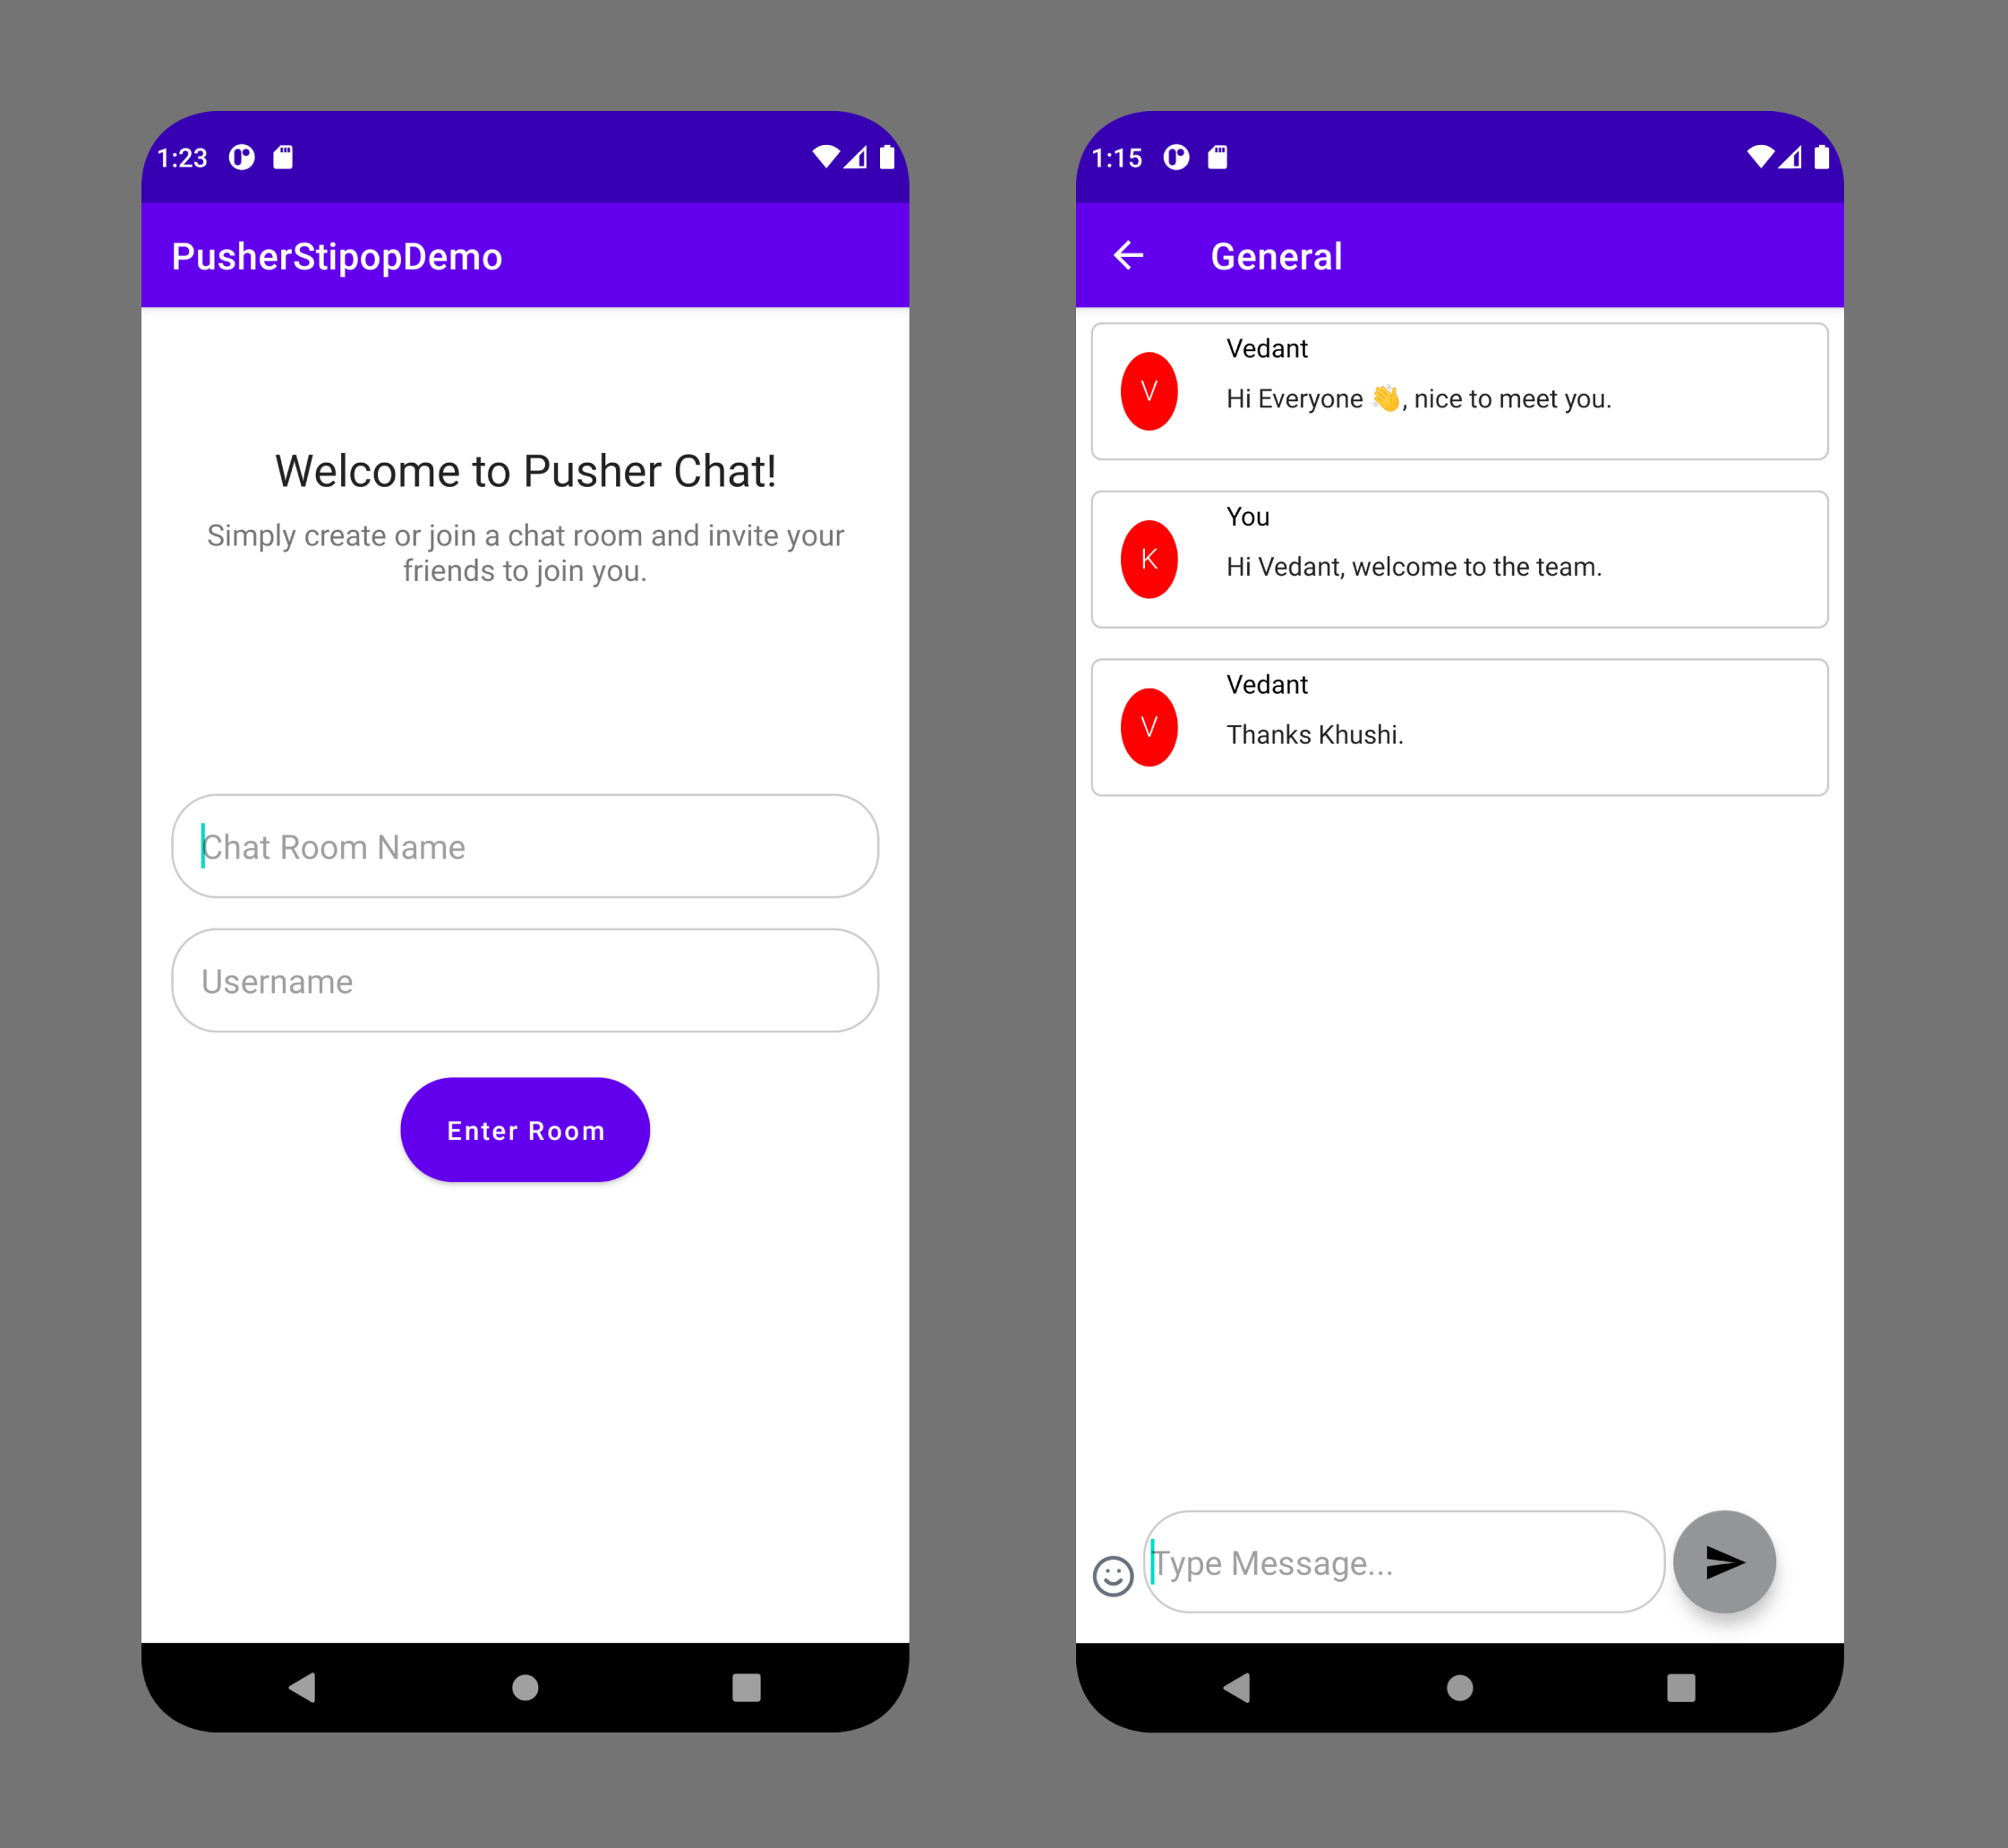
Awesome...Super ✌. We are able to successfully run the Pusher chat app🥳. We can send a few messages which use Pusher APIs internally to trigger the messages. Now, we will continue with the Stipop stickers integration into our chat app.
Get Stipop API Config
We need the API Key for Stipop SDK integration to our existing Twilio Kotlin app. For that Login to Stipop Dashboard, and create a free account.
After successful sign-in create an application with App Name, Region, etc given as the below image.You will now be able to see the API Key and download the Stipop.json file under android settings as shown below.
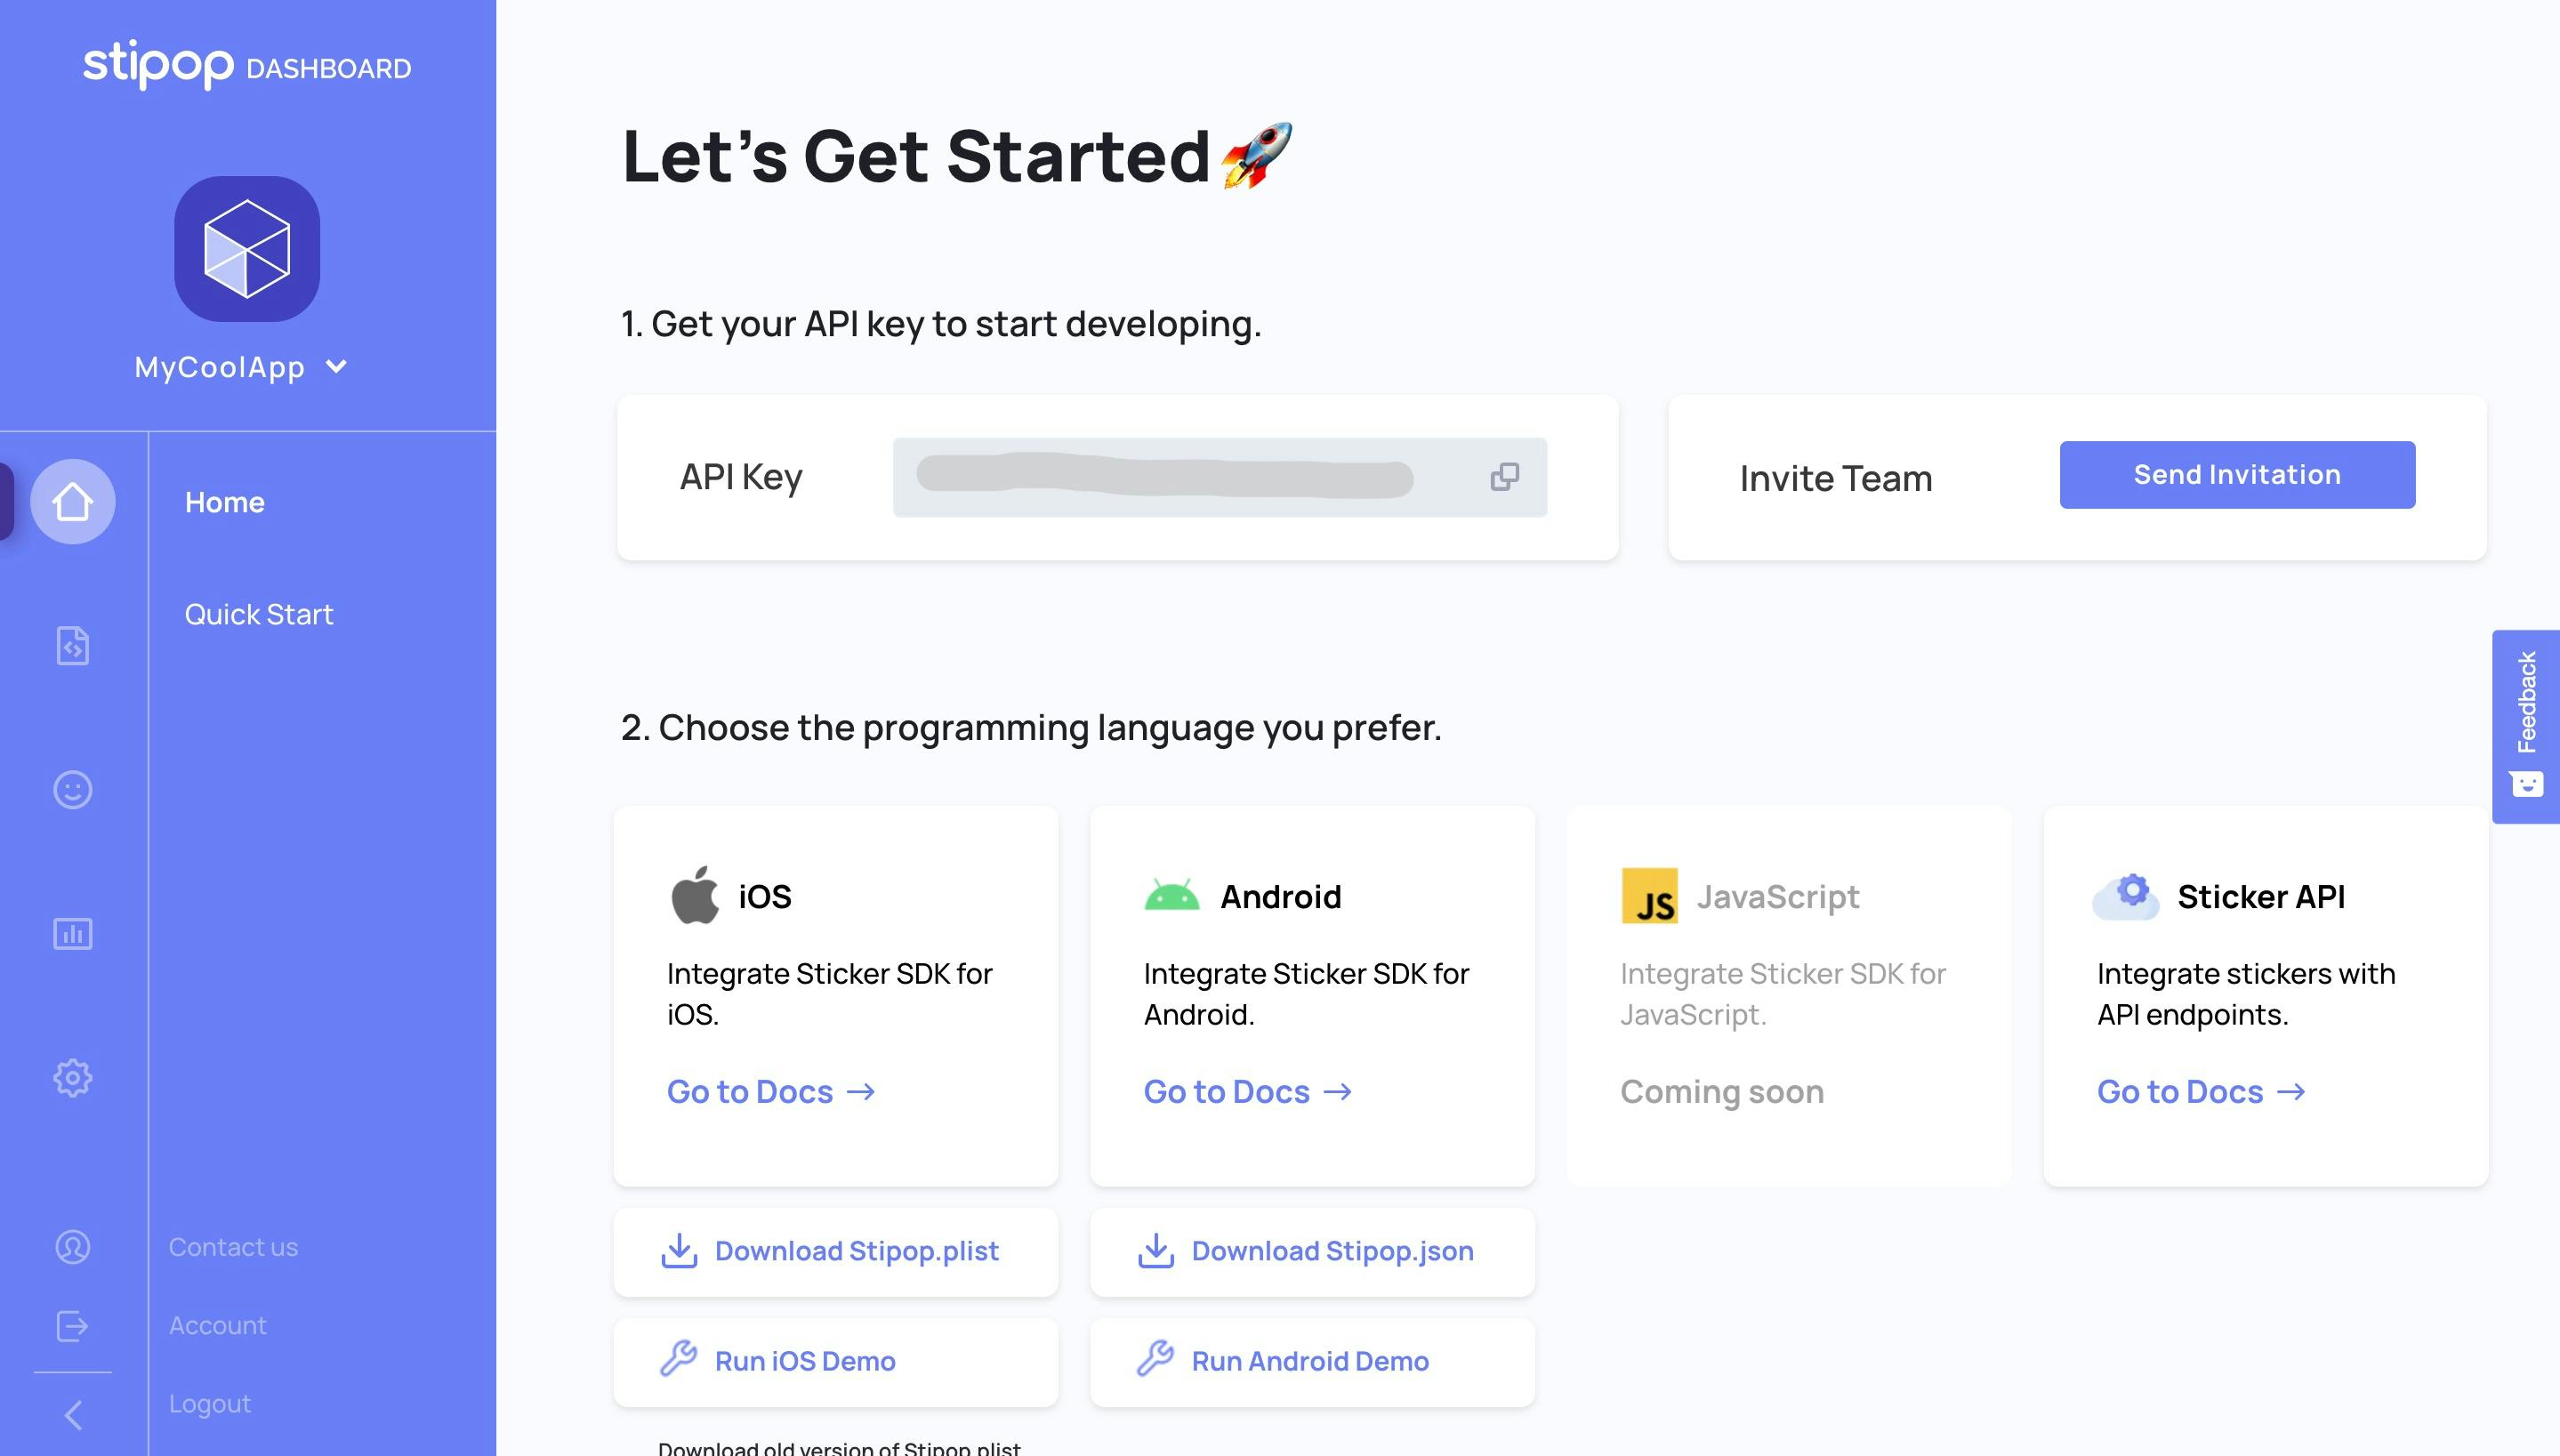
You need to place the Stipop.json file under app/ src/ main/ assets/ Stipop.json .
Ok okay, its time to give a little rest to your fingers now. You have done some awesome job so far right.
Once the break is over dear members lets focus again .
Let's begin with Integrating the Stipop SDK-
We will now proceed with the Stipop Android SDK integration for the Pusher chat app 😊😉 Navigate to the build.gradle file (project level) and add the below dependency.
allprojects {
  repositories {
    ...
    maven { url 'https://jitpack.io' }
  }
}
Again add the below dependency in the build.gradle file ( app level).
dependencies {
  ...
  implementation 'com.github.stipop-development:stipop-android-sdk:0.0.6'
}
We have already included the Stipop.json file in the assets folder right so now sync and rebuild the project so that the Stipop classes will be accessible.
Next step is to create GlobalApplication.kt class, and initialize the Stipop config.
class GlobalApplication : Application() {
   companion object {
       lateinit var instance: GlobalApplication
           private set
   }
   override fun onCreate() {
       super.onCreate()
       instance = this
       Stipop.configure(this)
   }
   fun context(): Context = applicationContext
}
Add the below line to the AndroidManifest.xml file and add the replace theme line.
<application
   android:name=".GlobalApplication"
   android:allowBackup="true"
   android:icon="@mipmap/ic_launcher"
   android:label="@string/app_name"
   android:roundIcon="@mipmap/ic_launcher_round"
   android:supportsRtl="true"
   android:theme="@style/Theme.PusherStipopDemo"
   tools:replace="android:theme">
We need to add the StipopImageButton which will upon click, open the Stipop Keyboard to select a sticker. Navigate to the activity_chat.xml layout and add the below snippet.
<io.stipop.extend.StipopImageView
   android:id="@+id/stipopIV"
   android:layout_width="24dp"
   android:layout_height="24dp"
   android:layout_marginLeft="8dp"
   android:layout_marginRight="4dp"
   android:layout_gravity="center"
   android:src="@mipmap/ic_sticker_normal"
   app:layout_constraintBottom_toBottomOf="parent"
   app:layout_constraintHorizontal_bias="0.0"
   app:layout_constraintLeft_toLeftOf="@+id/edt_chat_message"
   app:layout_constraintRight_toRightOf="parent" />
Now, navigate again to the ChatActivity.class and implement the StipopDelegate interface. Inside the onCreate method, initialize the Stipop instance and open the sticker keyboard on the click of the Stipop image button.
stipopIM = (StipopImageView) findViewById(R.id.stipopIV);
Stipop.Companion.connect(this, stipopIM, "1234", "en", "US", this);

stipopIM.setOnClickListener(new View.OnClickListener() {
   @Override
   public void onClick(View v) {
       Stipop.Companion.showKeyboard();
   }
});
After implementing the StipopDelegate interface, we need to override the methods canDownload() and onStickerSelected().
As soon the user selects and click on any of the sticker from the Sticker keyboard, sendMessage() method will be called and will pass the sticker url as the message body. It will be handled inside the ChatRecyclerAdapter class.
@Override
public boolean canDownload(@NotNull SPPackage spPackage) {
   return true;
}

@Override
public boolean onStickerSelected(@NotNull SPSticker spSticker) {
   sendMessage(spSticker.getStickerImg());
   return true;
}
ChatRecyclerAdapter:
Inside the onBindViewHolder method of the recyclerview adapter -
When the message is of the Stipop sticker url type, it will load the sticker image using the Glide image loading library.
@Override
public void onBindViewHolder(ChatViewHolder holder, int position) {
   Message message = messageList.get(position);

   if (message.getMessage().contains("stipop")) {
       holder.stickerIV.setVisibility(View.VISIBLE);
         Glide.with(context).load(Uri.parse(message.getMessage())).into(holder.stickerIV);
       holder.txt_chat_message.setVisibility(View.GONE);

   } else {
       holder.txt_chat_message.setVisibility(View.VISIBLE);
       holder.stickerIV.setVisibility(View.GONE);
       holder.txt_chat_message.setText(message.getMessage());
   }
   if (message.getUsername().equals(m_username))
       holder.txt_username.setText("You");
else
       holder.txt_username.setText(message.getUsername());
}
We have come to the end of this adventure and its time to see the magic .Say the magic word “Alohomora” like Hermoine did and rather than using wand we will just 👇🏻👇🏻
Run the App
We are now done with the coding. Let’s run the app once again and test if Stipop stickers are working as expected.
Remember to say the word like Hermoine not like Ron Weasley because he always messes up 😅😅
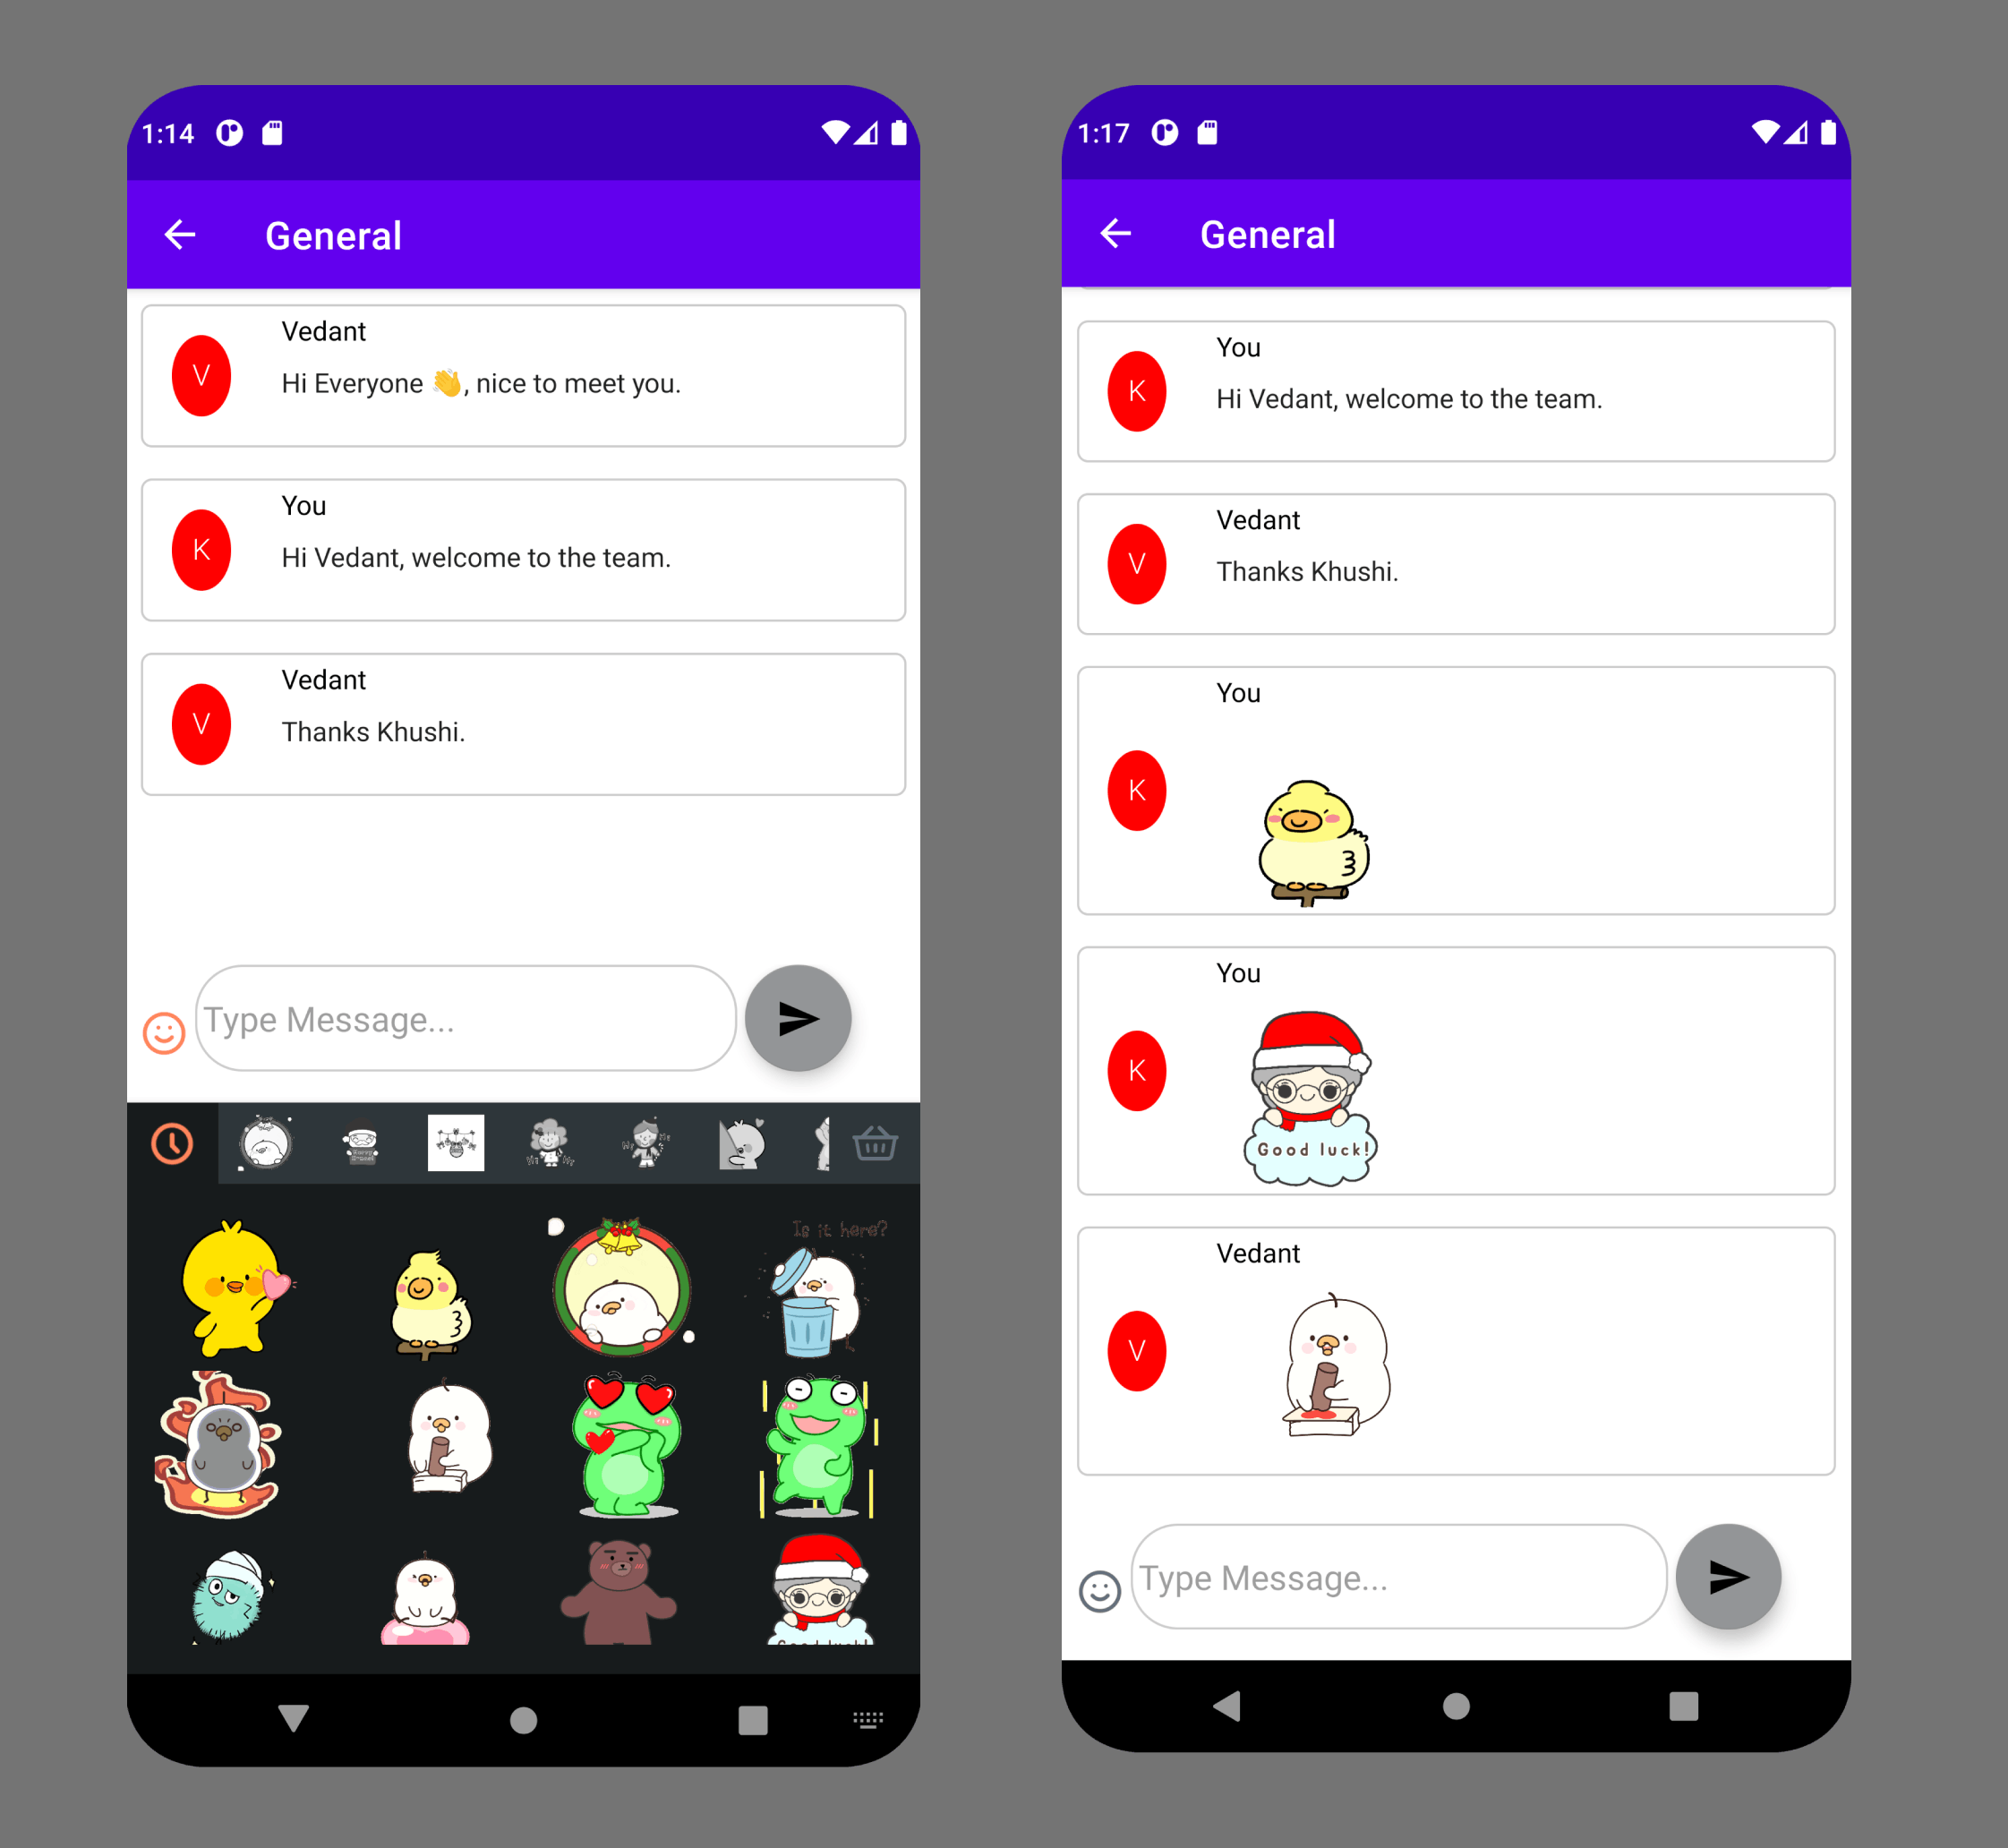
Fantastic🎊 We have integrated Stipop Android SDK into our Pusher chat app successfully. Like always Integrating Stipop SDK was easy as it has an inbuilt Sticker Keyboard and Sticker search option. I highly recommend to try the Stipop SDK/ API if you are building a chat/social+ application.
Have a great 🌹 Valentine day everybody. Remember Valentine will come and go but code stays forever😜.
With love and regards...😎 HAPPY CODING !!
🎅🏼 About Vedant
Vedant Jha is a full-stack developer and a technical writer at Stipop. Have a question about this article? Contact Vedant here.