

How to integrate stickers into Android app with Stipop SDK
Why stickers? Why not! With that said, in this blog, I will show how to integrate free stickers and make any Android app fun.

Integrate stickers into your app with Stipop API and SDK.
Hi everyone 👋
I'm Manuel, and I build things. On the rare occasion when I don't build those things, I help others build them.
This is my first blog here, and I thought of starting with something that everyone used at least once. Simple tools are great because we would have to make a lot of stuff from scratch without them. They are true time and effort savers, and therefore worth writing a blog about.
We will set up and use the basic functionalities of Stipop's UI SDK. Stipop is a library of free chat stickers, and the SDK will help us to get in. We will choose between two sticker views, and in the end you will see how stickers look when built into an app.
This time we will work with Android, but if you are interested in iOS, you can check the docs here.
First things first
Here is our ingredient list:
- Kotlin
- Android + (API level 26) or higher
- Java 7 or higher
- Support androidx only
- Gradle 3.4.0 or higher
Now let's get some prep done
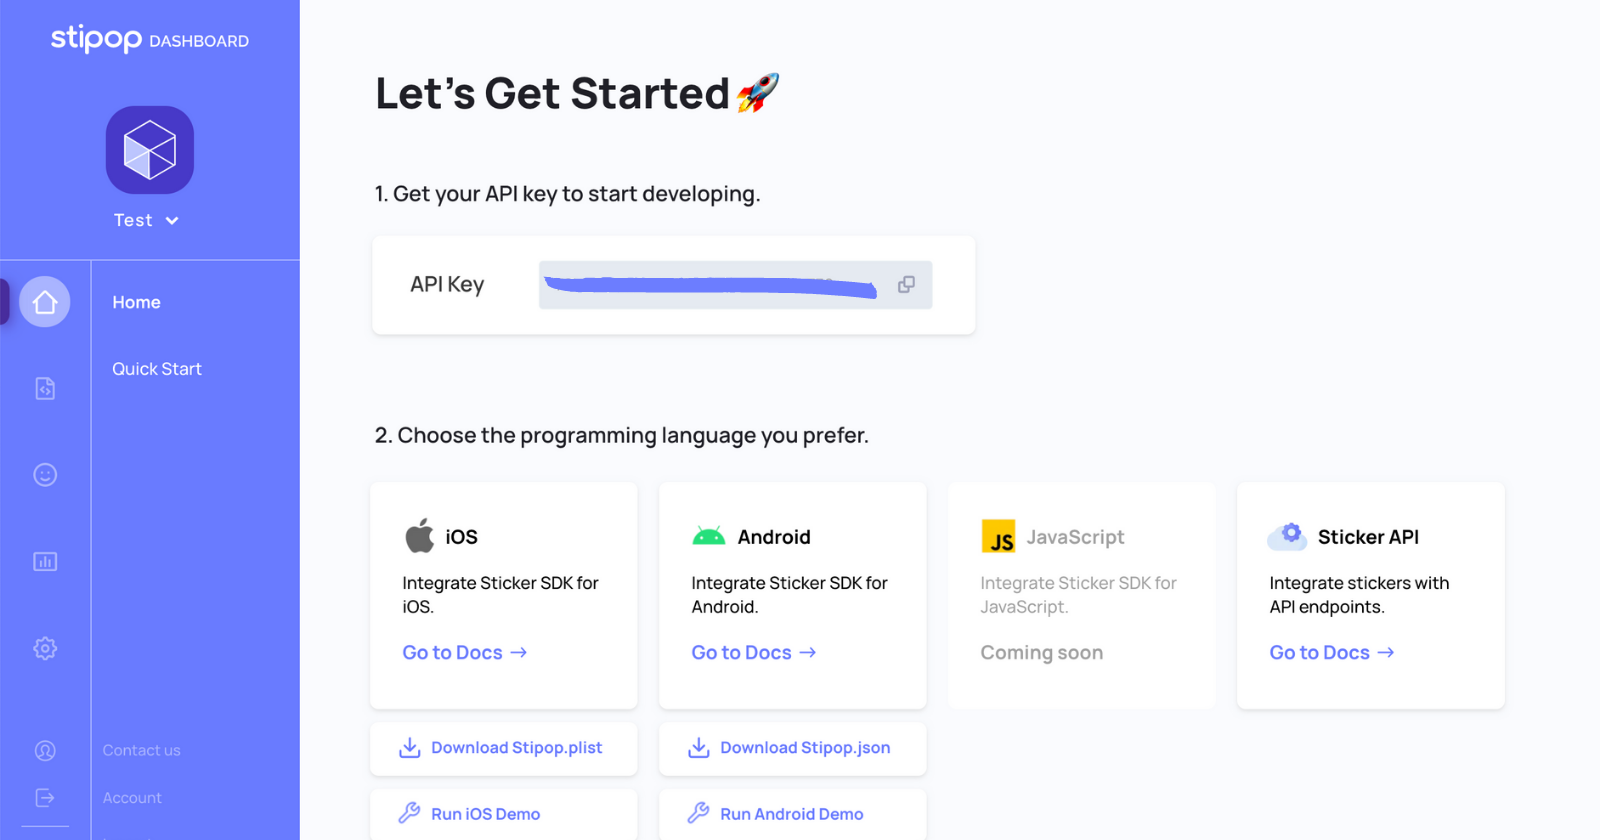
Let’s go over to Stipop Dashboard and create an account. Then we write down a few lines about our app, and once in, we get API Key together with the Stipop.json file. We need both to make the SDK work correctly.
Now it is time to head to Android Studio.
We are going to start with creating a new project for phone and tablet. Then we choose either basic or empty activity. Make sure to select Kotlin, plus check that the Minimum SDK is set to anything above API level 26 for the demo to work.
Ok, the prep is pretty much done. All that's left is to add the repositories and dependencies to our build.gradle files.
Jitpack repository goes to the end of the repositories section of the root build.gradle file.
allprojects {
  repositories {
    ...
    maven { url 'https://jitpack.io' }
  }
}
Stipop SDK Dependancy goes to the end of the dependency section of the app build.gradle file.
dependencies {
  ...
  implementation 'com.github.stipop-development:stipop-android-sdk:0.0.6'
}
Let’s get it started with the Stipop SDK
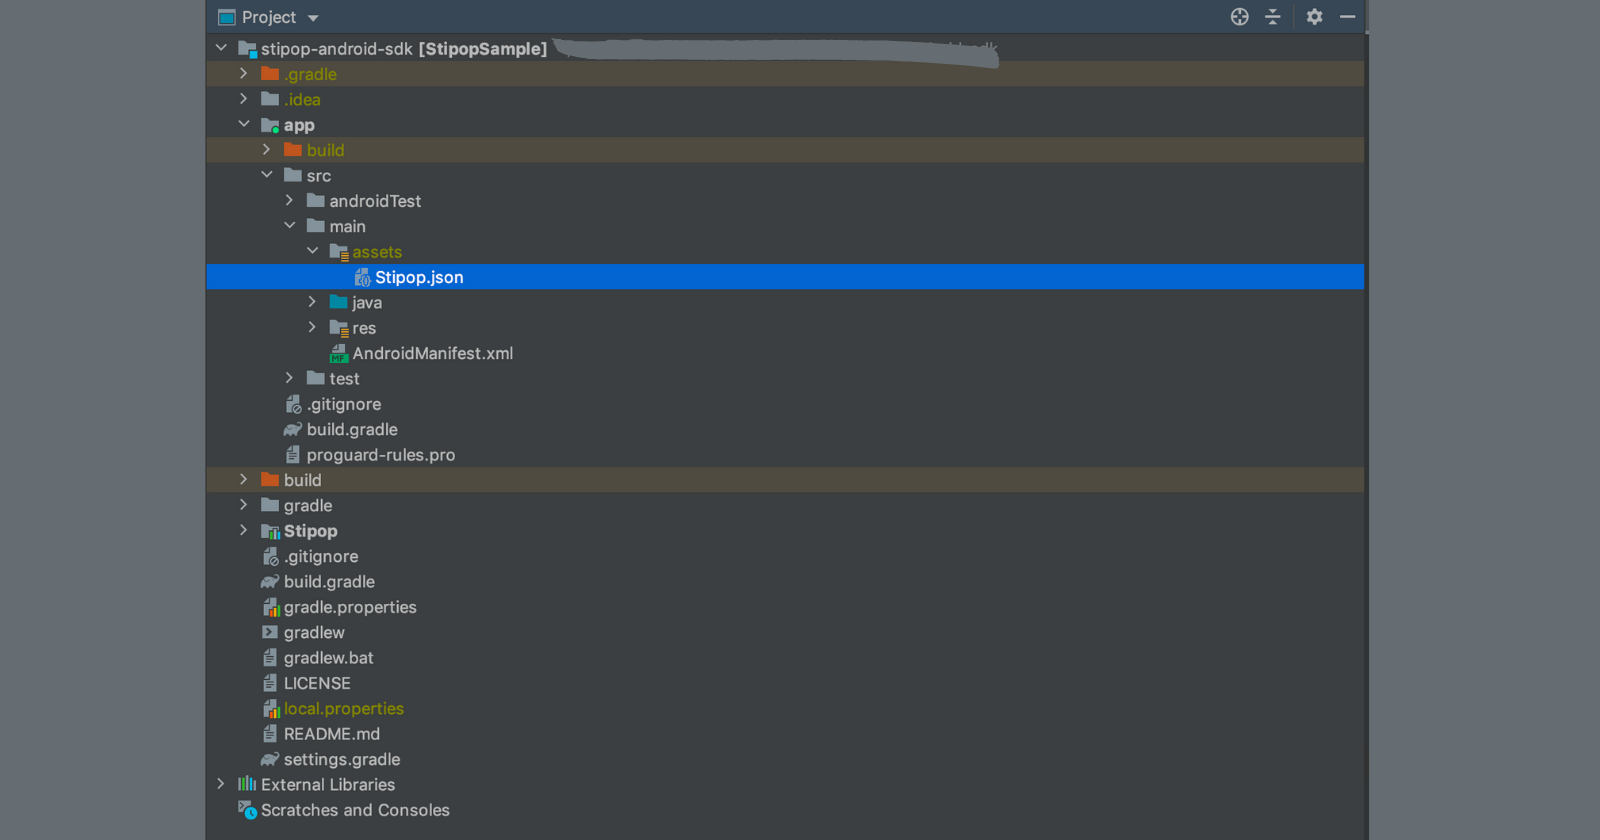
The Stipop.json file that we downloaded, in the beginning, will go inside the "assets" folder, which can be found in app > src > main. If for some reason, the folder is nowhere to be found, you can just create it and put the Stipop.json file inside.
One very important note: Stipop.json contains your API Key, so "keep it secret, keep it safe." If it accidentally gets leaked, you will need to regenerate a new one ASAP.
The next step is to create a GlobalApplication file. To do that, we go to App > src > main > [your package name] > GlobalApplication.kt:
import android.app.Application
import android.content.Context
import io.stipop.Stipop
class GlobalApplication : Application() {
    companion object {
        lateinit var instance: GlobalApplication
            private set
    }
    override fun onCreate() {
        super.onCreate()
        instance = this
        Stipop.configure(this)
    }
    fun context(): Context = applicationContext
}
Now is a good time to check for errors. Let’s build the code and if everything looks about right, the next step will be to modify the AndroidManifest.xml file:
<?xml version="1.0" encoding="utf-8"?>
<manifest xmlns:android="http://schemas.android.com/apk/res/android"
    package="YOUR_PACKAGE"
    xmlns:tools="http://schemas.android.com/tools"
    >
    <application
        android:name=".GlobalApplication"
        android:allowBackup="true"
        android:icon="@mipmap/ic_launcher"
        android:label="@string/app_name"
        android:roundIcon="@mipmap/ic_launcher_round"
        android:supportsRtl="true"
        tools:replace="android:theme">
        <activity
            android:name=".MainActivity"
            android:label="@string/app_name"
        >
            <intent-filter>
                <action android:name="android.intent.action.MAIN" />
                <category android:name="android.intent.category.LAUNCHER" />
            </intent-filter>
        </activity>
    </application>
</manifest>
Here's what we added and changed:
- line 3: your package name
- line 4:
xmlns:tools="http://schemas.android.com/tools" - line 8:
android:name=".GlobalApplication" - line 14:
tools:replace="android:theme"
This file will describe all the essential details about your app. In my case, most of them remain as the default options, except for the ones we have just changed.
The next step is to update activity_main, the file should be located at app > src > main > res > layout:
<?xml version="1.0" encoding="utf-8"?>
<LinearLayout xmlns:android="http://schemas.android.com/apk/res/android"
    xmlns:app="http://schemas.android.com/apk/res-auto"
    xmlns:tools="http://schemas.android.com/tools"
    android:layout_width="match_parent"
    android:layout_height="match_parent"
    android:gravity="bottom"
    android:orientation="vertical">
    <LinearLayout
        android:layout_width="match_parent"
        android:layout_height="0dp"
        android:layout_weight="1"
        >
        <TextView
            android:id="@+id/packageDetailTV"
            android:layout_width="match_parent"
            android:layout_height="wrap_content"
            android:text="packageDetail!"
            android:layout_gravity="center"
            android:gravity="center"/>
    </LinearLayout>
    <LinearLayout
        android:layout_width="match_parent"
        android:layout_height="50dp"
        android:orientation="horizontal"
        android:layout_margin="10dp"
        android:gravity="center_vertical">
        <EditText
            android:id="@+id/chatET"
            android:layout_width="0dp"
            android:layout_height="wrap_content"
            android:layout_weight="1"
            android:text="" />
        <io.stipop.extend.StipopImageView
            android:id="@+id/stipopIV"
            android:layout_width="24dp"
            android:layout_height="24dp"
            android:src="@mipmap/ic_sticker_normal"/>
    </LinearLayout>
</LinearLayout>
Activity_main contains all the information regarding how the UI will look.
Almost there
The final step is to go back to MainActivity and activate Stipop.connect. You can also play around with the parameters by changing the country and language code there. The stickers you will see in the end will be selected according to the criteria you picked.
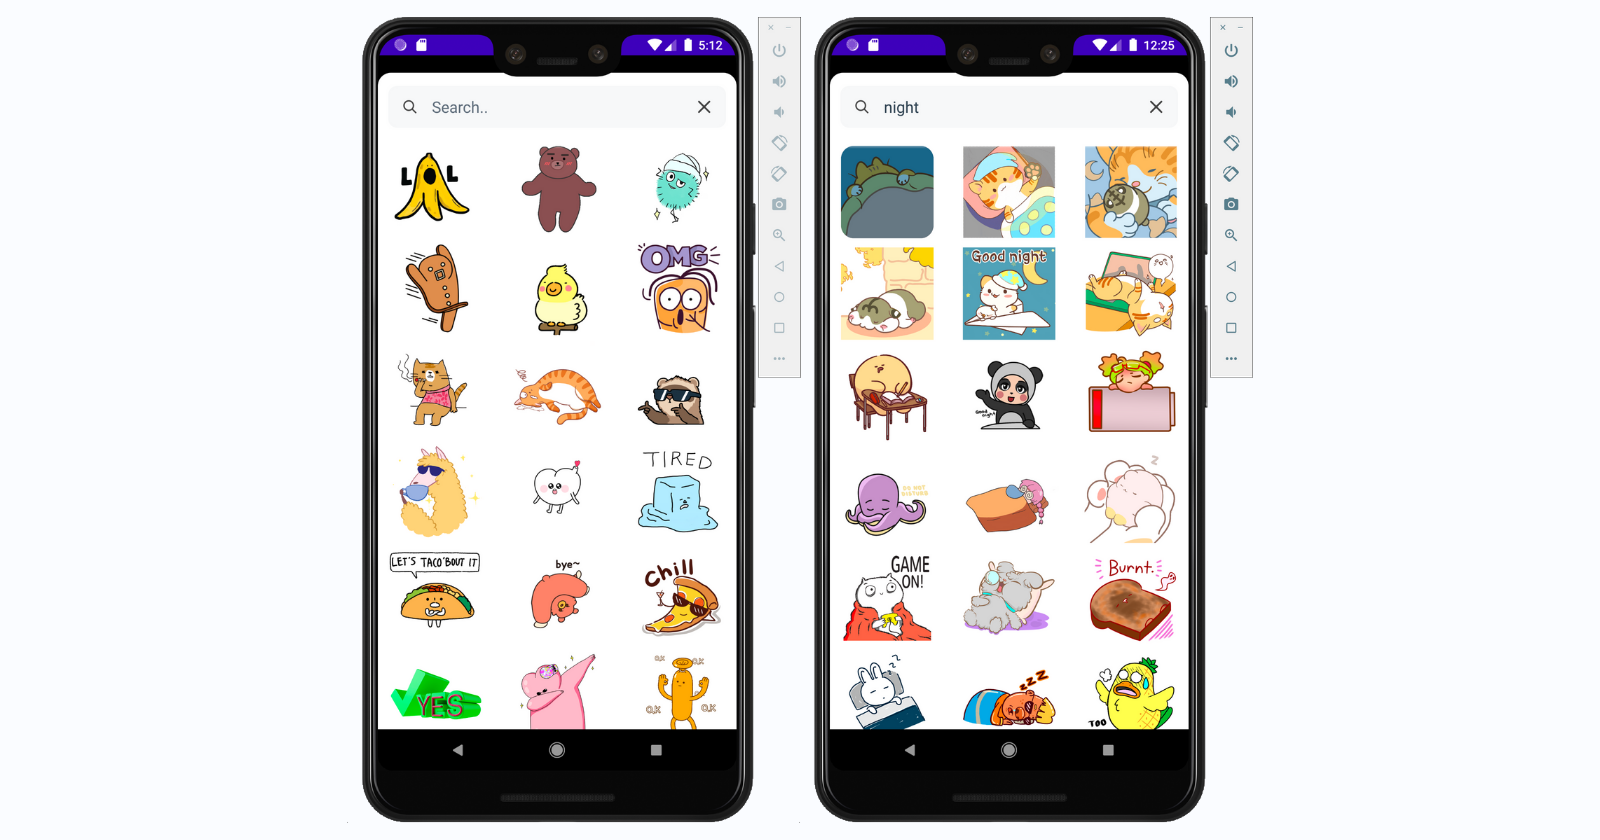
The code we currently have shows the "search view". This is a search engine for the sticker library. It works just like any other search engine: you enter a keyword and get all the stickers available for this keyword.
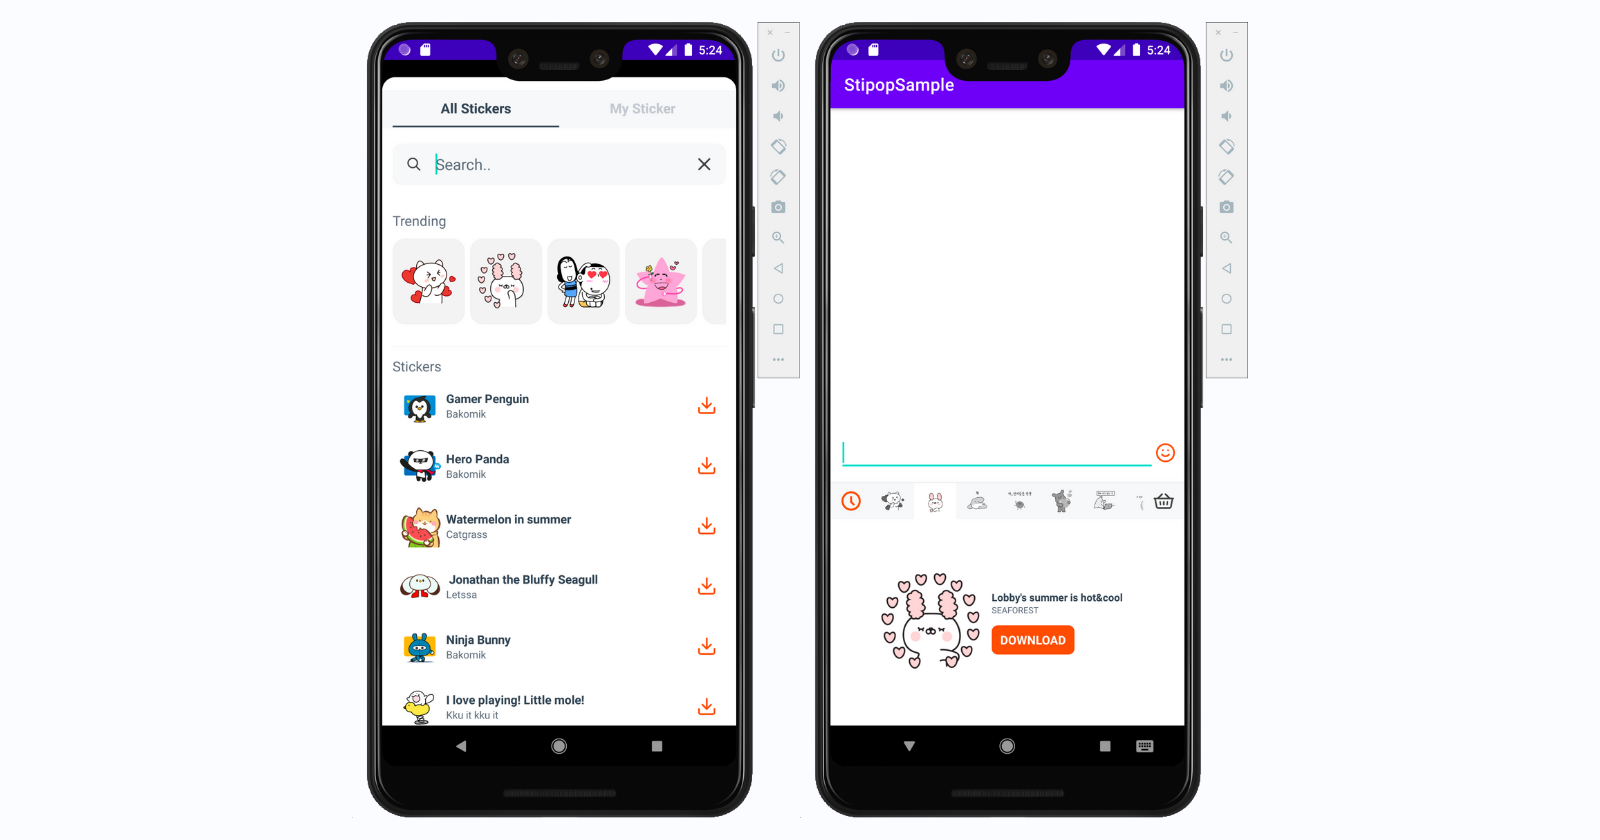
You can choose between this view and the "sticker picker" that looks like a well-organized library of stickers where you can download those that you like. If you want to go with the "sticker picker" view, just change Stipop.showSearch() to Stipop.showKeyboard(), and in the end, it will look like this:
Note: you can only activate one view within one app.
import android.os.Bundle
import androidx.appcompat.app.AppCompatActivity
import io.stipop.Stipop
import io.stipop.StipopDelegate
import io.stipop.extend.StipopImageView
import io.stipop.model.SPPackage
import io.stipop.model.SPSticker
class MainActivity : AppCompatActivity(), StipopDelegate {
  override fun onCreate(savedInstanceState: Bundle?) {
    super.onCreate(savedInstanceState)
    setContentView(R.layout.activity_main)

    val stipopIV = findViewById<StipopImageView>(R.id.stipopIV)

    Stipop.connect(this, stipopIV, "1234", "en", "US", this)

    stipopIV.setOnClickListener {
      Stipop.showSearch()
    }
  }
  override fun onStickerSelected(sticker: SPSticker) {
    print(sticker)
  }
  override fun canDownload(spPackage: SPPackage): Boolean {
      print(spPackage)
      return true
  }
}
Mission accomplished!
All that's left to do is to rebuild the project. If everything was done correctly you'll be able to see the SDK implementation as shown above. From here, you can build further, as well as use the SDK with your own app.
Thanks for reading and happy building! 😎
👽 About Manuel
Manuel Roque is a front-end developer and a technical writer at Stipop. Have a question about this article? Contact Manuel here.


