

Integrating Stipop Stickers into IMG.LY (Image/Video editor)SDK

Integrate stickers into your app with Stipop API and SDK.
Hello everyone we are back again with the 2nd blog of the month🎉🎊
I hope you all are doing well. Today’s article is going to be very fun and exciting because this is the first we are trying integration with a video editor app- IMG.LY.
👉🏻IMG.LY is a powerful SDK to edit photos and videos effectively. It provides the PhotoEditor, VideoEditor and CreativeEditor cross-platform SDKs and supports almost all the mobile and web tech stacks. It’s a client-side SDK for a faster and easy integration which is backed by the Node.js server.
To check the details please follow the below guidelines 👇🏻 where we will be showing how we integrated the VideoEditor IMG.LY SDK into the Android app and then to the Stipop stickers for a smooth video editing experience. So, let the fun begin✨✨
Prerequisites
Android SDK (API 19 or higher)
IMG.LY VideoEditor SDK
Java 8
AndroidX
Gradle Plugin version 3.5.4 or higher
Not that much right! Cool 🤘🏻
Let’s Start Coding😉
We will now start the development of the Android video editor app using IMG.LY’s VideoEditor SDK. Navigate to the Android Studio and create a blank project. You can name the project whatever you want (for example StipopImglyDemo) and set the language to Java/Kotlin.
After that, navigate to the build.gradle(project) and add the below dependencies for Stipop and IMG.LY SDKs.
buildscript {
   repositories {
       google()
       mavenCentral()
       maven { url 'https://jitpack.io' }
       maven { url 'https://artifactory.img.ly/artifactory/imgly' }
   }
   dependencies {
       classpath "com.android.tools.build:gradle:7.0.3"
       classpath "org.jetbrains.kotlin:kotlin-gradle-plugin:1.5.20"
       classpath 'ly.img.android.pesdk:plugin:9.1.1'
   }
}
We need to add the Stipop library to the build.gradle(app) and also declare the settings for the VideoEditor SDK.
plugins {
   id 'com.android.application'
   id 'kotlin-android'
   id 'ly.img.android.sdk'
}

// Configure the img.ly plugin
imglyConfig {
   vesdk {
       enabled true
       licensePath null
   }
   // Define the modules you are need
   modules {
       // Add all the UI modules you are need
       include 'ui:video-trim'
       include 'ui:core'
       include 'ui:text'
       include 'ui:focus'
       include 'ui:frame'
       include 'ui:brush'
       include 'ui:filter'
       include 'ui:sticker'
       include 'ui:overlay'
       include 'ui:transform'
       include 'ui:adjustment'
       include 'ui:text-design'

       // Add the serializer if you need
       include 'backend:serializer'

       // Add asset packs if you need
       include 'assets:font-basic'
       include 'assets:frame-basic'
       include 'assets:filter-basic'
       include 'assets:overlay-basic'
       include 'assets:sticker-shapes'
       include 'assets:sticker-emoticons'
   }
}
android {
  compileSdk 31

   defaultConfig {
       applicationId "com.vedant.stipopimglydemo"
       minSdk 23
       targetSdk 31
       versionCode 1
       versionName "1.0"

       testInstrumentationRunner "androidx.test.runner.AndroidJUnitRunner"
   }
 buildTypes {
       release {
           minifyEnabled false
           proguardFiles getDefaultProguardFile('proguard-android-optimize.txt'), 'proguard-rules.pro'
       }
   }
   compileOptions {
       sourceCompatibility JavaVersion.VERSION_1_8
       targetCompatibility JavaVersion.VERSION_1_8
   }
   kotlinOptions {
       jvmTarget = '1.8'
   }
}

dependencies {
   implementation 'androidx.core:core-ktx:1.7.0'
   implementation 'androidx.appcompat:appcompat:1.4.1'
   implementation 'com.google.android.material:material:1.5.0'
   implementation 'com.github.stipop-development:stipop-android-sdk:0.0.6'
   implementation 'androidx.constraintlayout:constraintlayout:2.1.3'
   testImplementation 'junit:junit:4.+'
   androidTestImplementation 'androidx.test.ext:junit:1.1.3'
   androidTestImplementation 'androidx.test.espresso:espresso-core:3.4.0'
}
You have done adding the above snippet right Nice 👍✨ now please sync and rebuild the project.
Get Stipop API Config
Like always we need the API Key for Stipop SDK integration to our existing IMG.LY Kotlin app. Login to Stipop Dashboard, and create a free account. After successful sign-in, create an application with App Name, Region, etc.
You can now see the API Key. Please download the Stipop.json file under android settings as shown below 👇🏻
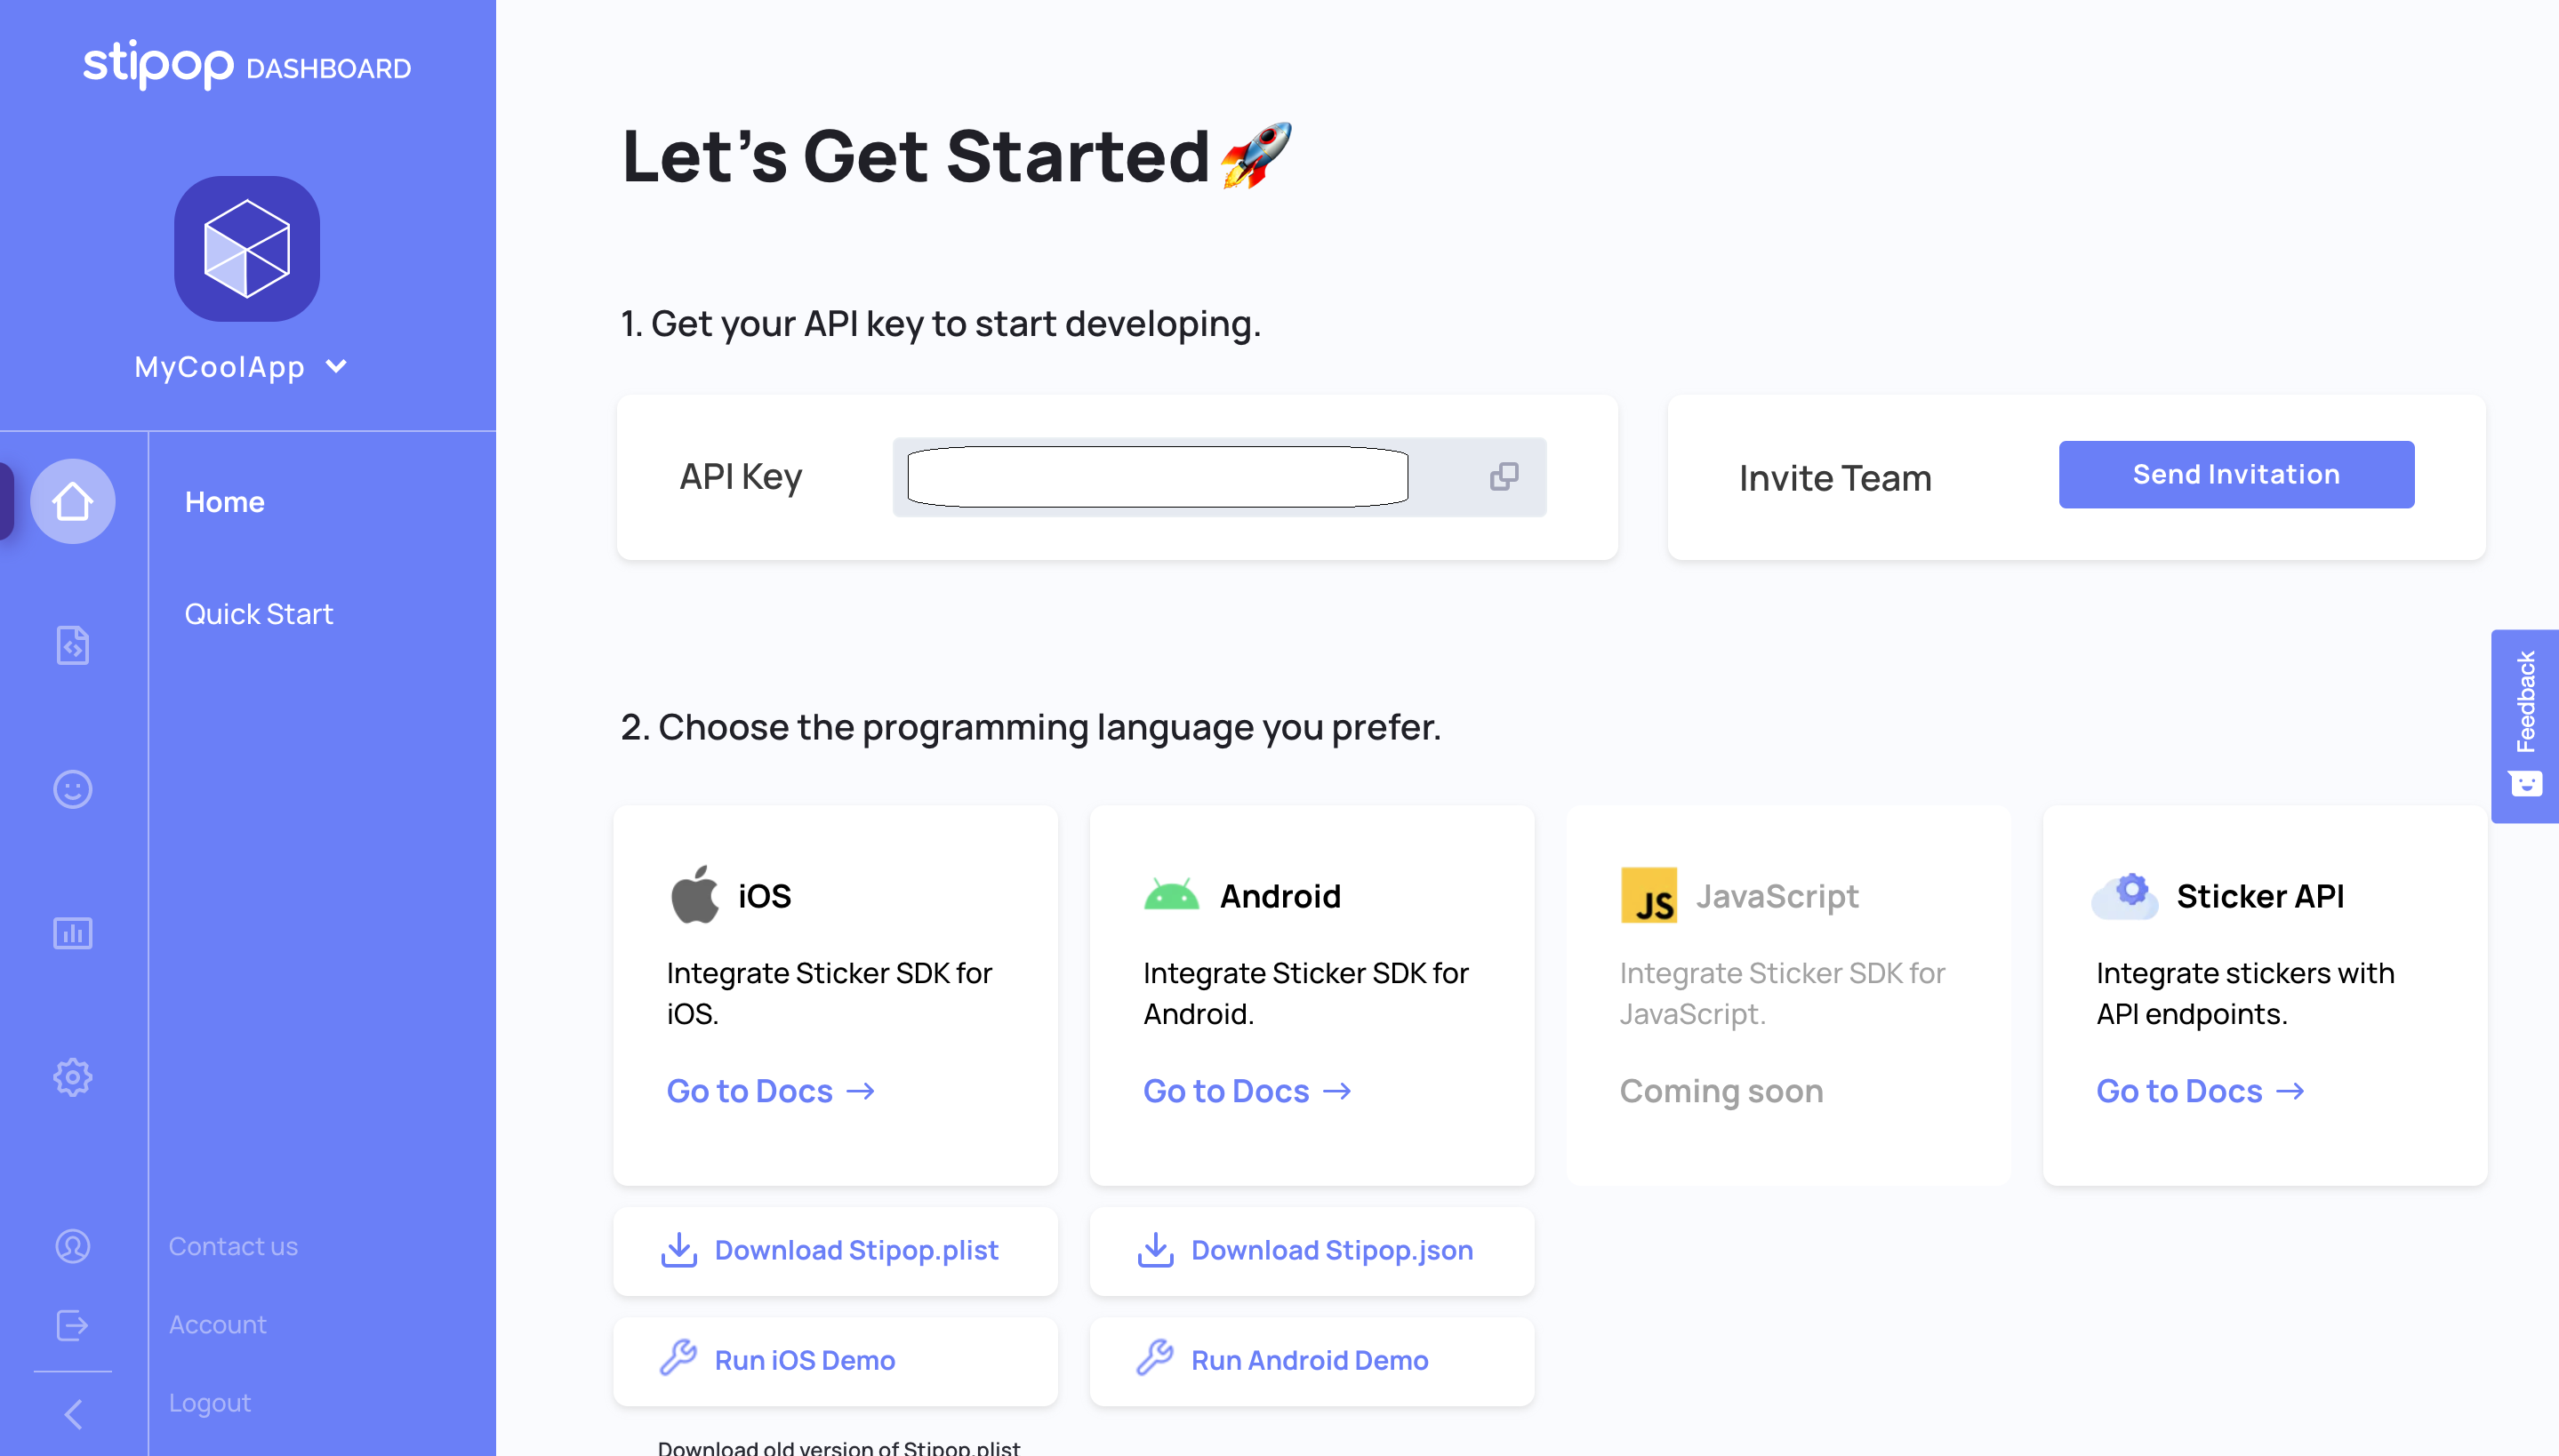
Paste the Stipop.json file inside the app/src/main/assets folder and rebuild the project.
After the successful sync of the project, create a class GlobalApplication.kt and add the configuration for the Stipop.
import android.app.Application
import io.stipop.Stipop

class MyApplication : Application() {
   override fun onCreate() {
       super.onCreate()
       Stipop.configure(this)
   }
 }
Next , navigate to the AndroidManifest.xml file and add the below code snippet to include the Application name and tools:replace attribute.
<application
   android:name=".GlobalApplication"
   android:allowBackup="true"
   android:icon="@mipmap/ic_launcher"
   android:label="@string/app_name"
   android:roundIcon="@mipmap/ic_launcher_round"
   android:supportsRtl="true"
   android:theme="@style/Theme.AppTheme"
   tools:replace="android:theme">
Design the Layout
Navigate to the activity_main.xml and add the below layout code to declare the Stipop-ImageButton and a button which will upon the click, open the video for IMG.ly video editor.
<?xml version="1.0" encoding="utf-8"?>
<RelativeLayout xmlns:android="http://schemas.android.com/apk/res/android"
   xmlns:app="http://schemas.android.com/apk/res-auto"
   xmlns:tools="http://schemas.android.com/tools"
   android:layout_width="match_parent"
   android:layout_height="match_parent">

   <androidx.appcompat.widget.LinearLayoutCompat
       android:layout_width="match_parent"
       android:layout_height="wrap_content"
       android:orientation="vertical">

       <LinearLayout
           android:layout_width="match_parent"
           android:layout_height="wrap_content"
           android:layout_margin="8dp"
           android:orientation="vertical">
<Button
               android:id="@+id/button_imgly_gallery"
               android:layout_width="match_parent"
               android:layout_height="wrap_content"
               android:layout_gravity="center"
               android:gravity="center"
               android:padding="8dp"
               android:text="Click here to select video"
               android:textColor="@color/white" />
       </LinearLayout>

       <TextView
           android:layout_width="match_parent"
           android:layout_height="wrap_content"
           android:layout_gravity="center"
           android:gravity="center"
           android:padding="8dp"
           android:text="Choose Stipop Stickers"
           android:textColor="@color/black" />

       <io.stipop.extend.StipopImageView
           android:id="@+id/stipopImg"
           android:layout_width="96dp"
           android:layout_height="96dp"
           android:layout_margin="22dp"
           android:adjustViewBounds="true"
           android:src="@mipmap/ic_sticker_normal" />
   </androidx.appcompat.widget.LinearLayoutCompat>

</RelativeLayout>
Still with me right 😀 or you are gone for a coffee/tea break. ☕😅 Okay, let’s focus again 🔍
Now, attach the VideoEditor Frame
Let’s start with the integration of VideoEditor Frame to the android app. Navigate to the MainActivity.java class and define the class variables.
public static int VESDK_RESULT = 1;
public static int GALLERY_RESULT = 2;

StipopImageView stipopImageView;

private static ArrayList<SPSticker> stipopStickers = new ArrayList<>();
We will now initialize the layout widgets inside the onCreate method and attach the onClick listeners for the gallery and stipop buttons.
stipopStickers.clear();

stipopImageView = (StipopImageView) findViewById(R.id.stipopImg);
Stipop.Companion.connect(this, stipopImageView, "1234", "en", "US", this);

findViewById(R.id.button_imgly_gallery).setOnClickListener(new View.OnClickListener() {
   @Override
   public void onClick(View v) {
       openSystemGalleryToSelectAVideo();
   }
});

findViewById(R.id.stipopImg).setOnClickListener(new View.OnClickListener() {
   @Override
   public void onClick(View v) {
       Stipop.Companion.showKeyboard();
   }
});
Let’s declare the method to open the video using the Intent.ACTION_PICK flag.
private void openSystemGalleryToSelectAVideo() {
   Intent intent = new Intent(Intent.ACTION_PICK);
   intent.setDataAndType(MediaStore.Video.Media.EXTERNAL_CONTENT_URI, "video/*");
   try {
       startActivityForResult(intent, GALLERY_RESULT);
   } catch (ActivityNotFoundException exception) {
       Toast.makeText(
               this,
               "No Gallery APP installed",
        Toast.LENGTH_LONG
       ).show();
   }
}
The GALLERY_RESULT flag will handle the intent-result of picking the video from files and will open the video in the editor. VESDK_RESULT flag will be called when there have been changes done on the editor and the resulting video result needs to be handled.
@Override
protected void onActivityResult(int requestCode, int resultCode, Intent intent) {
   super.onActivityResult(requestCode, resultCode, intent);

   if (resultCode == RESULT_OK && requestCode == GALLERY_RESULT) {
       // Open Editor with some uri in this case with a video selected from the system gallery.
       Uri selectedVideo = intent.getData();
       openEditor(selectedVideo);

   } else if (resultCode == RESULT_OK && requestCode == VESDK_RESULT) {
       // Editor has saved a video.
       EditorSDKResult data = new EditorSDKResult(intent);

       Uri resultURI = data.getResultUri();
       Uri sourceURI = data.getSourceUri();

       // OPTIONAL: read the latest state to save it as a serialisation
       SettingsList lastState = data.getSettingsList();
       try {
           new IMGLYFileWriter(lastState).writeJson(new File(
                   getExternalFilesDir(null),
                   "serialisationReadyToReadWithPESDKFileReader.json"
           ));
       } catch (IOException e) {
           e.printStackTrace();
       }

   } else if (resultCode == RESULT_CANCELED && requestCode == VESDK_RESULT) {
       // Editor was canceled
       EditorSDKResult data = new EditorSDKResult(intent);

       Uri sourceURI = data.getSourceUri();
   }
}
VideoEditorSettingsList will initialize the settings list for the Video Editor. VideoEditorBuilder class will process the VESDK_RESULT for the edited video result.
private void openEditor(Uri inputSource) {

   VideoEditorSettingsList settingsList;
   if (android.os.Build.VERSION.SDK_INT >= android.os.Build.VERSION_CODES.JELLY_BEAN_MR2) {
       settingsList = createVesdkSettingsList();
   } else {
       Toast.makeText(this, "Video support needs Android 4.3", Toast.LENGTH_LONG).show();
       return;
   }

   // Set input video
   settingsList.getSettingsModel(LoadSettings.class).setSource(inputSource);

   // Set output video
   settingsList.getSettingsModel(VideoEditorSaveSettings.class).setOutputToGallery(Environment.DIRECTORY_DCIM);

   new VideoEditorBuilder(this)
           .setSettingsList(settingsList)
           .startActivityForResult(this, VESDK_RESULT);

}
VideoEditorSettingsList class is used to set the filter, font, frame, sticker etc to the input video. We will only call the method addStipopStickerToImgly() and pass the settingsList as an input parameter in this method.
@RequiresApi(api = Build.VERSION_CODES.JELLY_BEAN_MR2)
private VideoEditorSettingsList createVesdkSettingsList() {
   // Create an empty new SettingsList and apply the changes on this reference.
   VideoEditorSettingsList settingsList = new VideoEditorSettingsList();

   settingsList.getSettingsModel(UiConfigFilter.class).setFilterList(
           FilterPackBasic.getFilterPack()
   );

   settingsList.getSettingsModel(UiConfigText.class).setFontList(
     FontPackBasic.getFontPack()
   );

   settingsList.getSettingsModel(UiConfigFrame.class).setFrameList(
           FramePackBasic.getFramePack()
   );

   settingsList.getSettingsModel(UiConfigOverlay.class).setOverlayList(
           OverlayPackBasic.getOverlayPack()
   );

   addStipopStickersToImgly(settingsList);

   return settingsList;
}
This is the important method that actually inserts the Stipop stickers into the new sticker asset compatible with the IMG.LY sticker renderer ViewHolderclass.
public void addStipopStickersToImgly(SettingsList settingsList) {

   AssetConfig assetConfig = settingsList.getConfig();

   List<ImageStickerItem> imageStickerItems = new ArrayList<>();
   imageStickerItems.clear();

   UiConfigSticker uiConfigSticker = settingsList.getSettingsModel(UiConfigSticker.class);

   for (SPSticker spSticker : stipopStickers) {
       assetConfig.addAsset(new ImageStickerAsset("stipop" + spSticker.getStickerId(), ImageSource.create(Uri.parse(spSticker.getStickerImg()))));


       ImageStickerItem imageStickerItem = new ImageStickerItem("stipop" + spSticker.getStickerId(), spSticker.getKeyword(), ImageSource.create(Uri.parse(spSticker.getStickerImg())));
              imageStickerItems.add(imageStickerItem);
   }

StickerCategoryItem stickerCategoryItem = new StickerCategoryItem("stipop", R.string.app_name, ImageSource.create(R.mipmap.ic_sticker_normal), imageStickerItems);
 settingsList.getSettingsModel(UiConfigSticker.class).setStickerLists(
           StickerPackEmoticons.getStickerCategory(),
           StickerPackShapes.getStickerCategory(),
           stickerCategoryItem
   );
}
@Override
public boolean canDownload(@NonNull SPPackage spPackage) {
   return true;
}

@Override
public boolean onStickerSelected(@NonNull SPSticker spSticker) {
   stipopStickers.add(spSticker);
   return true;
}
Alrighty alrighty then, are you ready to check the fruit of your labor. Here we go 🤞🏻 Run the App 🥳
That’s all folks that's it, you just have to do this much coding and after that, you can run the app to test. If everything is working fine. You will see the Stipop image button on the first app screen which will open the Sticker keyboard upon the click of the button.
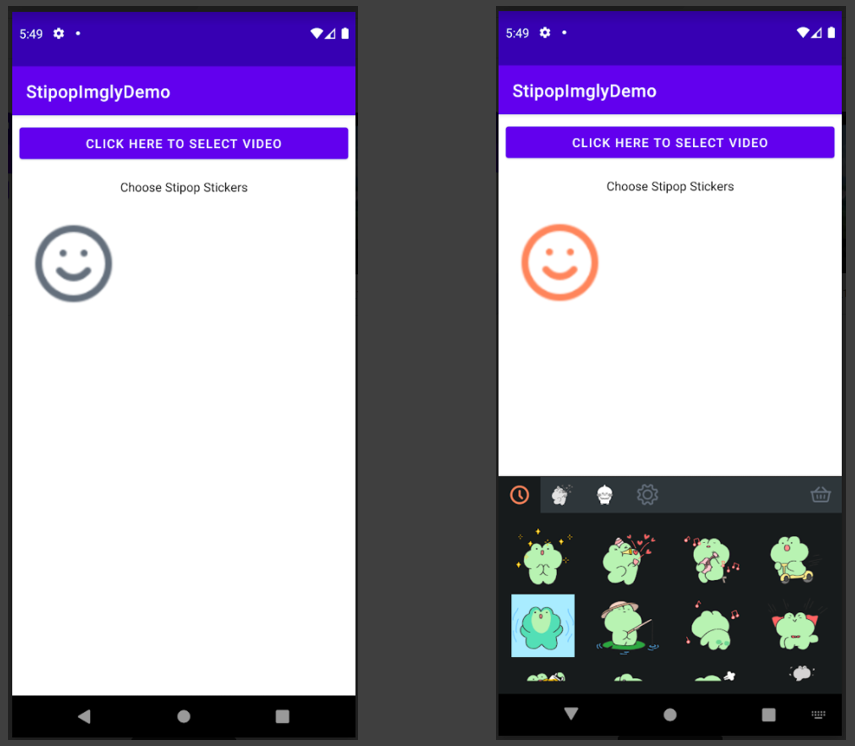
Choose a video from Gallery and it will open the VideoEditor frame with various options like Filter, Text, Sticker etc.
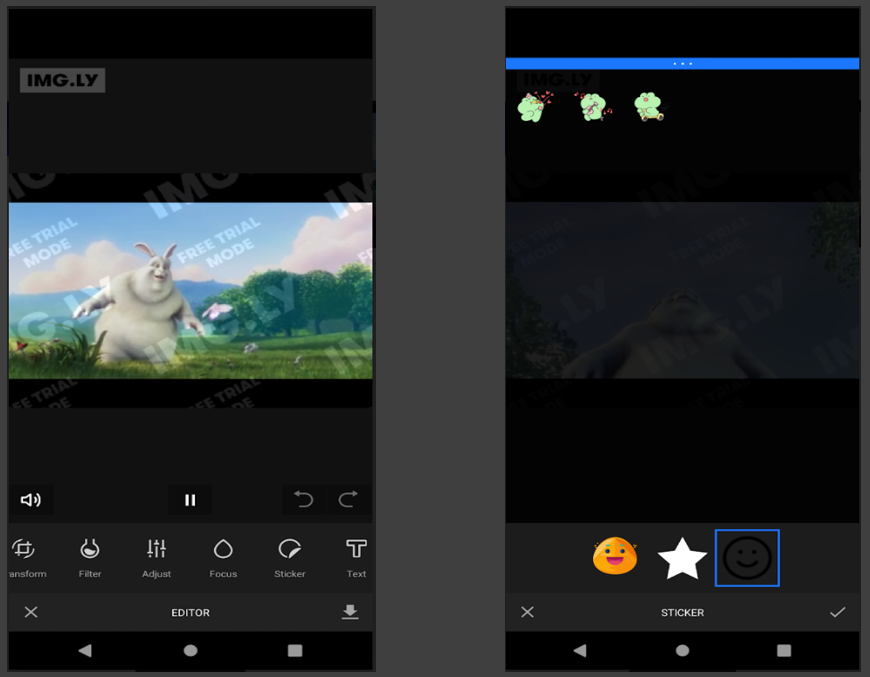
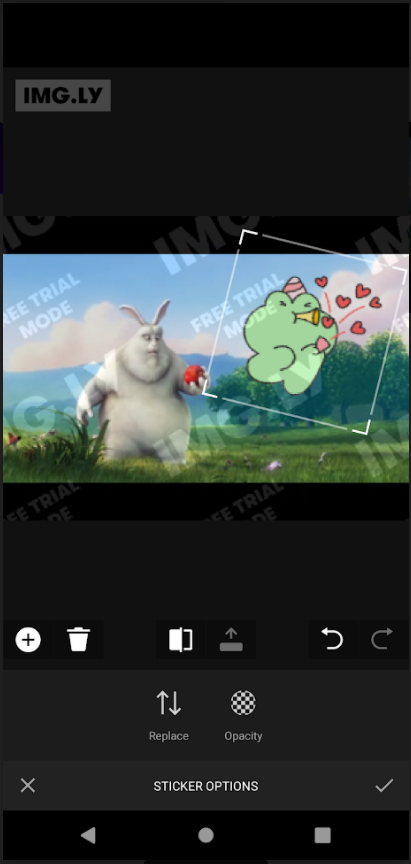
You should be able to see the Stipop stickers in the IMG.LY sticker frame which can be further customized in terms of size, orientation etc. Wow, these stickers look amazing. 😍
Awesome !! We have successfully integrated the Stipop Android SDK with the IMG.LY VideoEditor app.
Integrating Stipop SDK is easy as it comes with an inbuilt Sticker Keyboard and Sticker Search option, which make it a great addition for any video or image editing app.You should also try the Stipop SDK/ API if you are building a frontend app that uses stickers.
Thanks for reading everyone and lets get ready for the Feb. with new joy and excitement. 🙌🏻🙌🏻
🎅🏼 About Vedant
Vedant Jha is a full-stack developer and a technical writer at Stipop. Have a question about this article? Contact Vedant here.


