

Integrating Stipop Stickers with Stream Flutter App
We are back again with a new interesting development. Scroll down for the first blog of the year !!

Integrate stickers into your app with Stipop API and SDK.
Finally, here we go !!
Hello everyone! This is Vedant again and today we are going to continue exploring more about the Stream chat SDK.
Stream is one of the most popular chat SDKs with real-time chat messaging, is highly feature-rich, provides an awesome chat experience with overall in-app conversion, engagement, and retention of the end-users. Its API can support up to 5 million+ concurrent connections in a single chat channel without any issues and is easy to integrate with any of the tech stacks like Kotlin, Swift, Flutter, etc to name a few.
In this article, we are going to integrate the Stream Chat SDK into the flutter app and then with Stipop stickers for a smooth chat experience 🤞 Exciting right !!
Prerequisites
- Flutter with Android Studio
- Android SDK (API 16 or higher)
- Xcode and iOS(10.0 or higher)
- Stream Flutter SDK
- Stipop Flutter SDK
- Java 8
- AndroidX
- Gradle 3.5.4 or higher
So, let’s get started
Get Stream API Key & Secret
We need a Stream API key to enable the Stream SDK for our Android project. Login to Stream Dashboard and create a free account. You will be able to see the API Key on the Dashboard and keep it handy during the production release.
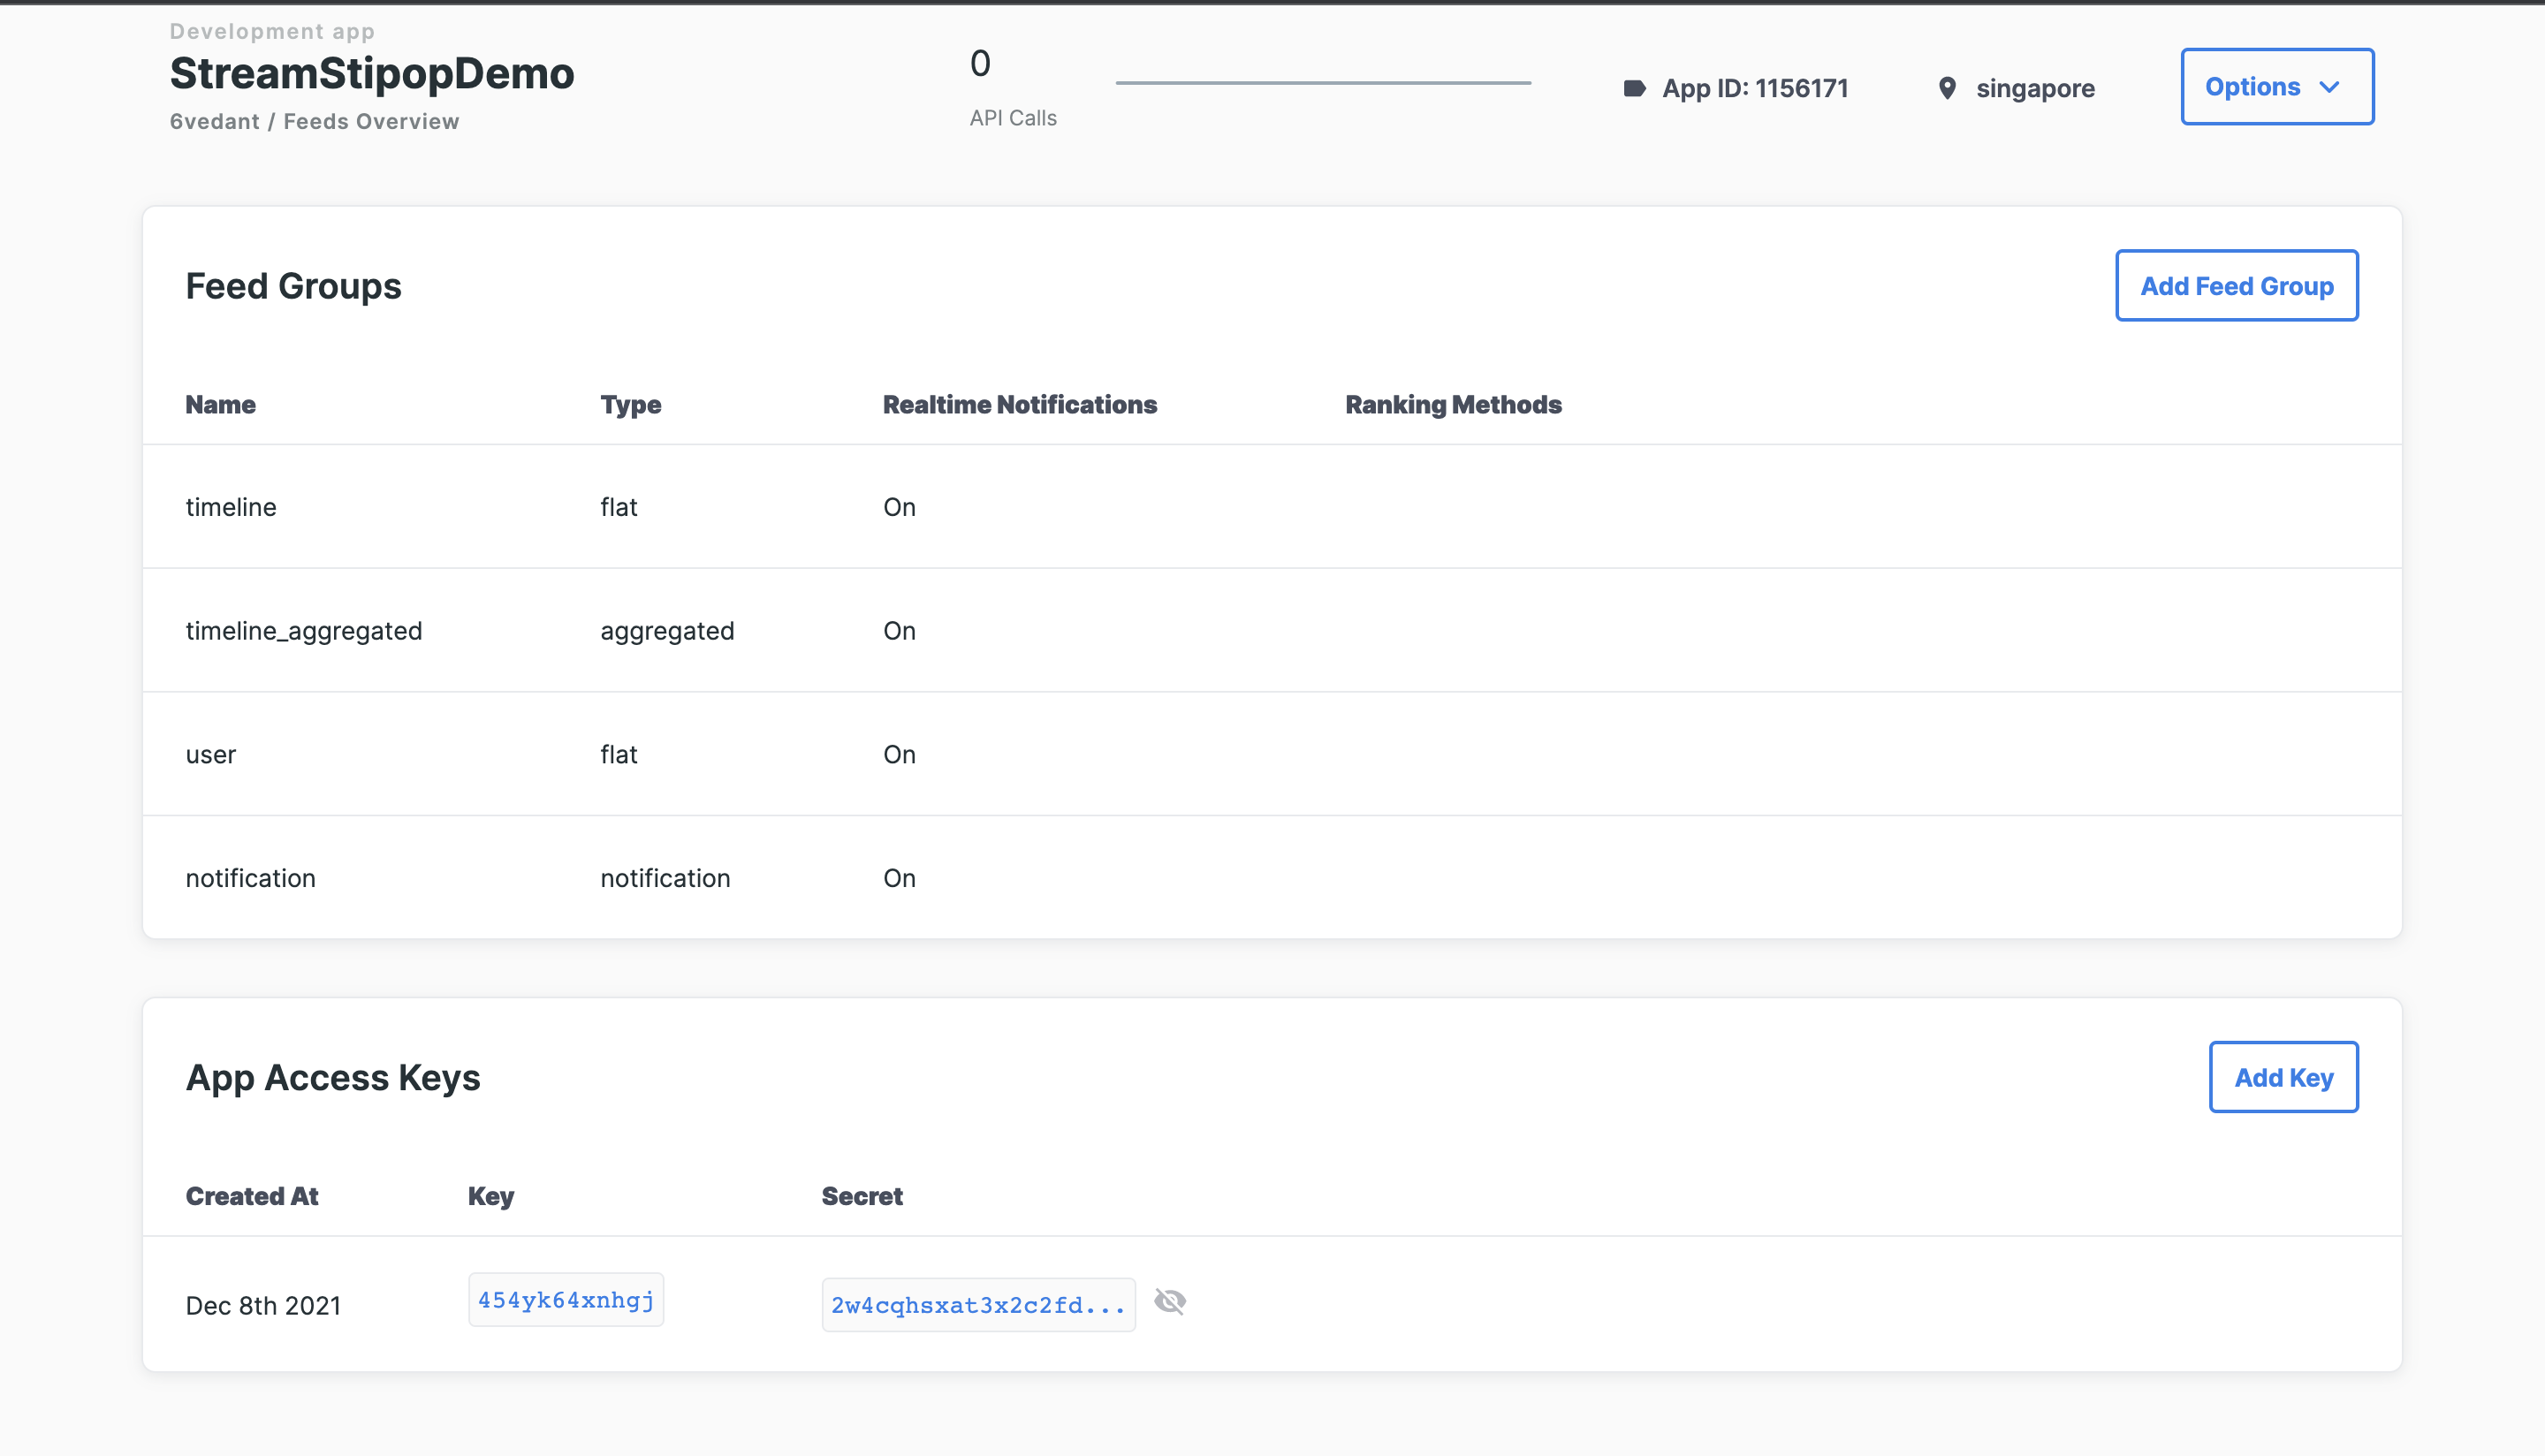
Now click on Create app and fill the form as per your choice of Stream SDK configuration that satisfies your app requirements.
After this, you will be able to see the API Key and the API Secret on the Stream Dashboard .Please keep them handy for the next steps.
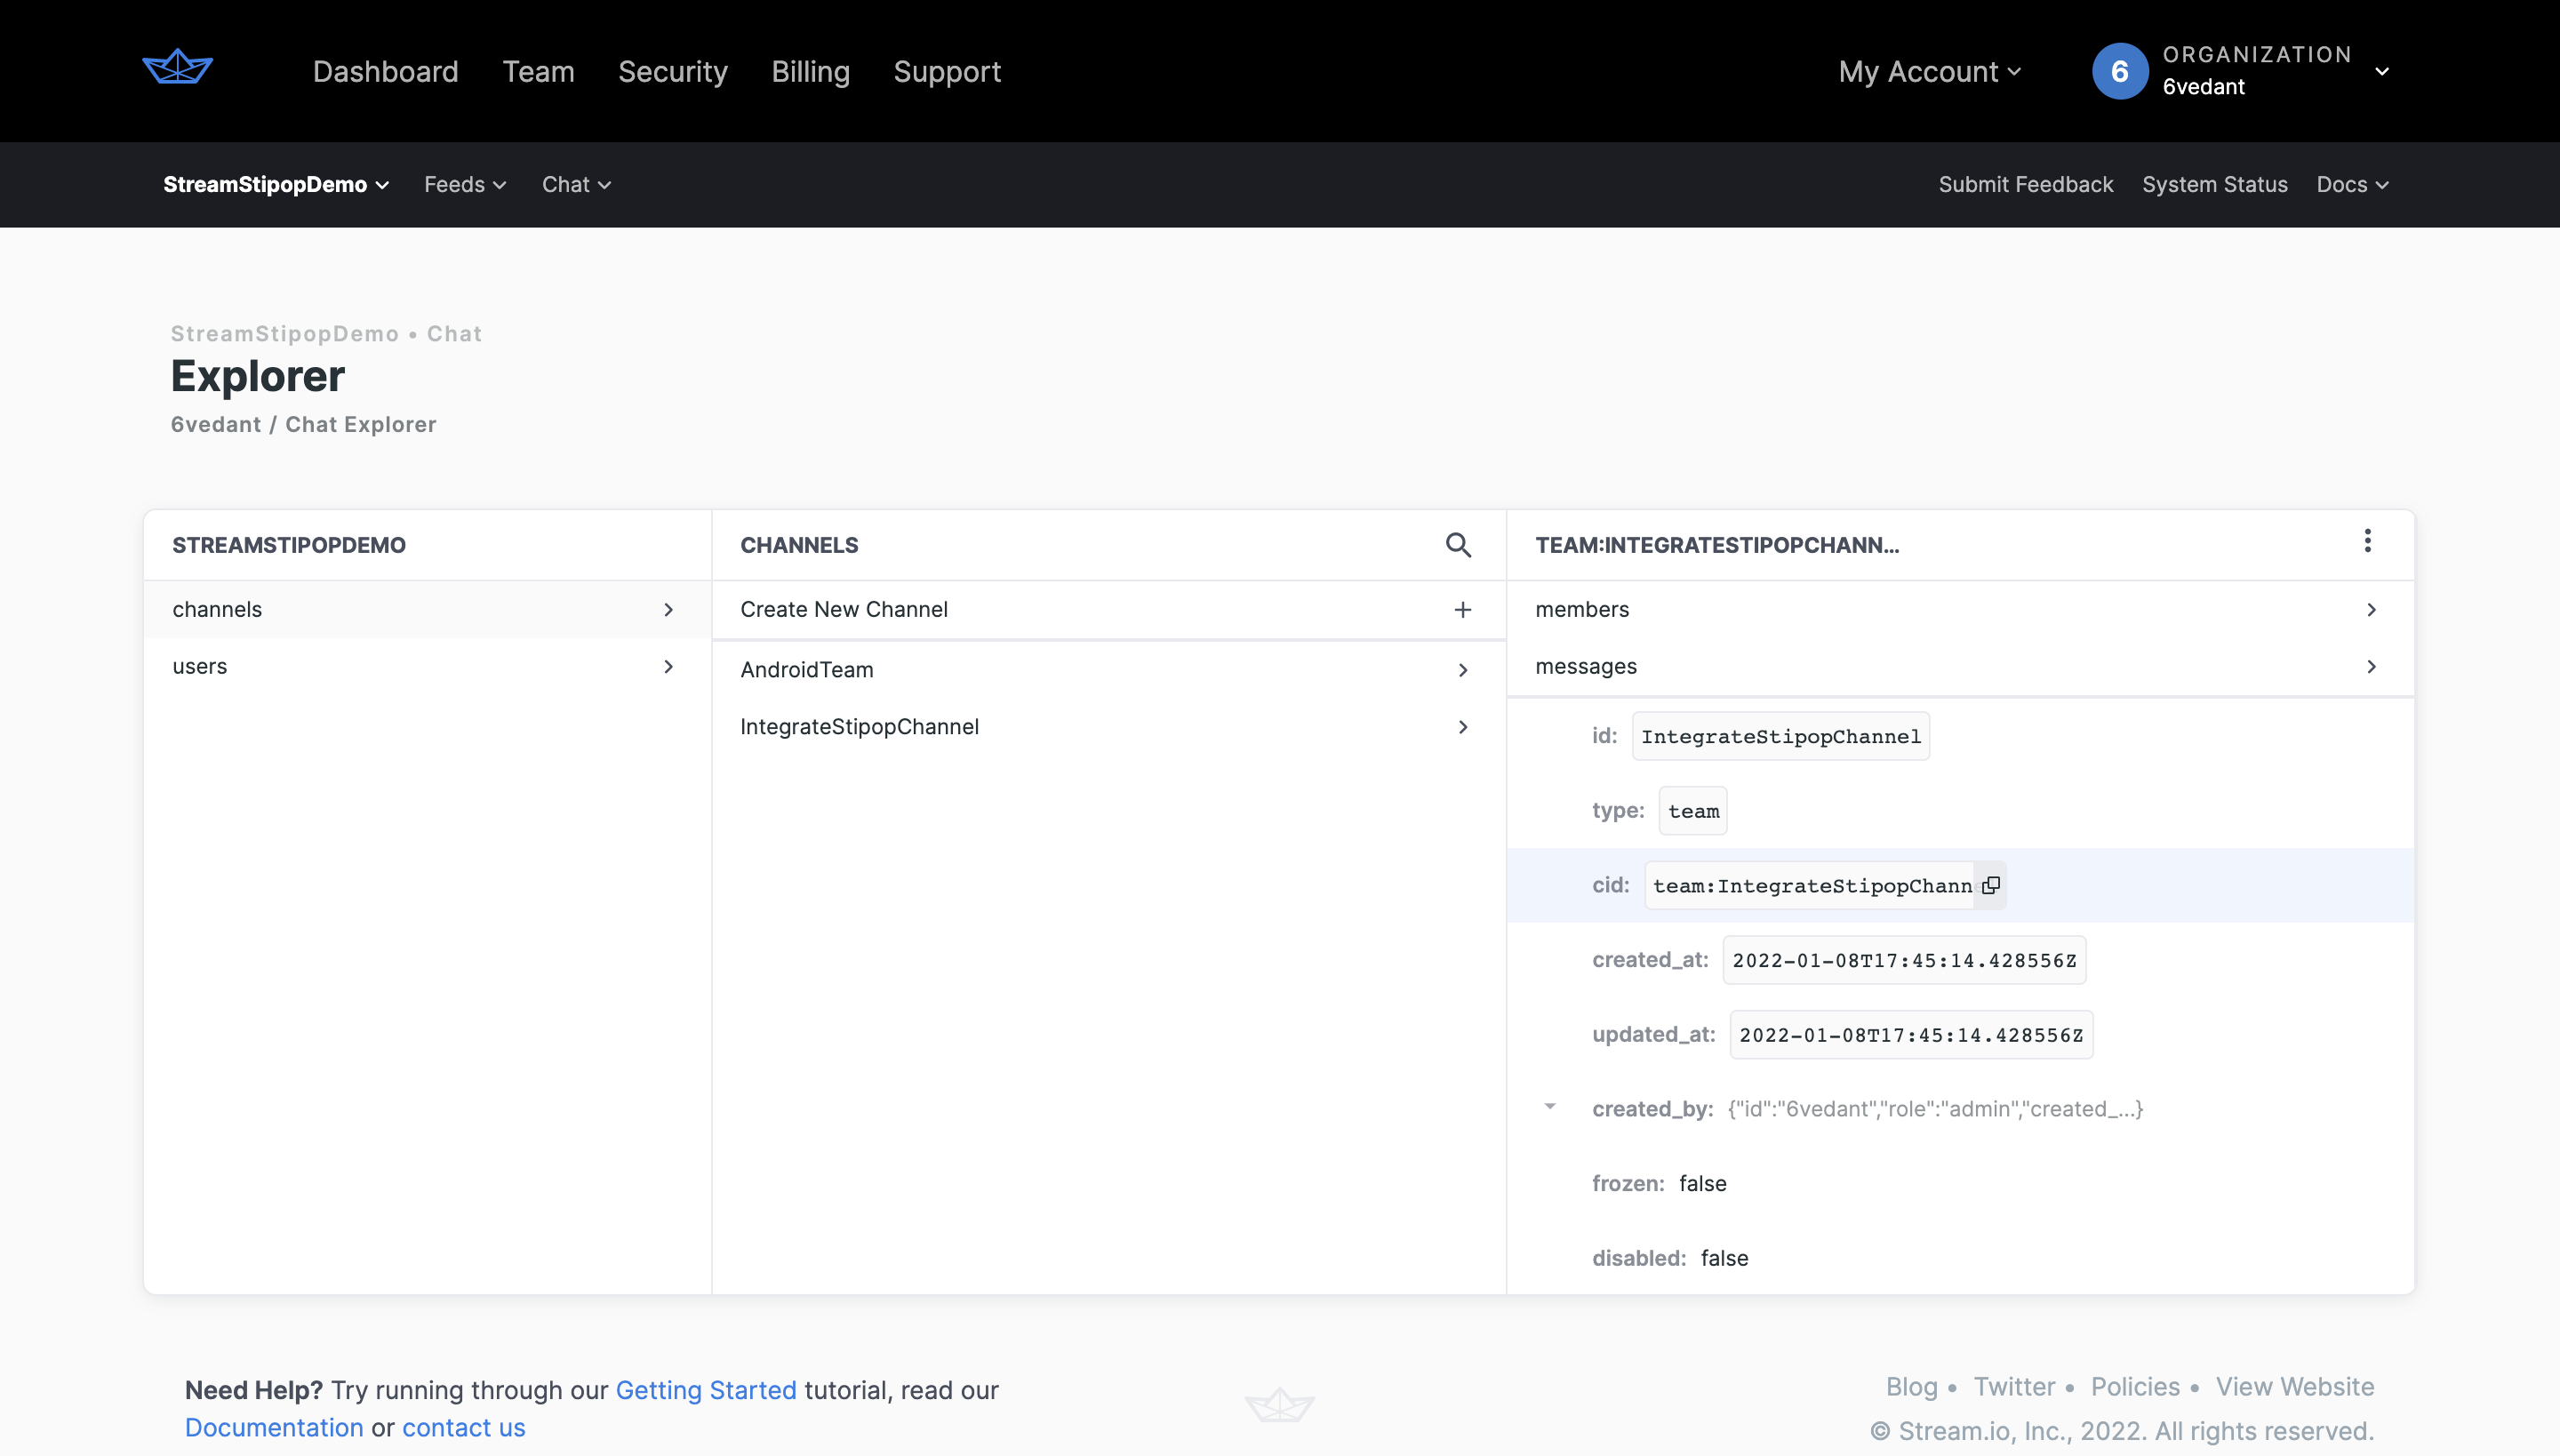
Create Channels and Users
To test the chat feature, we need a few user/channel accounts. We can create Users on the Stream Dashboard under the Chat/ Explorer/ option present in the Toolbar. Under the Users option, click on the Create New User and pass the Identity, User ID, and choose an appropriate role.
Once done we will now create a Channel and add the member bypassing the user id so that this particular user can send/receive messages.
Bingo... so without any wait, lets get down to business -
Integrate Stream Flutter SDK
As we have to integrate both Stream and Stipop flutter SDKs, we will start this by cloning the Stipop Flutter GIT repository Why? so that a basic Flutter container with inbuilt Stipop SDK will be ready for the integration.
git clone
https://github.com/stipop-development/stipop-flutter-sdk.git
Assuming - Flutter with Android Studio is already installed.
Now open the stipop-flutter-sdk in Android Studio. It will fetch the dependencies and sync the project automatically. Navigate to the example/ pubspec.yaml file and add the Stream flutter dependency.
dependencies:
 flutter:
   sdk: flutter
 stream_chat_flutter: ^3.1.1
stipop_sdk:
   path: ../
Run the flutter pub get command so that it will fetch the Stream library and sync the project. Now we are ready to use the Stream classes and build the chat application.
It’s exciting right now Let’s Build the Chat App 🤟✨
👊 Step 1: Get JWT auth token from https://jwt.io/ by using the API secret and user id as input parameters

👊 Step 2: Setup the Stream Chat client for API calls and use the API key and JWT auth token from step 1.
import 'package:flutter/material.dart';
import 'package:stream_chat_flutter/stream_chat_flutter.dart';
final client = StreamChatClient(
 'YOUR_API_KEY',
 logLevel: Level.INFO,
);

await client.connectUser(
 User(id: 'user01'),
 'JWT_AUTH_TOKEN',
);
👊Step 3: Modify the MyApp component to use the default StreamChat container and pass the client object and ChannelListPage as the home-screen parameter.
class MyApp extends StatelessWidget {
 const MyApp({
   Key? key,
   required this.client,
 }) : super(key: key);

 final StreamChatClient client;

 @override
 Widget build(BuildContext context) {
   return MaterialApp(
     builder: (context, child) => StreamChat(
       client: client,
       child: child,
     ),
     home: const ChannelListPage(),
   );
 }
}
👊Step 4: we will use ChannelBloc as the body, and ChannelListView to display the list of channels. Also, on tap of the channel, it will open the StreamChannel screen for the particular channel.
class ChannelListPage extends StatelessWidget {
const ChannelListPage({
   Key? key,
 }) : super(key: key);
 @override
 Widget build(BuildContext context) {
   return Scaffold(
     body: ChannelsBloc(
       child: ChannelListView(
         filter: Filter.in_(
           'members',
           [StreamChat.of(context).currentUser!.id],
         ),
         sort: const [SortOption('last_message_at')],
         limit: 20,
         channelWidget: ChannelPage(),
         onChannelTap: (channel, widget) {
           Navigator.push(
             context,
             MaterialPageRoute(
               builder: (context) => StreamChannel(
                 channel: channel,
                 child: widget!,
               ),
             ),
           );
         },
       ),
     ),
   );
 }
}
👊Step 5: Let’s build the layout for the ChannelPage which has the inbuilt Stream components:
ChannelHeaderas theappBar.MessageListViewto display the list of messages exchanged in the channel.MessageInputlayout to type a message and include the buttons for attachments, Stipop button, Emojis, etc.
class ChannelPage extends StatefulWidget {
 @override
 _ChannelPageState createState() => _ChannelPageState();
}

class _ChannelPageState extends State<ChannelPage> {
 Message? quotedMessage;

@override
Widget build(BuildContext context) {
 return Scaffold(
   appBar: const ChannelHeader(),
   body: Column(
     children: <Widget>[
       Expanded(
         child: MessageListView(
           // ...
           messageBuilder: _messageBuilder,
           onMessageSwiped: (message) {
             setState(() {
               quotedMessage = message;
             });
           },
         ),
       ),
       MessageInput(
         actions: [
           InkWell(
             child: Icon(
               Icons.emoji_emotions,
               size: 20.0,
               color: StreamChatTheme.of(context).colorTheme.accentPrimary,
             ),
             onTap: () {
               // integrate the stipop keyboard here
             },
           ),
         ],
         quotedMessage: quotedMessage,
disableAttachments: true,
         onQuotedMessageCleared: () {
           setState(() => quotedMessage = null);
         },
       ),
     ],
   ),
 );
}
Run the app on iOS/Android
For iOS- We have to set up the pod file and install the components. Also, start the iOS simulator and keep it running for future deployments.
pod install
open -a Simulator
Testing time BRAVO 😎!!
Set the target as an iOS simulator and hit the run button (cmd + R) in Android studio.
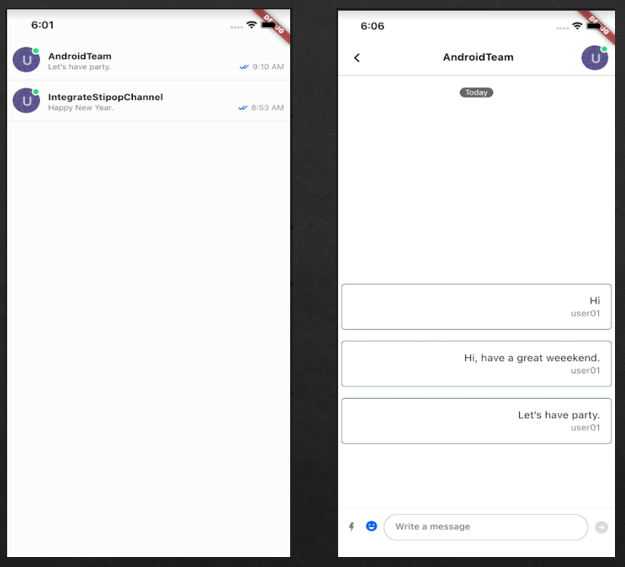
Fantastic ✌ We are able to successfully run the Stream Flutter chat app. We can send a few messages which use Stream APIs internally to save the messages. Now we will continue with the Stipop Flutter SDK integration to our Stream Chat app.
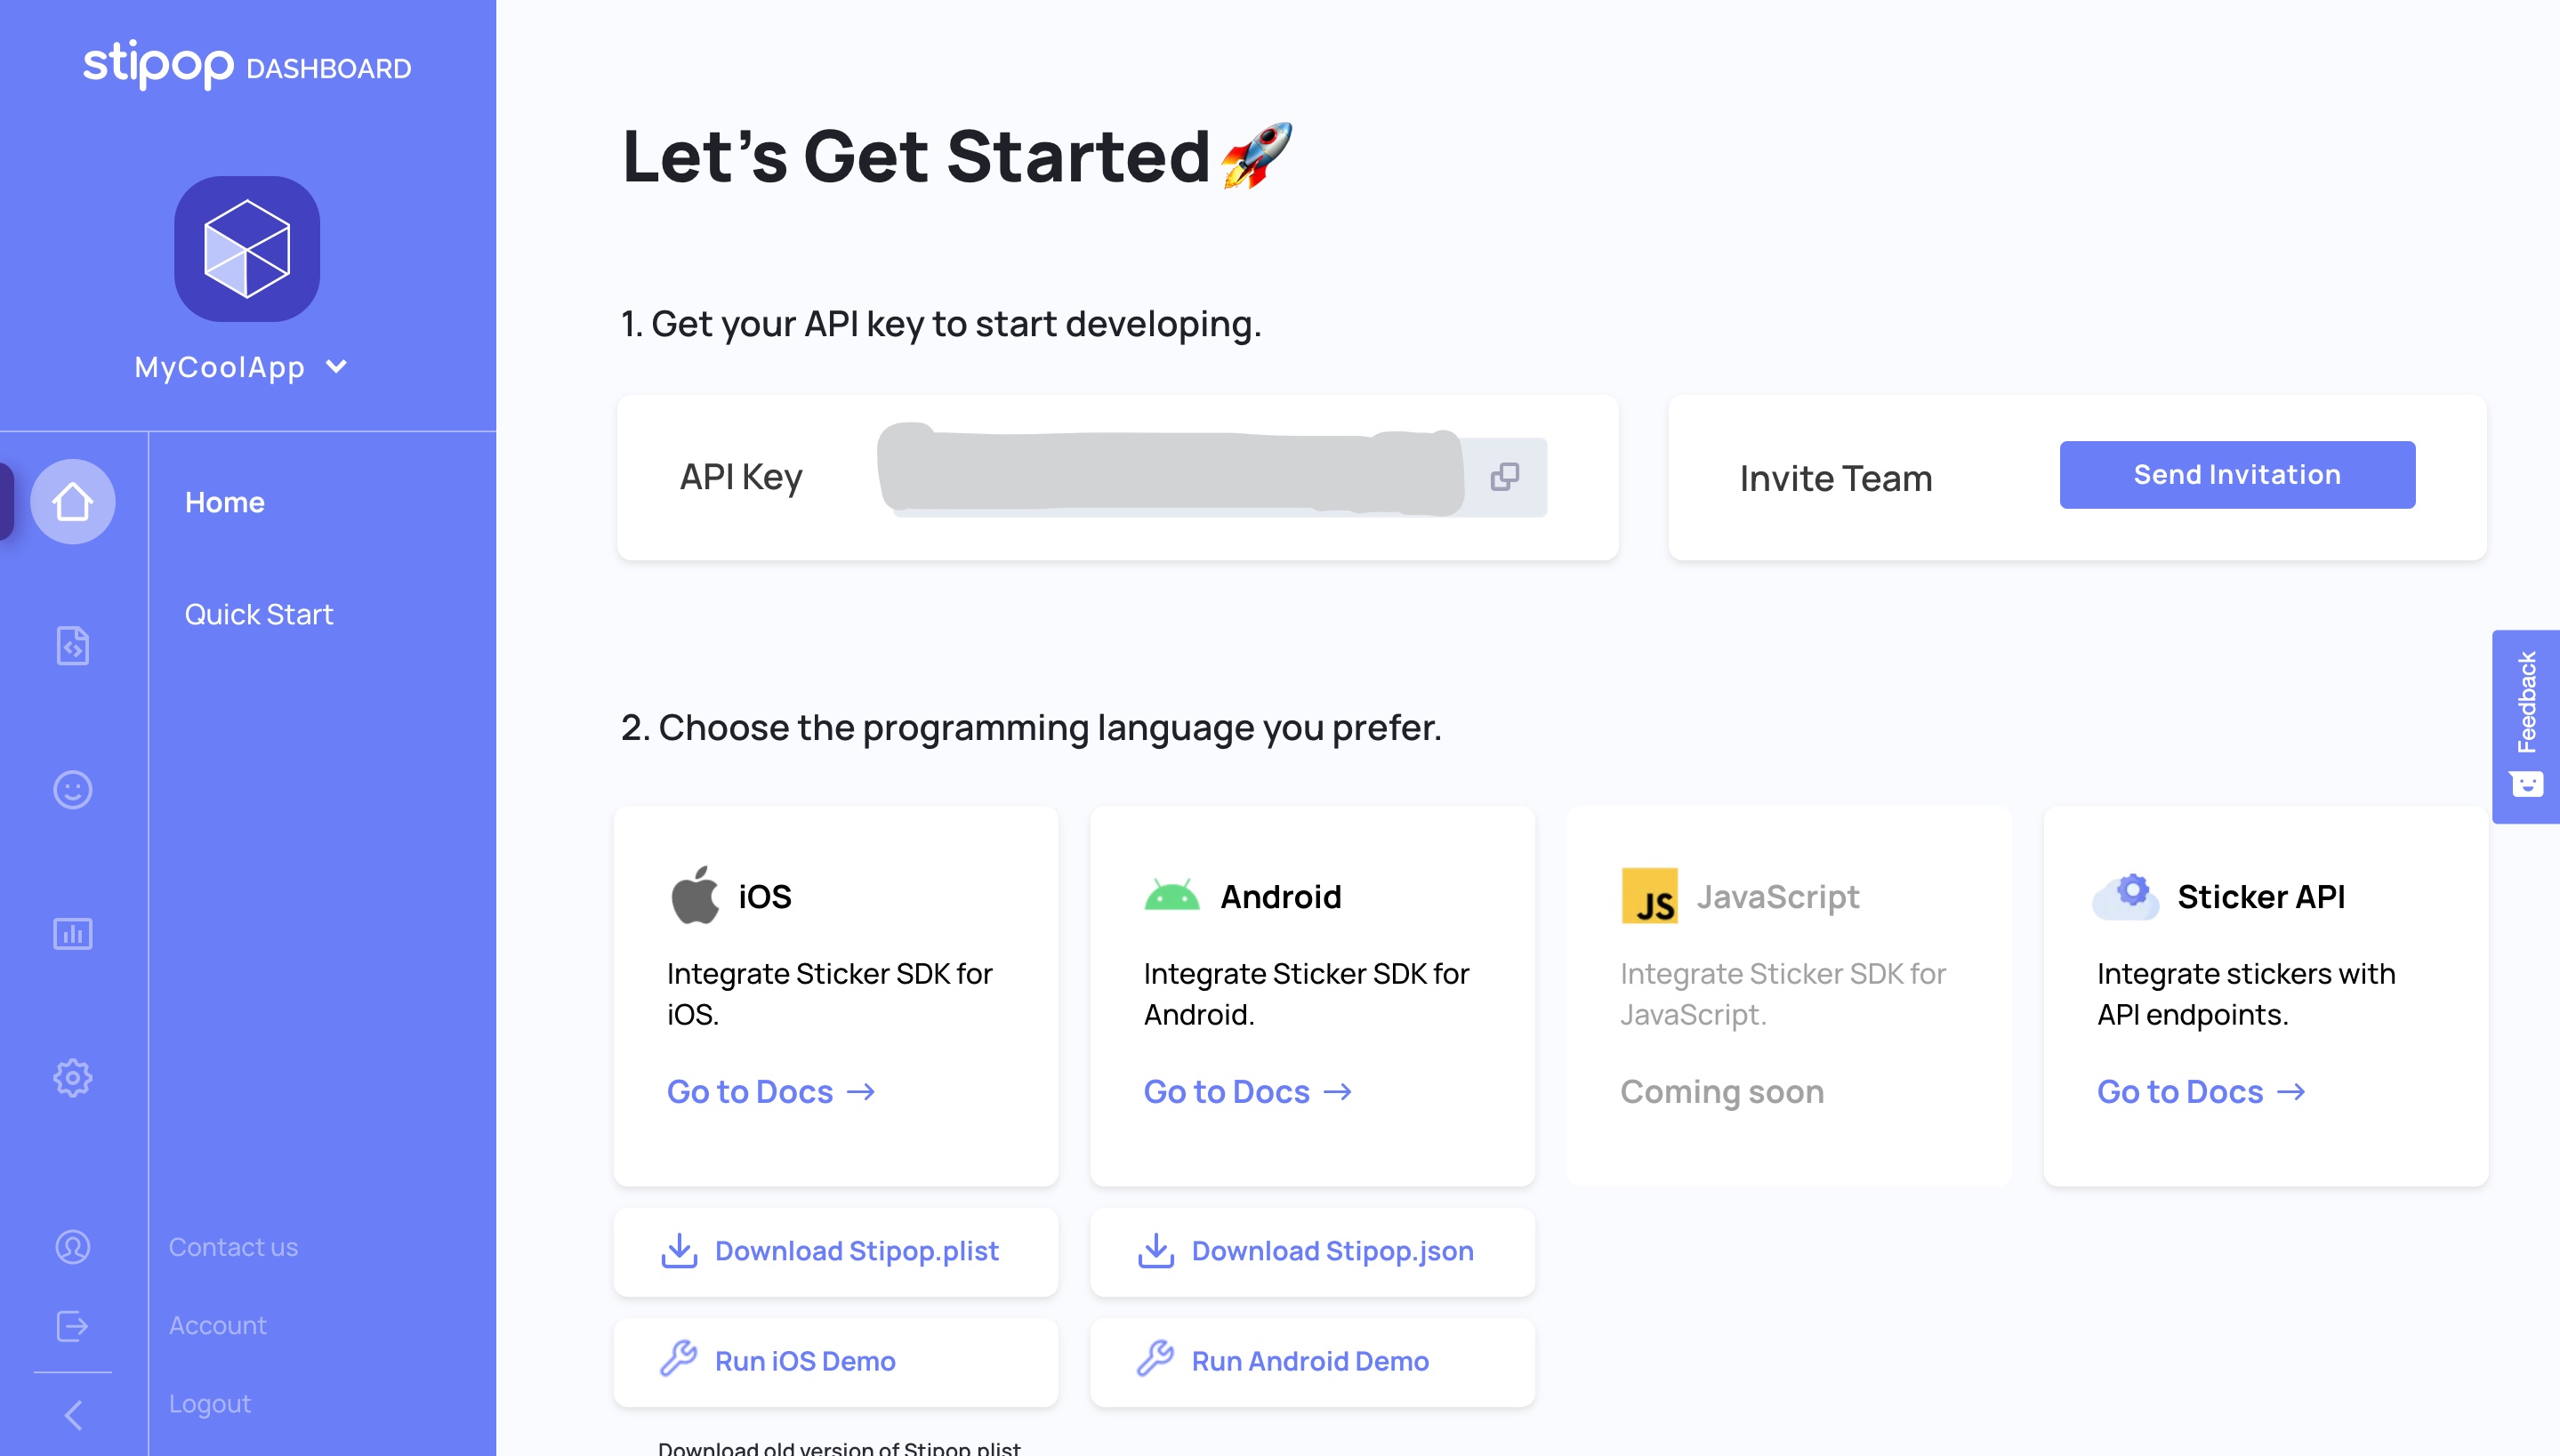
Get Stipop SDK Config
We will need the API Key for Stipop SDK integration to our existing Stream Flutter app. Login to Stipop Dashboard , and create a free account. After successful sign-in, Create an application with App Name, Region, etc
You will be now able to see the API Key and download the Stipop.json file under android settings and Stipop.plist under iOS settings, as shown below.
You need to place the Stipop.json file under example/android/app/ src/ main/ assets/ Stipop.json to target the Android devices. Similarly, to target iOS devices, place the Stipop.plist file under example/ios/Runner/Stipop.plist directory.
And Finally what you all have been waiting for 🤩…
Integrate Stipop Flutter SDK
As we have already cloned the Stipop Github repo, so Stipop classes are already available to use now. We will proceed with the integration of Stipop in the Stream Chat layout.
Let’s import the stipop_plugin class, declare a Stipop instance, and stickerImg to contain the URL of the selected sticker.
import 'package:stipop_sdk/stipop_plugin.dart';
class _ChannelPageState extends State<ChannelPage> {
late Stipop stipop;
String callbackMsg = '';
String? stickerImg = null;

@override
void initState() {
 super.initState();
 stipop = Stipop(
   'a01',
   languageCode: 'en',
   countryCode: 'US',
   onStickerPackSelected: (spPackage) {
     setState(() {
       callbackMsg = 'onStickerPackSelected\n${spPackage.toJson()}';
       stickerImg = null;
     });
   },
   onStickerSelected: (sticker) {
     setState(() {
       callbackMsg = 'onStickerSelected\n${sticker.toJson()}';
       stickerImg = sticker.stickerImg;
     });
   },
 );
}
Then initialize the stipop instance and override the onStickerSelected() and onStickerPackSelected() methods. We will use setState() to save the current selected sticker gif url to stickerImg.
Now we will add the Stipop button(smiley 😊) that will open the Stipop sticker keyboard to select a sticker. Place the button as an Icon inside the Messageinput.actions block.
@override
Widget build(BuildContext context) {
 return Scaffold(
   appBar: const ChannelHeader(),
   body: Column(
     children: <Widget>[
       Expanded(
child: MessageListView(
           // ...
           messageBuilder: _messageBuilder,
           onMessageSwiped: (message) {
             setState(() {
               quotedMessage = message;
             });
           },
         ),
       ),
       MessageInput(
         actions: [
           InkWell(
             child: Icon(
               Icons.emoji_emotions,
               size: 20.0,
               color: StreamChatTheme.of(context).colorTheme.accentPrimary,
             ),
             onTap: () {
               print("showing stipop keyboard");
               stipop.showKeyboard();

              // stipop.showSearch();
             },
           ),
         ],
quotedMessage: quotedMessage,
         disableAttachments: true,
         onQuotedMessageCleared: () {
           setState(() => quotedMessage = null);
         },
       ),
     ],
   ),
 );
}
So on the tap action of the Stipop button, we can either open the sticker keyboard or the sticker search layout by calling showKeyboard() or showSearch() methods respectively.
👉Please note that we are using state management to update the current sticker URL when a sticker is selected.
_messageBuilder widget component will create the layout for each message item. In this method, we get the message instance for which each text message will be getting rendered one by one. It will return the _messageContainer() method to render the message item layout.
Widget _messageBuilder(
 BuildContext context,
 MessageDetails details,
 List<Message> messages,
 MessageWidget defaultMessageWidget,
) {
 final message = details.message;

 Message current_message = messages.first;

 if (message.text!.isNotEmpty) {
   return Padding(
     padding: const EdgeInsets.all(5),
     child: _messageContainer(message, current_message),
   );
 } else {
   return Container();
 }
}
In the _messageContainer, we display the messageText, authorNameText, and include the *_stickerImage* layout to render the Stipop gif when the user selects any gif from the sticker keyboard.
Widget _messageContainer(message, current_message) {
 final isCurrentUser =
     StreamChat.of(context).currentUser!.id == message.user!.id;

 final textAlign = isCurrentUser ? TextAlign.right : TextAlign.left;
final color = isCurrentUser ? Colors.blueGrey : Colors.blue;

 return Container(
     decoration: BoxDecoration(
       border: Border.all(
         color: color,
       ),
       borderRadius: const BorderRadius.all(
         Radius.circular(5),
       ),
     ),
     child: Column(
       children: <Widget>[
         ListTile(
           title: Text(
             message.text!,
             textAlign: textAlign,
           ),
           subtitle: Text(
             message.user!.name,
             textAlign: textAlign,
           ),
         ),
         _stickerImage(message, current_message),
       ],
     ));
}
As we can see from the _stickerImage, we check if the stickerImg has some value or not and load the image Url in the _messageContainer.
Widget _stickerImage(message, last_message) {
 if (stickerImg != null && message == last_message) {
   return Image.network(
     stickerImg!,
     width: 100,
     height: 100,
   );
 } else {
   return Container();
 }
}
So that’s all coding we have to do. You just a need a cup of coffee or tea and some coding time and that will do the magic for you.
You can run the app to test now. You can see the Stipop button(smiley 😊) at the left corner of the Inputbox layout. Upon clicking it opens up the Stipop sticker keyboard to select the stickers.
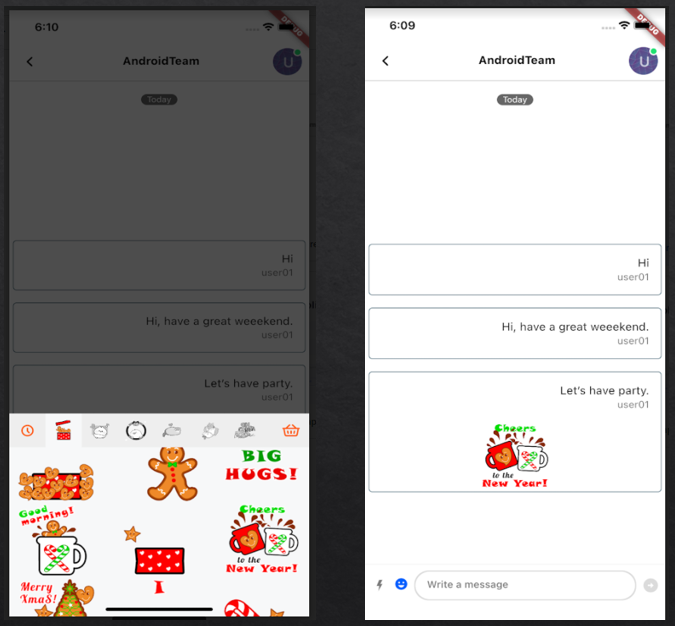
Voila! 👏🏻👏🏻 As always Integrating Stipop SDK is always easy as it has an inbuilt Sticker Keyboard and Sticker search option which make it a great addition to any chat application. We recommend you definitely try the Stipop Flutter SDK for your next Flutter application.
A very happy new year again and as great Jedi Master Obi-wan always said May the force be with you !!
Happy Coding guys😉
🎅🏼 About Vedant
Vedant Jha is a full-stack developer and a technical writer at Stipop. Have a question about this article? Contact Vedant here.


